A user saving incorrect data over an Excel file in a shared folder, deleting a folder by mistake, or asking for the version of a file from that morning is part of the weekly routine of everyone who manages a file server. Opening the backup software for each of these requests, finding the relevant job, selecting the correct date and running a restore takes time and turns a simple file request into an administrator task. Shadow Copies of Shared Folders is a built-in Windows Server feature that fills exactly this gap.
In the background, the feature uses the Volume Shadow Copy Service (VSS) infrastructure. At the scheduled times, the current state of the volume is saved as a shadow copy, and these shadow copies are presented through the Previous Versions tab to users who access the shared folder over the network. This way, users can themselves open the previous version of a file or folder they have permission to access, restore it to another location, or write it back over the current content.
The right expectation needs to be set from the start. A shadow copy does not replace a backup solution. Shadow copies are kept in a storage area called the diff area, and in the scenario in this article the diff area is on the D:\ volume itself, where the data is located. If the disk fails, the volume becomes corrupted or the server is lost, the shadow copy history is lost as well. The real value of the feature is that it handles short-term, user-caused recovery requests quickly and on a self-service basis.
Throughout the article, we will first look at how the copy-on-write mechanism works, then enable the feature on D:\ and configure the storage area and the schedule. After that, we will cover reverting to a previous version on the client side, diff area sizing, management with vssadmin, and how to report which files changed between 2 shadow copies with PowerShell.
The server-side shadow copy configuration, the vssadmin commands and the PowerShell scripts apply to Windows Server 2012 and all later versions. Previous Versions access on the user side works in the same way on Windows 8 and later Windows client versions. The interface screens may show minor differences depending on the version.
We need to start with the mechanism, because almost all wrong decisions about storage planning come from misunderstanding this point. The default VSS system provider in Windows works with the copy-on-write method, and a full copy of the volume is not created at the moment a shadow copy is taken.
When a block on D:\ is about to be changed after a shadow copy has been taken, VSS first copies the old content of that block to the diff area, and the new data is written only after that. When the diff area is kept on the same volume, this data is stored in the System Volume Information folder under D:\. When the shadow copy is accessed, unchanged blocks are read directly from the current state of the volume, and the old state of changed blocks is read from the diff area.
Shadow copy time (T0)
        |
        v
D:\ Volume
+------------------------------------------------+
| Production data                                |
|   Block A  (T0 state)                          |
|   Block B  (T0 state)                          |
|                                                |
| Diff area (System Volume Information)          |
|   (empty)                                      |
+------------------------------------------------+

After T0, a change to Block B is requested
        |
        v
1. The T0 state of Block B is copied to the diff area on D:\
2. The new data is written to Block B

When the shadow copy is read:
Block A  -> From production data (unchanged)
Block B  -> From the diff area (T0 state)
The practical result of this behaviour is that the diff area grows according to the number of blocks that change after the shadow copy, not according to the size of the D:\ volume. For this reason, the first shadow copy does not consume a fixed percentage of the volume size at the moment it is created. At creation time, only a small amount of space is used for VSS metadata and index information, and consumption increases as blocks change.
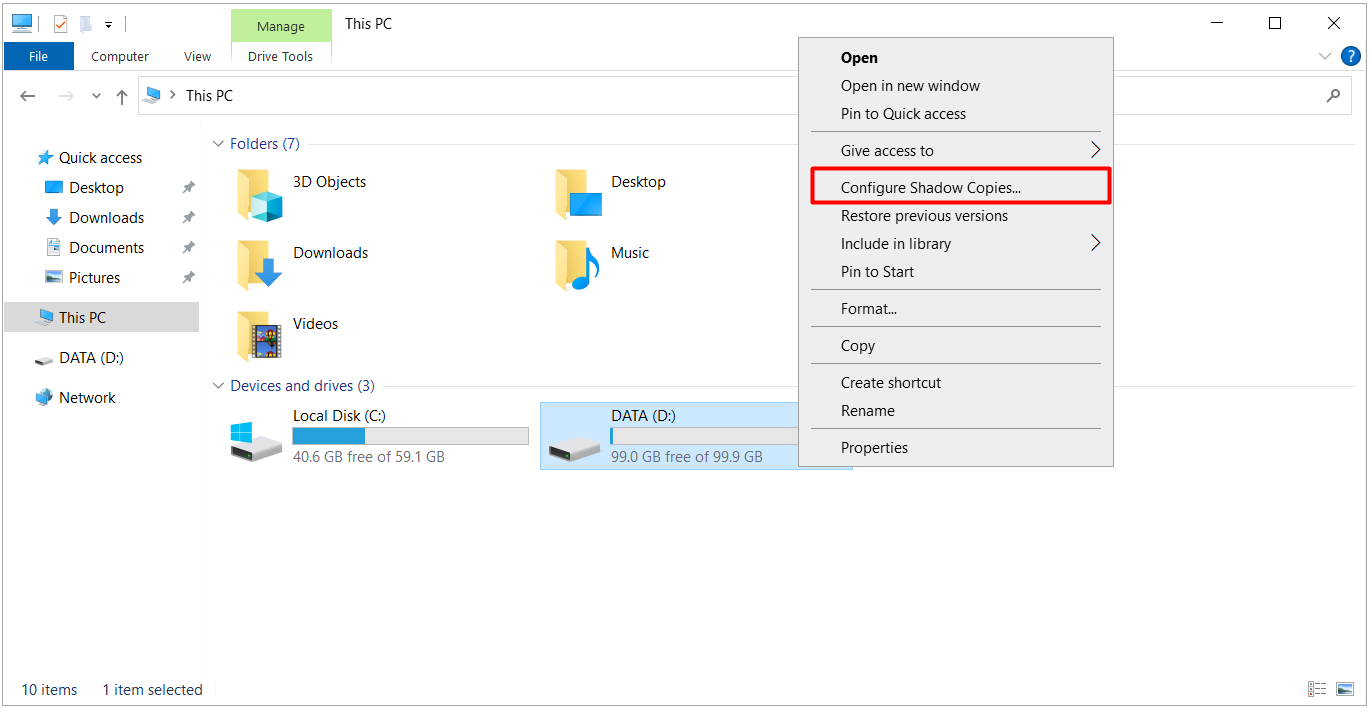
The configuration starts on the Shadow Copies tab in the Properties window of the D:\ volume. The shortest way to reach this tab is to right-click the drive in File Explorer and select Configure Shadow Copies. The window that opens lists the volumes on the server and the shadow copy status of each one.
Remember that the feature works per volume, not per share. Shadow copies enabled on D:\ apply to all shared folders on that volume.
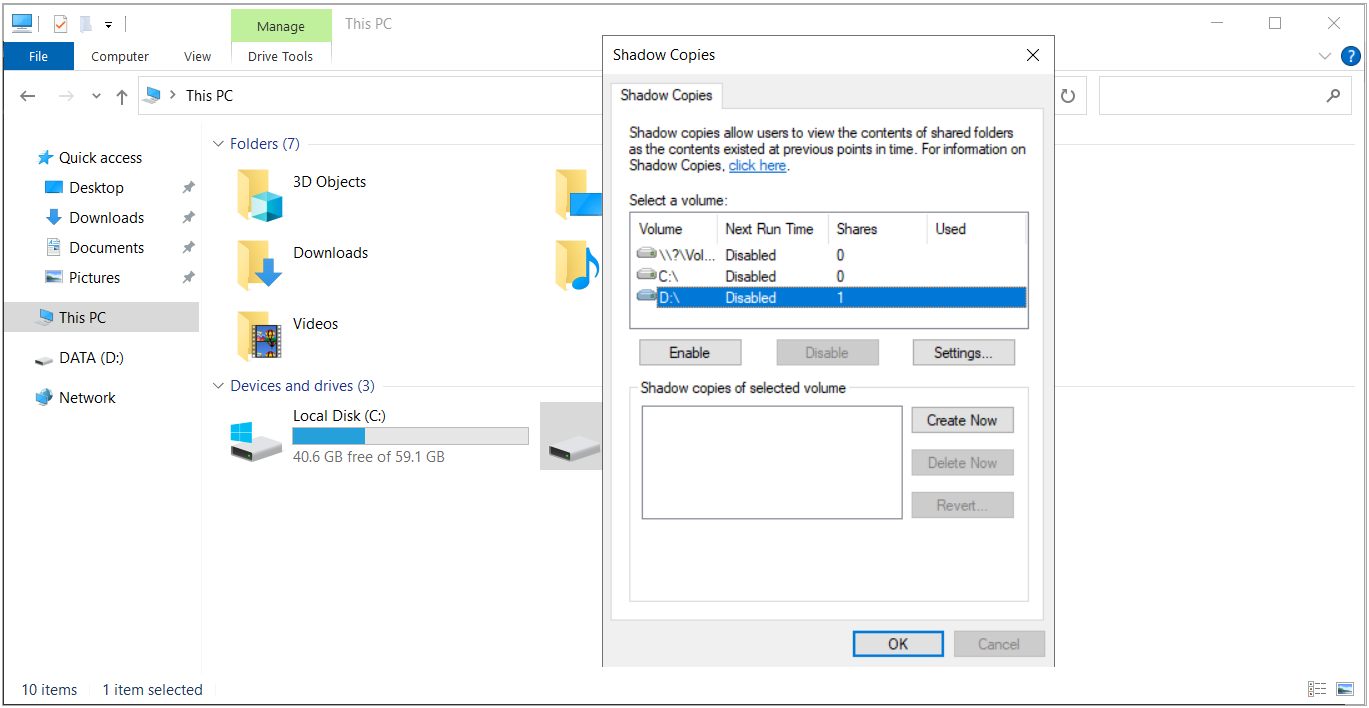
The correct order is to go to the Settings screen before clicking the Enable button. This screen defines which volume holds the diff area and what limit is set for this area. In this scenario, D:\ is left selected in the Located on this volume field, which means the shadow copies are kept on the volume where the data is located. This location must be decided before the first shadow copy is taken, because changing the location later does not preserve the existing shadow copy history.
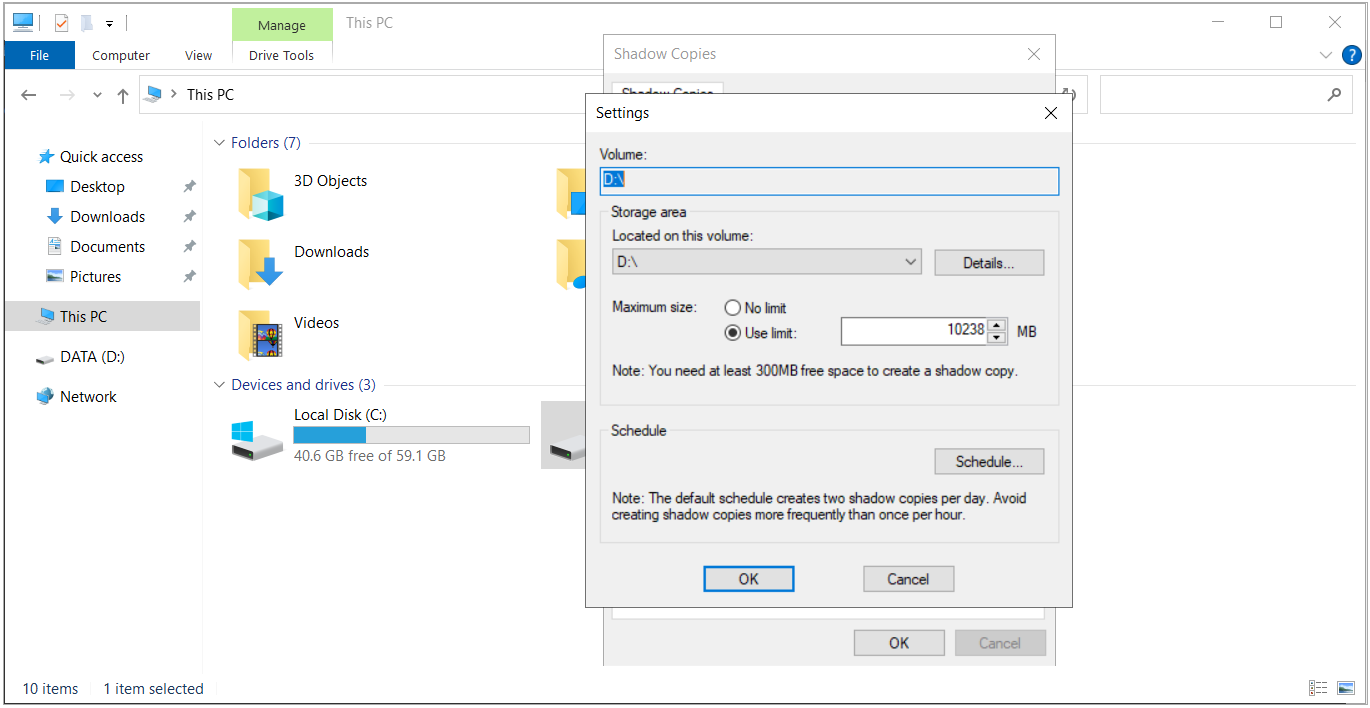
The Maximum size section on the same screen is the most decisive setting in this configuration. The Use limit option sets a fixed upper limit in MB for the diff area, and No limit leaves the area unlimited. This value directly determines how far back users can go on the Previous Versions tab. When the diff area reaches the limit, VSS deletes the oldest shadow copies to free space, so a low limit keeps the history short whatever the schedule is.
In this environment, the Use limit field shows 10238 MB. This is a starting value offered by the interface, and it does not take the data change rate of the environment into account. For this reason, it should not be left as it is. It should be set with the observation-based calculation described later in this article. The limit can be changed later on the same screen or with the vssadmin resize shadowstorage command. The note at the bottom of the screen is a reminder that at least 300 MB of free space is required on the volume for a shadow copy to be created.
Because the diff area is kept on D:\, the shadow copies and the production data share the same free space. The limit must be set so that enough free space remains for the data on D:\ to grow. Another result of using the same volume is that copy-on-write writes share the I/O capacity of the same disk as the production data. On a typical file server this load is usually not noticeable, but it is a point to keep in mind on volumes with heavy write activity.
The diff area location and limit must be planned before the first shadow copy is taken. Changing the location later means losing the existing shadow copy history for that volume.
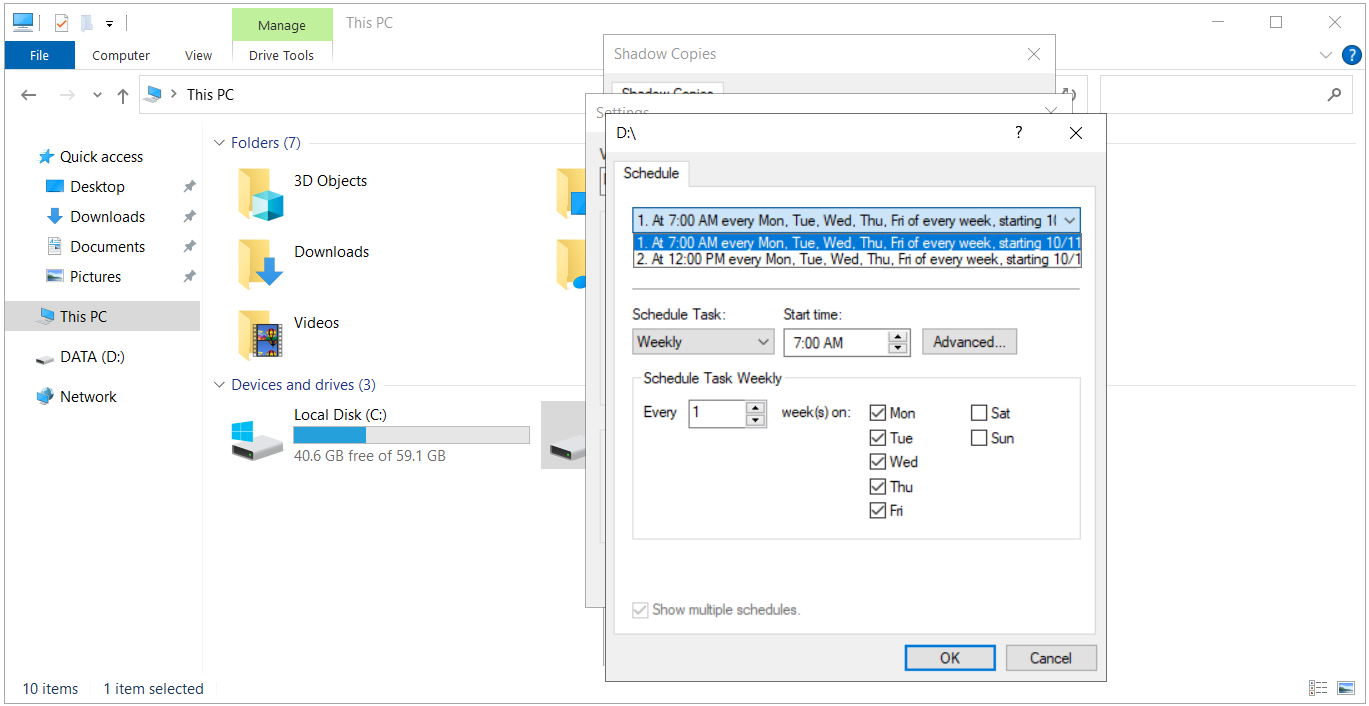
The Schedule button on the Settings screen defines when shadow copies are taken. The default schedule takes 2 shadow copies a day, at 07:00 and 12:00 on every weekday. This timing is a reasonable starting point for most file servers, but it should be adjusted according to the intervals at which users request recoveries during the day.
For example, adding 1 more shadow copy at the end of the working day keeps the changes made during the day recoverable until the next morning. Microsoft recommends that shadow copies are not taken more often than once an hour, and this warning also appears in the Schedule section of the Settings screen. More frequent shadow copies increase diff area consumption and cause the history to be used up faster.
Once the settings are complete, return to the Shadow Copies window and click the Enable button. Windows creates the first shadow copy immediately and registers the defined schedule as a task in Task Scheduler. In the D:\ row, the Next Run Time column shows the next scheduled run, the Shares column shows the number of shares on the volume, and the Used column shows the space used for the diff area.
In this environment, the value in the Used column was observed to be the same as the Allocated Shadow Copy Storage space value in the vssadmin output. The first shadow copy that was created is also listed with its date and time in the lower part of the window.
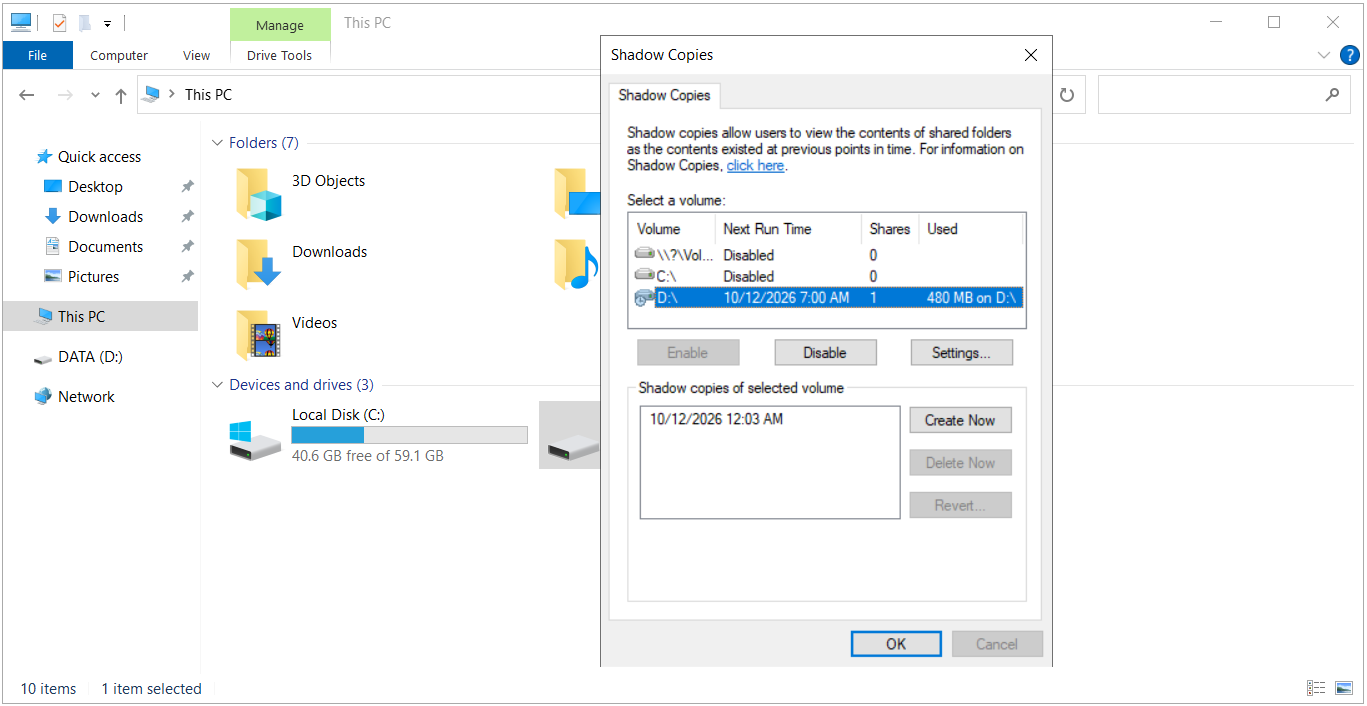
The Create Now button is used to take a manual shadow copy without waiting for the schedule. Taking a manual shadow copy before a large file move or a bulk change leaves a clear point to return to if an error occurs. In the screen below, after the first shadow copy, 8 files were deleted, 12 files were modified, 6 files were renamed and 6 new files were created in the shared data, and then a second shadow copy was taken with Create Now.
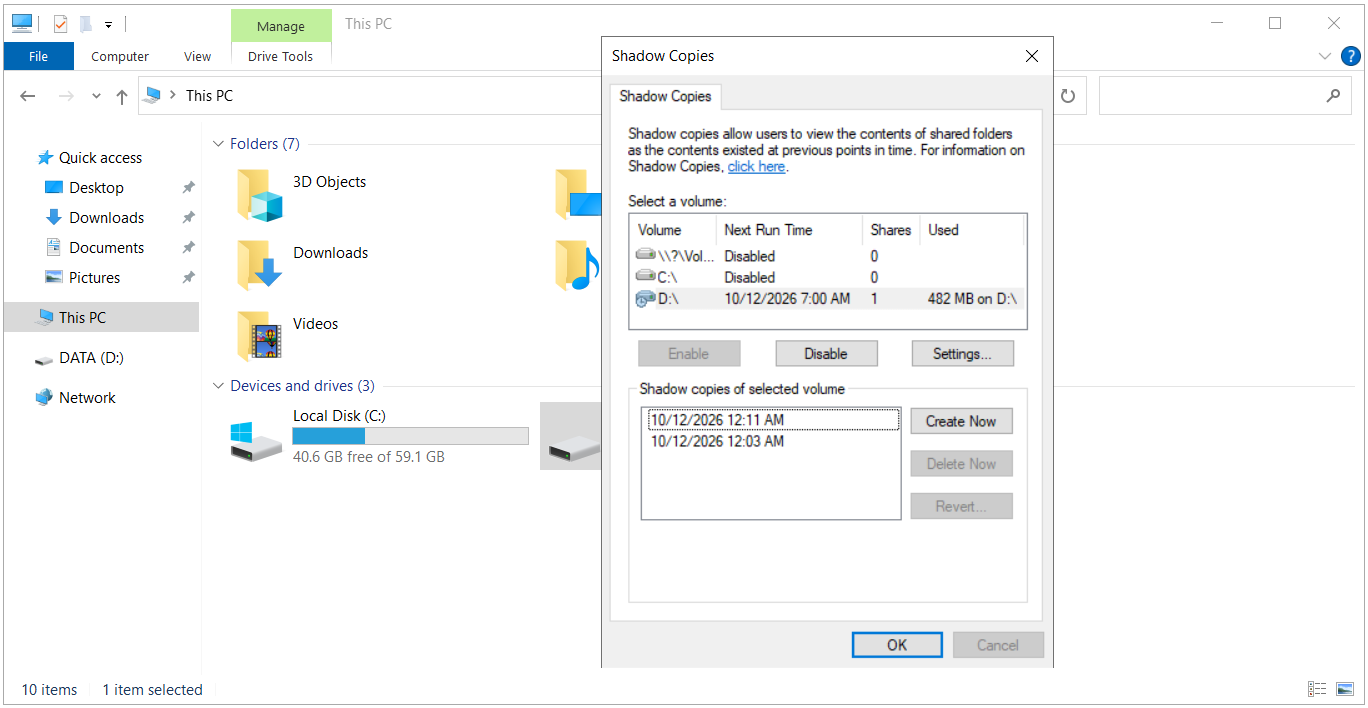
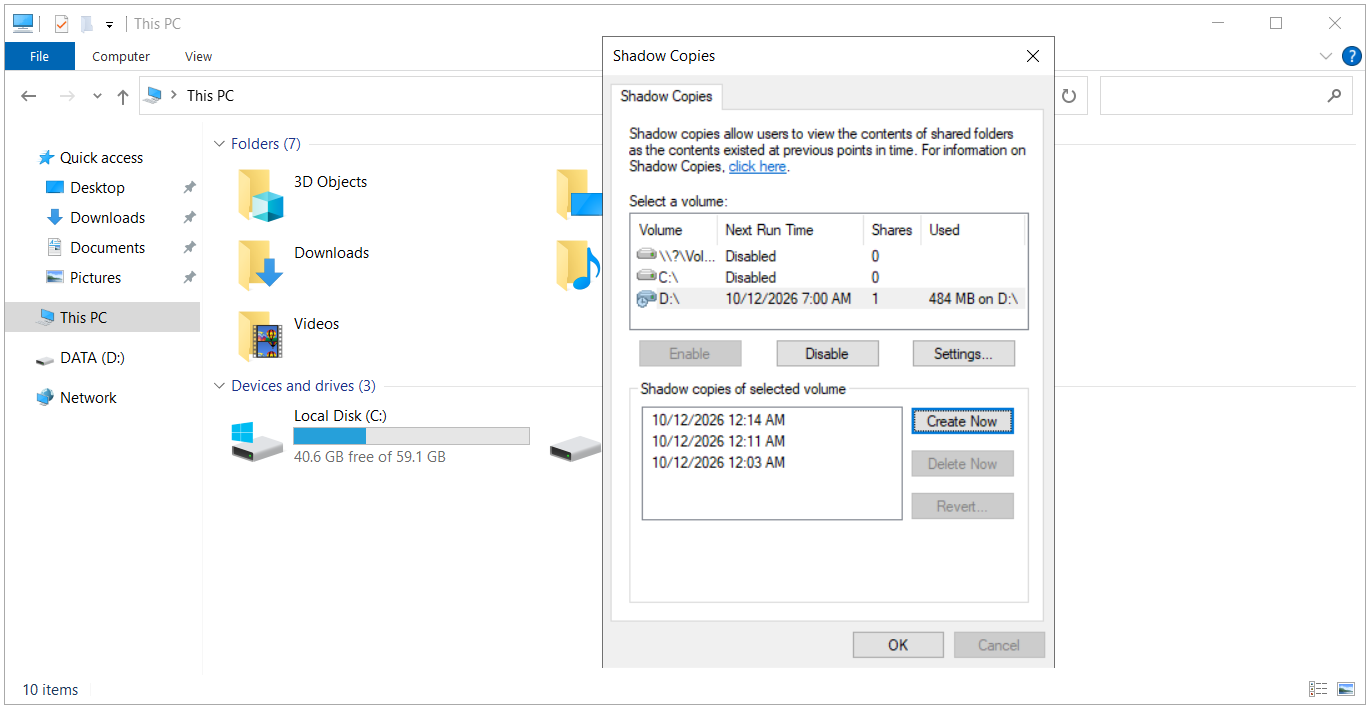
When the same types of changes are made once more and a third shadow copy is taken with Create Now, the list grows to 3 entries. Meanwhile, the value in the Used column increases by only a few MB. VSS allocates space for the diff area in advance and in chunks, so this value does not reflect the amount of changed data exactly, but it clearly shows that only the changes take up space, not the whole volume.
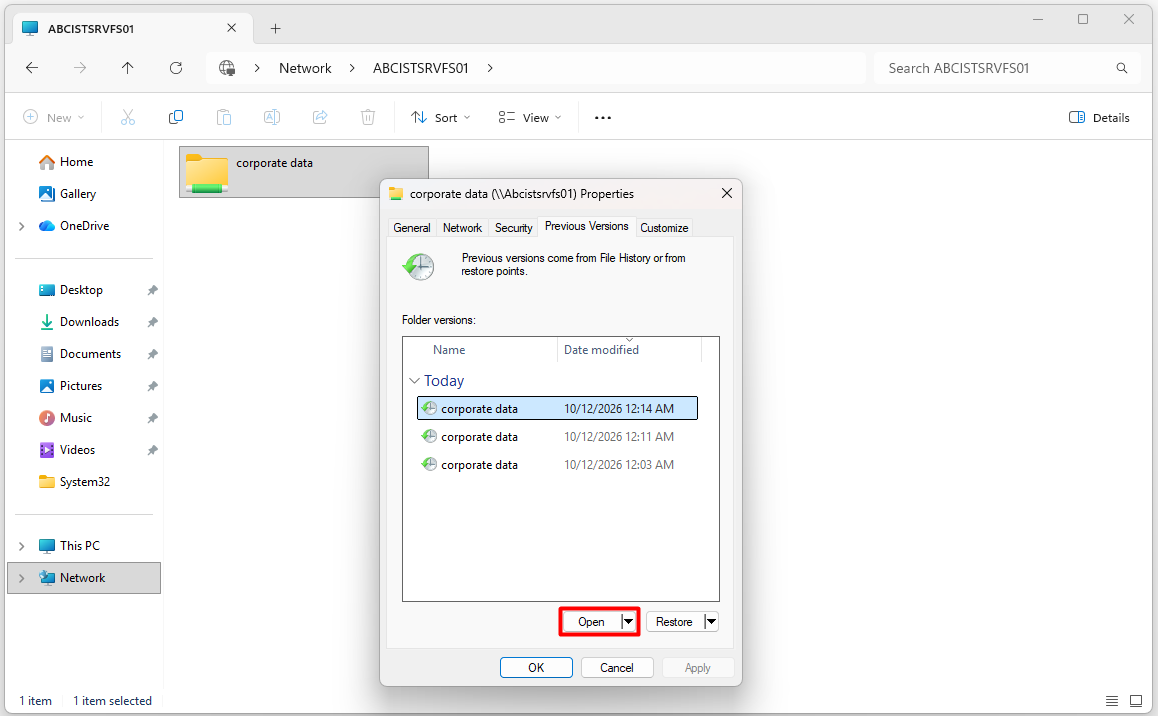
The main benefit is seen on the client side. When a user accesses the server through the \\ServerName path, they right-click the share itself, or a folder or file inside it, and open the Previous Versions tab in the Properties window. The tab lists the versions of the selected item that exist in the shadow copies, with date and time information, and the timestamp of every shadow copy taken on the server appears here exactly.
The list shows only the versions in which the selected item is actually different. If a file did not change at all between 2 shadow copies, the same version is not shown twice. At share or folder level, however, any change in the content is enough for that version to appear in the list. The screen below is viewed at share level, so all 3 shadow copies taken on the server are listed.
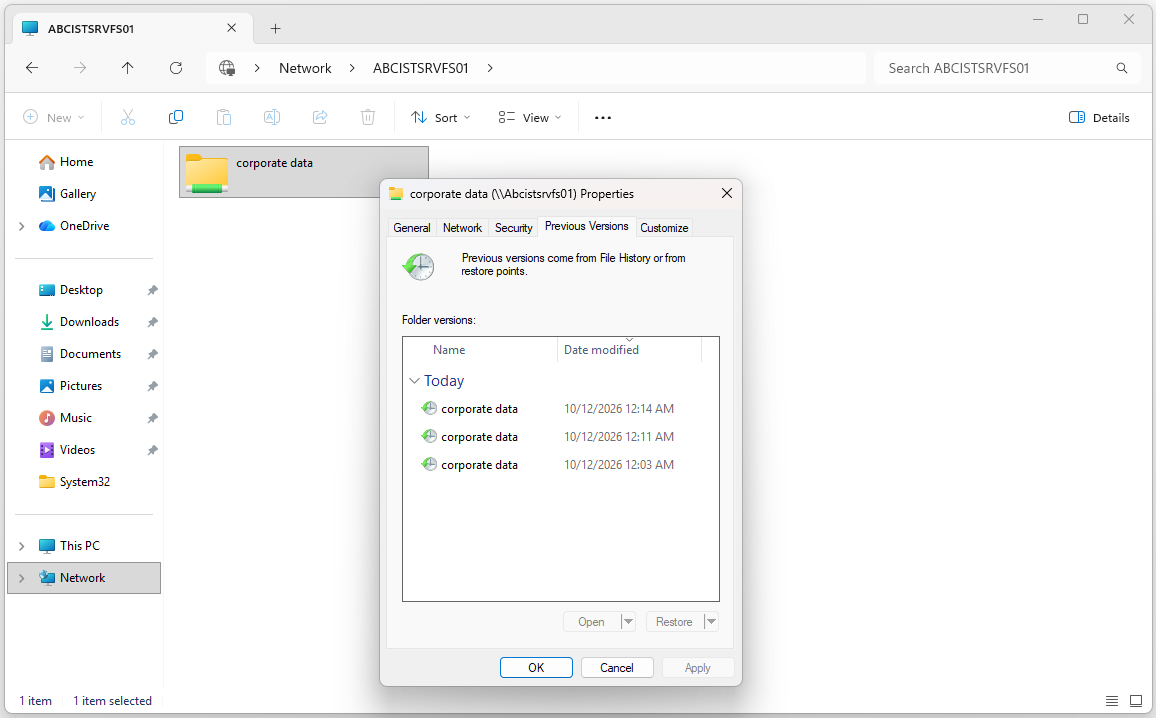
On Windows 8 and later Windows client versions, this tab has 2 buttons, Open and Restore. When a version is selected and the Open button is clicked, that version opens as read-only.
When used at share or folder level, Open displays the whole folder structure and all files as they were at the time of that shadow copy, in a browsable form in File Explorer. The address bar shows the date of the shadow copy and how long ago it was taken next to the share name. In this window, the user can go into subfolders, open files and check whether this is the correct version.
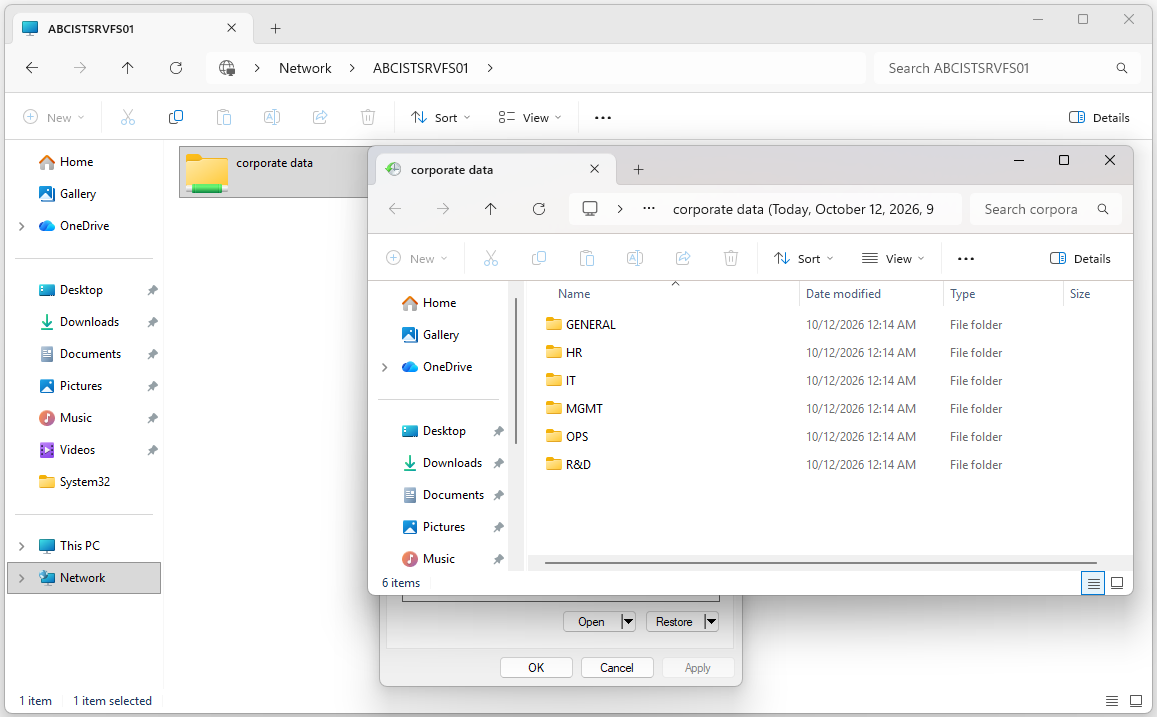
The Open window is also the most practical way to recover deleted files. A deleted file cannot be right-clicked, but when a version from before the deletion is opened with Open from the Previous Versions tab of the folder or share that contained it, the deleted files are still in place in that window. The required files can be selected there and copied to the original location or to another location.
Restore, on the other hand, writes the selected version back to the original location and overwrites existing files with the same name. The Restore To option, opened from the arrow next to the Restore button, restores the version to a different location and does not touch the current content. The practical approach to recommend to users is to verify the version with Open first and, if the current content has changes that must be kept, to use Restore To instead of Restore or to copy the required files from the Open window.
A restore overwrites existing files with the same name, and the changes made to these files after the shadow copy was taken are lost. When in doubt, restoring to a different location with Restore To is safer.
Remember also that a restore and a copy back both require the user to have write permission on the original location. A shadow copy does not give the user more access than the NTFS and share permissions allow.
Once the feature is running, the most common question is how much space should be allocated for the diff area. There is no universal percentage rule based on volume size, and commonly quoted ratios such as 10%-20% are not a documented Microsoft recommendation. The required space is determined by 3 factors: the data change rate, the shadow copy frequency and the amount of history to be kept, that is, the retention period.
Let us consider this with a concrete scenario. The data is on a 10 TB D:\ volume, and the shadow copies will be kept on the same volume. The diff area limit is not calculated as a percentage of the D:\ size. The correct approach is to enable shadow copies, observe real usage for a period, find the average amount of data that changes per day and make a rough initial estimate. The following command is used for the observation.
vssadmin list shadowstorage
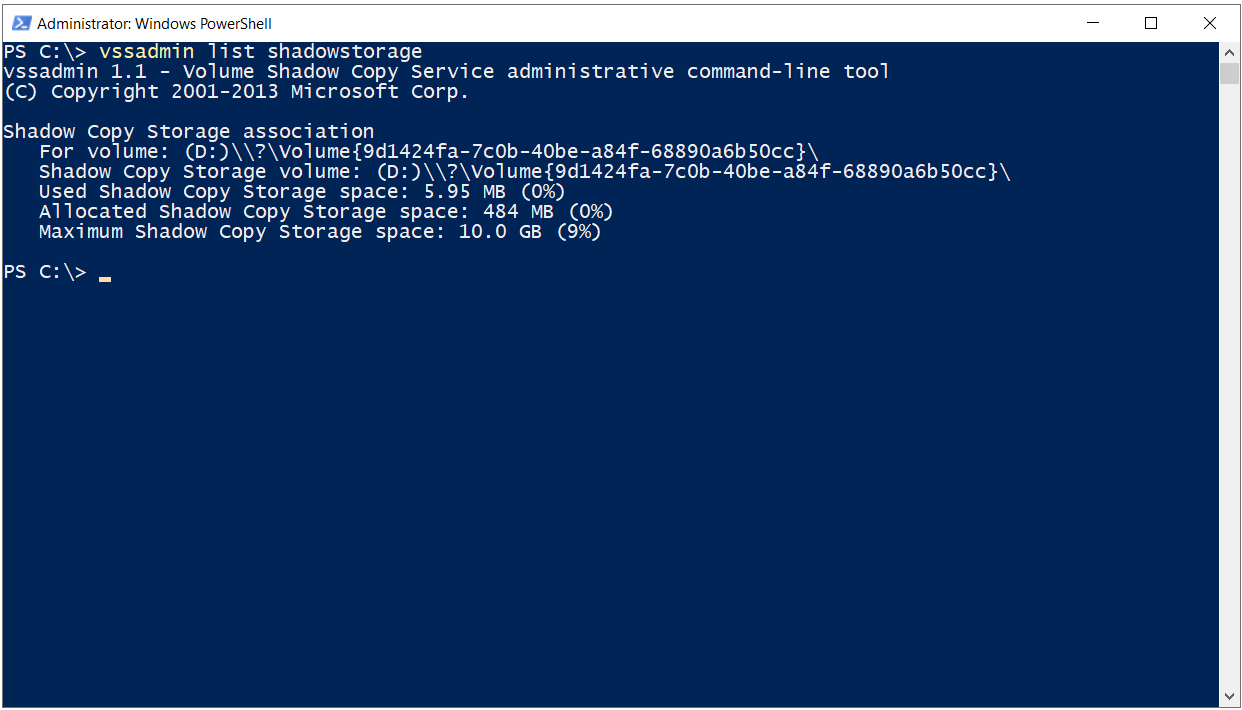
The table below explains the lines in the output.
|
Line |
Example Value |
Meaning |
|
For volume |
D:\ |
Volume that is shadow copied |
|
Shadow Copy Storage volume |
D:\ |
Volume that holds the diff area |
|
Used Shadow Copy Storage space |
5.95 MB |
Space actually used by the shadow copies |
|
Allocated Shadow Copy Storage space |
484 MB |
Space that VSS has allocated in advance for the diff area |
|
Maximum Shadow Copy Storage space |
10.0 GB |
Use limit value set on the Settings screen |
The output shows that the Used Shadow Copy Storage space value (5.95 MB) is well below the Allocated Shadow Copy Storage space value (484 MB). In the Shadow Copies window, opened earlier by right-clicking the D:\ drive and selecting Configure Shadow Copies, the Used column in the D:\ row shows the same 484 MB value. In other words, the Used column in this window shows the Allocated value from the vssadmin output, not the actual usage. For this reason, use the Used value in the vssadmin output instead of the window to observe the daily change, and use the Allocated value to track how much space is actually occupied on the disk.
For the initial estimate, the daily changed data is multiplied by the number of days to keep, and a growth margin is added on top. With hypothetical values, if an average of 50 GB of data changes per day and 14 days of history are required, the result is 50 x 14 = 700 GB. With the margin added, a limit of about 1 TB is a reasonable starting point. In this scenario, D:\ must be able to provide this 1 TB of space in addition to the growth requirement of the production data.
This is not a Microsoft formula. It is an initial estimate based on observation. With copy-on-write, a block is copied only once even if it changes more than once between 2 shadow copies, and the VSS metadata and index overhead is added to this. For this reason, real consumption can differ from the calculation, and the limit must be adjusted later according to real usage.
The effect of the change rate on the diff area is independent of file size. On a share where a few files are updated or small files are added, the diff area grows slowly and a long history can be kept. On a volume where a large database file changes heavily every day, the diff area fills quickly and old shadow copies are deleted earlier.
The deciding factor is the number of changed blocks. If only a small part of a 500 GB file changes, only those blocks are copied to the diff area.
The same logic applies to the question of how many shadow copies can be kept. Shadow copies are not independent, fixed-size files. The diff area works with shared changed blocks and index information. For this reason, dividing the allocated space by the average snapshot size to calculate the number of snapshots does not give a reliable result.
The history that can be kept is determined by the data change rate, the shadow copy schedule, the diff area limit and the limit on the number of shadow copies per volume. For Shadow Copies of Shared Folders, the MaxShadowCopies value is 64 by default, and VSS technically supports a maximum of 512 in this registry value. When this limit is reached, the oldest shadow copy is deleted when a new one is taken, even if there is space in the diff area.
However, on Windows Server 2012 and later versions, the SMB server can list a maximum of 500 previous versions per volume to users who connect to the share. If the MaxShadowCopies value is raised to 512, the highest value allowed, to obtain a longer history, 512 shadow copies are kept on the server, but only 500 of them appear on the user's Previous Versions tab. The 12 shadow copies that do not appear are the newest ones, not the oldest. Because the most recent versions, which users need most often, are missing from the list, the MaxShadowCopies value should be set to 500 instead of 512 in a shared folder scenario.
reg add "HKLM\SYSTEM\CurrentControlSet\Services\VSS\Settings" /v MaxShadowCopies /t REG_DWORD /d 500 /f
Raising the limit to 500 does not provide a longer history by itself. If the diff area limit is not sufficient, VSS starts deleting old shadow copies before the count limit is reached.
What happens when the space fills up also needs to be made clear. Although the diff area is on the same volume, shadow copy data is not written over production data. When the diff area limit is reached or the free space on D:\ is used up, VSS can delete shadow copies, starting with the oldest. What is lost is not production data but the existing shadow copy and Previous Versions history.
If the D:\ volume fills completely, this also causes normal file system and application problems. Because the diff area and the production data share the same free space, regular monitoring of the free space on D:\ becomes even more important in this scenario.
Everything the graphical interface does can also be managed from the command line. The commands below list the existing shadow copies and storage associations, create a manual shadow copy, define the diff area for D:\ on D:\ itself, change the limit and delete shadow copies. The commands require an elevated CMD or PowerShell window, that is, one opened with Run as administrator.
vssadmin list shadows
vssadmin list shadowstorage

vssadmin create shadow /for=D:

vssadmin add shadowstorage /for=D: /on=D: /maxsize=1TB
vssadmin resize shadowstorage /for=D: /on=D: /maxsize=1TB

vssadmin delete shadows /for=D: /oldest
vssadmin delete shadows /for=D: /all
Reducing the limit with resize shadowstorage can cause existing shadow copies to be deleted. The delete shadows operation cannot be undone.
add shadowstorage is used when no storage association has been defined for D:\ yet. If the feature was enabled from the interface, this association already exists and the limit is changed with resize shadowstorage.
The /maxsize parameter can be given as a fixed value (for example 1TB), a percentage of the volume (for example 15%) or UNBOUNDED. Because the diff area is kept on the same volume as the production data, using UNBOUNDED means that the shadow copies can consume the free space on D:\ without any limit. In this scenario, a fixed limit gives more predictable capacity management.
The Previous Versions tab shows which versions of a file or folder exist, but it does not list exactly which files were added, deleted or changed between 2 shadow copies. This information is needed when a user asks what changed in a folder yesterday afternoon, or when the scope of a bulk deletion has to be determined.
For this, we use the fact that shadow copies are directly accessible through the share. Each shadow copy can be opened with a timestamp that starts with @GMT, appended to the end of the share path. For example, the path \\ABCISTSRVFS01\corporate data\@GMT-2026.10.11-21.14.47 shows the state of that share at 00:14:47 on 12 October, when Istanbul time is UTC+3. The same structure is visible in the location of the folders opened in the Open window.
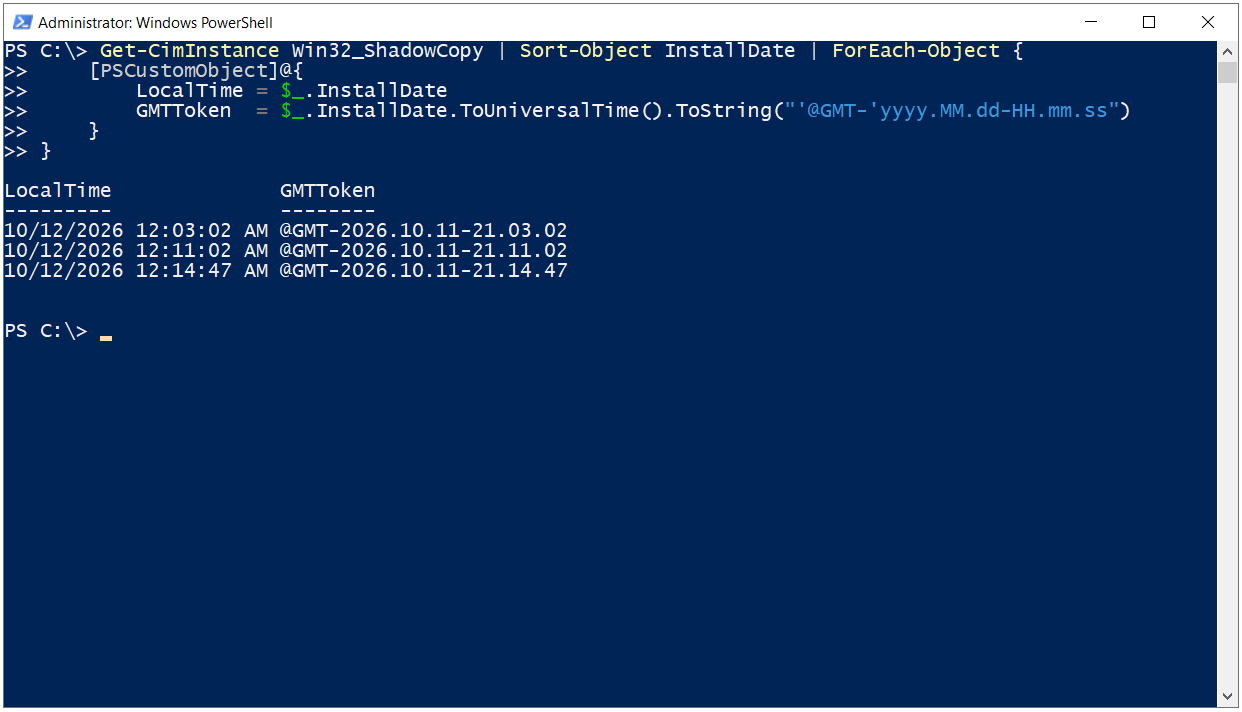
This timestamp is in UTC. Because the server time is set to Istanbul time, that is UTC+3, a shadow copy taken at 00:14 on 12 October appears as 21:14 on 11 October in the timestamp. Instead of calculating the correct values manually, run the following command on the server to list the local time of each shadow copy and the corresponding @GMT value.
Get-CimInstance Win32_ShadowCopy | Sort-Object InstallDate | ForEach-Object {
    [PSCustomObject]@{
        LocalTime = $_.InstallDate
        GMTToken  = $_.InstallDate.ToUniversalTime().ToString("'@GMT-'yyyy.MM.dd-HH.mm.ss")
    }
}
The LocalTime column in the output matches the time shown in the Shadow Copies window and on the Previous Versions tab exactly, and the GMTToken column matches the value to use in the share path.
Once these values are available, the comparison is done with the Compare-VSSSnapshot.ps1 script below. The script compares each shadow copy in the list with the next one. It scans the files in both shadow copies including subfolders, matches the files by their relative paths within the share, and marks those with a different size or last modified time as Modified, those that exist only in the newer one as Added, and those that exist only in the older one as Removed.
The result is written to the screen and, at the same time, saved as a date and time stamped TXT file in the folder where the script is located. Before using it, you only need to enter your own share path in the $share variable and the GMTToken values from the output of the previous command in the $snapshots list. The Label values are free text that appears only in the report heading and they do not affect the comparison. In this example, they are written as 12:03, 12:11 and 12:14 to match the 12-hour display in the Shadow Copies window, which corresponds to 00:03, 00:11 and 00:14 in 24-hour format. The script can be run on any machine that has read permission on the share.
$share = "\\ABCISTSRVFS01\corporate data"

$snapshots = @(
    @{ Label = "12:03"; Token = "@GMT-2026.10.11-21.03.02" },
    @{ Label = "12:11"; Token = "@GMT-2026.10.11-21.11.02" },
    @{ Label = "12:14"; Token = "@GMT-2026.10.11-21.14.47" }
)

$logFile  = Join-Path $PSScriptRoot ("Compare-VSSSnapshot_{0}.txt" -f (Get-Date -Format "yyyyMMdd_HHmmss"))
$utf8Bom  = New-Object System.Text.UTF8Encoding($true)

function Write-Log($text) {
    Write-Host $text
    [System.IO.File]::AppendAllText($logFile, $text + [Environment]::NewLine, $utf8Bom)
}

function Get-Snap($root) {
    $h = @{}
    Get-ChildItem -LiteralPath $root -Recurse -File | ForEach-Object {
        $h[$_.FullName.Substring($root.Length)] = $_
    }
    return $h
}

Write-Log ("Compare-VSSSnapshot  |  {0}  |  {1}" -f (Get-Date -Format "yyyy-MM-dd HH:mm:ss"), $share)

for ($i = 0; $i -lt $snapshots.Count - 1; $i++) {
    $oldLabel = $snapshots[$i].Label
    $newLabel = $snapshots[$i + 1].Label
    $ha = Get-Snap "$share\$($snapshots[$i].Token)"
    $hb = Get-Snap "$share\$($snapshots[$i + 1].Token)"

    $result = foreach ($p in (@($ha.Keys) + @($hb.Keys) | Sort-Object -Unique)) {
        if (-not $hb.ContainsKey($p))     { [PSCustomObject]@{ Change = 'Removed';  Path = $p } }
        elseif (-not $ha.ContainsKey($p)) { [PSCustomObject]@{ Change = 'Added';    Path = $p } }
        elseif ($ha[$p].Length -ne $hb[$p].Length -or $ha[$p].LastWriteTime -ne $hb[$p].LastWriteTime) {
                                            [PSCustomObject]@{ Change = 'Modified'; Path = $p } }
    }

    Write-Log ""
    Write-Log "===== $oldLabel  ->  $newLabel ====="
    Write-Log ($result | Sort-Object Change, Path | Format-Table -AutoSize | Out-String -Width 300).TrimEnd()
    Write-Log ""
    Write-Log ($result | Group-Object Change | Sort-Object Name | Select-Object Name, Count | Format-Table -AutoSize | Out-String).TrimEnd()
}

Write-Log ""
Write-Log "Log: $logFile"
When the script is saved and run, the running scripts is disabled on this system error can appear, especially on Windows client operating systems. The reason is that the PowerShell execution policy setting does not allow scripts to run. The following command is used to allow scripts to run only in the open PowerShell window, without changing the system-wide policy.
Set-ExecutionPolicy -Scope Process -ExecutionPolicy Bypass
A change made with -Scope Process applies only to that PowerShell session. When the window is closed, the execution policy returns to its previous state and the system-wide setting is not affected.
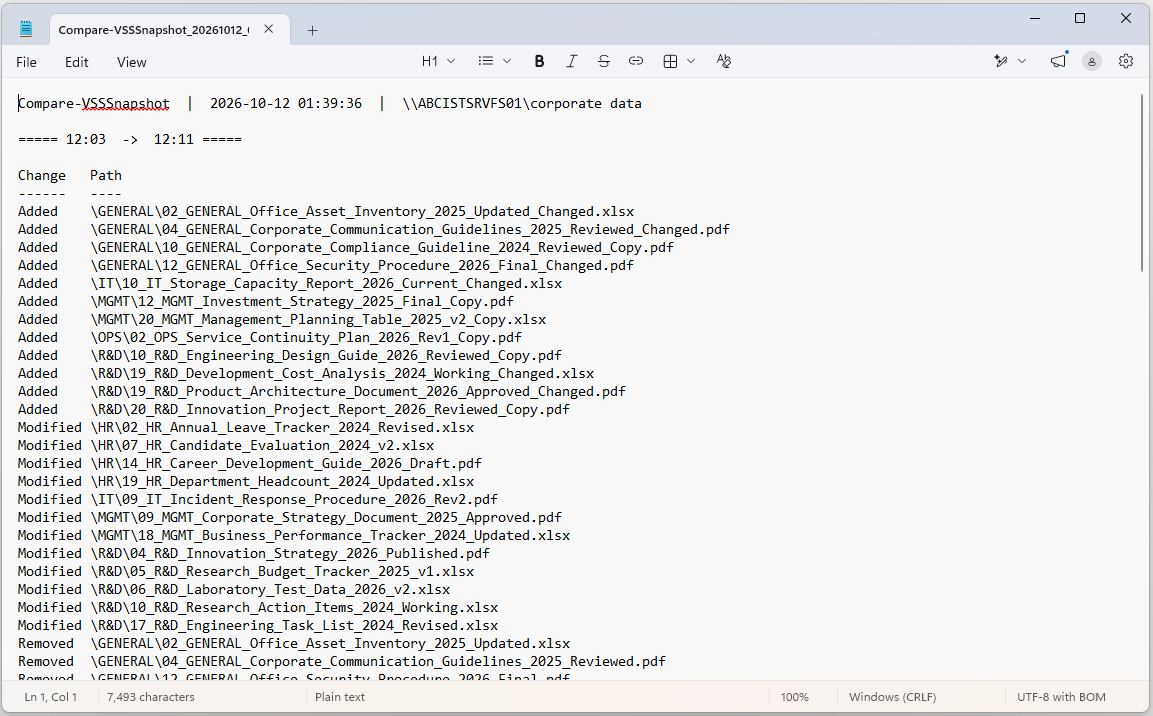
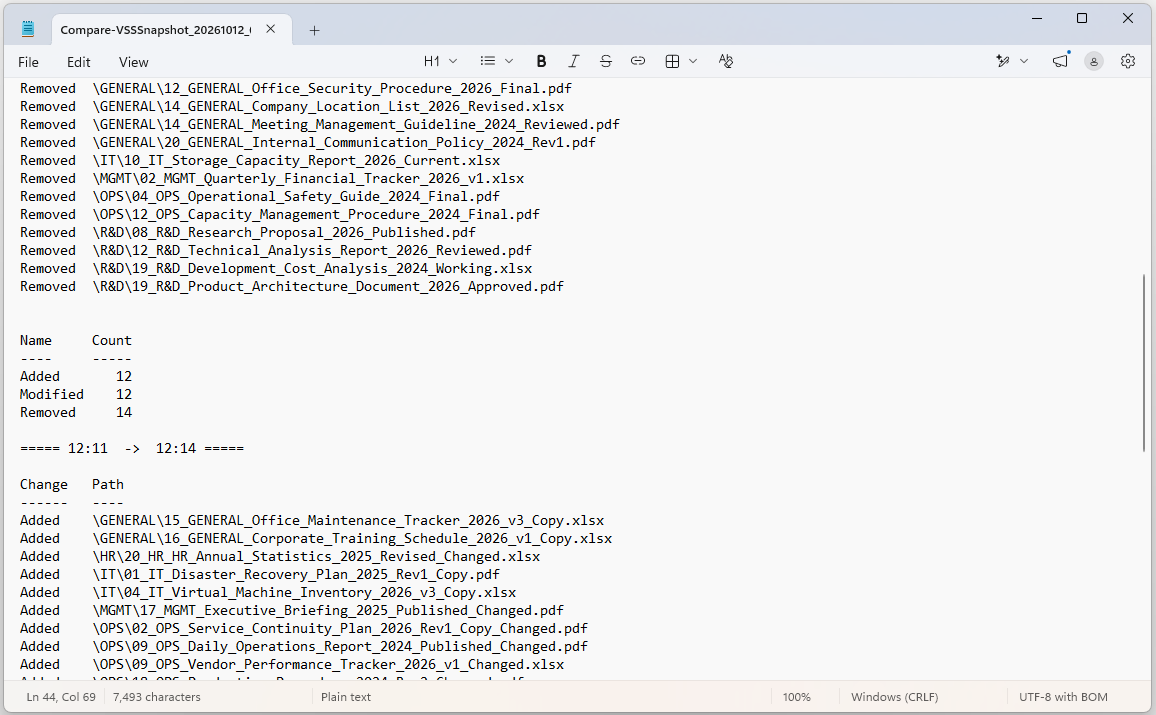
When the script runs, the output contains a separate heading for each interval, the list of changed files below it and the count of each change type at the bottom. The last line prints the full path of the log file that was created.
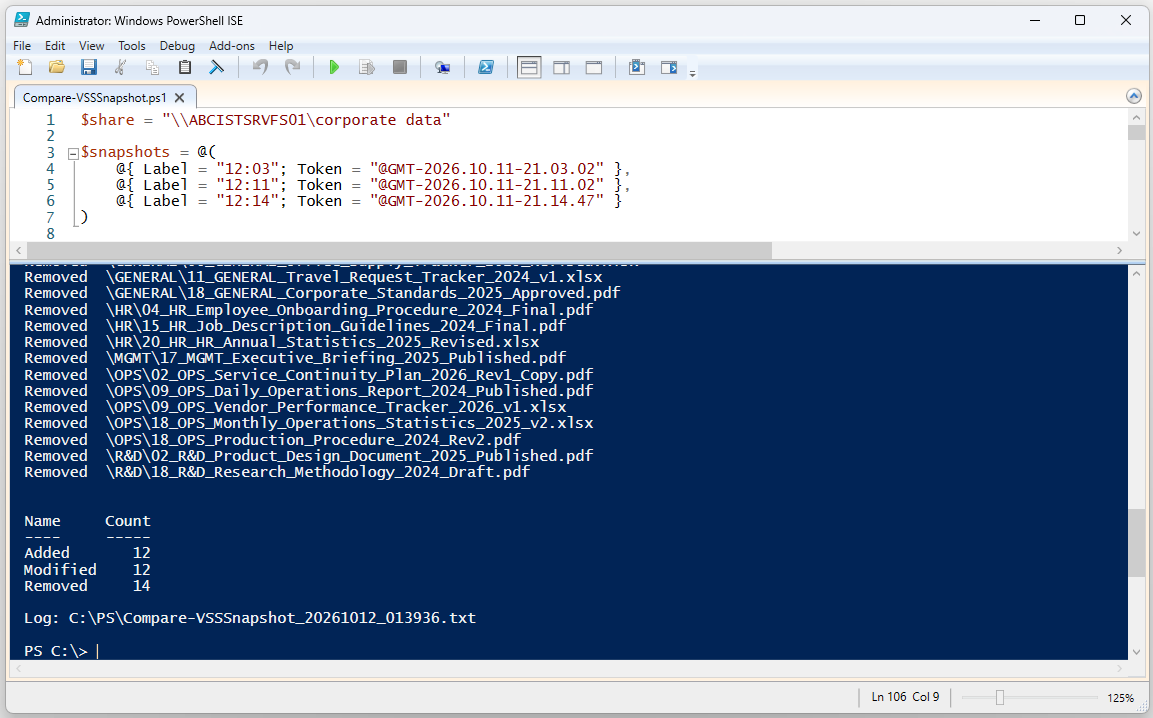
The results match the changes made during the test exactly. The only point to know here is how renamed files appear. Because the script matches files by name, it sees a renamed file as 2 separate entries. The old name is listed as Removed because it no longer exists, and the new name is listed as Added because it did not exist before. Modified is used only for files whose name stays the same and whose size or last modified time differs, so a renamed file never appears as Modified.
For this reason, in each interval the old names of the 6 renamed files are added to the 8 deleted files, and a total of 14 Removed entries appear. The new names of the 6 renamed files are added to the 6 newly created files, and a total of 12 Added entries appear. The 12 files whose content was modified are listed directly as 12 Modified entries.
These numbers belong to the changes made in each interval in the test environment prepared for this article. In your own environment, the numbers in the script output will differ according to the real changes made between the shadow copies.
The same output that appears on the screen is also written to the log file. The file is saved as UTF-8 with BOM so that Windows can detect the character encoding correctly. The BOM is a small marker added to the beginning of the file that indicates the content is UTF-8. Without this marker, some Windows tools can display Turkish characters and special characters incorrectly.
PowerShell's own Out-File command behaves differently in this respect depending on the version. It produces a file with a BOM in Windows PowerShell 5.1 and a file without a BOM in PowerShell 7. To avoid this difference, the script writes the log file directly through .NET as UTF-8 with BOM. As a result, the same log file is produced whichever PowerShell version runs the script, and this file can be used directly as an incident record or as a report to send to the user.
When Shadow Copies of Shared Folders is planned correctly, most user-caused file losses are resolved from the Previous Versions tab without reaching the administrator at all. For a healthy setup in a single-volume design, it is enough to set the diff area limit before the first shadow copy and in a way that leaves room for the data on D:\ to grow, to adjust the schedule to the real needs of the users, and to update the limit based on a few weeks of vssadmin observation.
For long-term protection and disaster scenarios, a separate backup solution must always be in place alongside this configuration.
This article covered how to revert to previous versions of files in shared folders with the Shadow Copies of Shared Folders feature on Windows Server, using a scenario in which the data and the diff area are kept on the same volume.
The Volume Shadow Copy Service, which runs in the background of the feature, stores only the old state of changed blocks with the copy-on-write method. For this reason, the diff area requirement is determined by the data change rate, the shadow copy frequency and the retention period, not by the volume size, and the Use limit value must be planned according to these 3 factors.
On the client side, the Previous Versions tab lets users view the previous states of shares, folders and files with Open, and restore them with Restore or Restore To, within the limits of their NTFS and share permissions. The shadow copy limit per volume, the MaxShadowCopies registry value and the 500-version limit of the SMB server are points to consider when planning the history that can be kept.
Managing the storage association and the limit with vssadmin, and reporting file changes between shadow copies with a PowerShell script through @GMT timestamps, cover the operational needs on the administrator side. Shadow copies are a strong tool for short-term recovery, but they do not replace a backup strategy.
I hope you find it useful...
Feel free to share your thoughts and questions about this article in the comments below. Every contribution helps the content reach more people and makes for a more useful discussion.