Synchronising the users, groups and passwords in on-premises Active Directory with Microsoft Entra ID depends on the choices made on each screen of the wizard during the Microsoft Entra Connect Sync installation. Some decisions, such as the sign-in method, the Connector account, the source anchor and the OU scope, cannot be changed after the installation, so it is necessary to know what these choices mean before proceeding. I explained what the tool is, the system requirements, the UPN suffix preparation and the pre-installation checks in my article Microsoft Entra Connect Installation - Part 1: Basic Setup and Preparation. I now move on to the installation itself and show step by step which choice changes what on each screen.
I structured the article in 3 stages. First, I complete the preparation with the version information, the checklist and the decision table. Then I go through the wizard screen by screen. In the last section, I collect the tasks that must be done after the installation in a single list.
PREPARATION                   INSTALLATION                   POST-INSTALLATION
---------------------------   ----------------------------   ------------------------------
Version and dates             Wizard screens (1-17)          Initial synchronisation and verification
Pre-installation checks       1 decision on each screen      Seamless SSO GPO and Key Rollover
Decision table                Screenshot and short warning   Additional agents and licence checks
The official name of the product is Microsoft Entra Connect Sync, and its former name is Azure AD Connect. The old names still appear in the installation directories and on some wizard screens. I point this out separately wherever I meet these names in the article.
Which Version Should Be Used for the Installation?
I updated the article as of October 2026. On this date, the latest version downloaded from the Microsoft Entra admin center is 2.6.92.0, released on 23 September 2026. A new installation must always use the latest version. I collected the dates that matter for the version in the table below.
|
Date |
What Happens |
Action Required |
|
23 September 2026 |
2.6.92.0 was released. |
A new installation is done with this version. |
|
30 September 2026 |
All synchronisation services stop working on versions earlier than 2.5.79.0. |
A server in this state does not synchronise until it is upgraded to a current version. |
|
23 October 2026 |
The support period of version 2.5.79.0 itself ends. |
Servers that remain on this version are upgraded. |
|
7 April 2027 |
The old method that connects with the user name and password of the Sync_ account will stop working. |
The server must be on version 2.6.84.0 or later and must be configured with Application-Based Authentication. The migration does not happen automatically. |
Some of the screenshots in this article belong to an older build, in which a synchronisation account starting with Sync_ was created in the tenant. Because there are behaviour differences between that build and the version downloaded today, I wrote the old behaviour first and then the current behaviour at every point that changed.
What Changed in the Current Version?
The table below shows together the behaviours that Microsoft changed later for the topics covered in this article. The last column shows the installation step in which I meet each change.
|
Topic |
Old Behaviour |
Current Behaviour |
Step |
|
Installation file |
It was downloaded from the Microsoft Download Center. |
From version 2.5.3.0 onwards, it is downloaded only from the Microsoft Entra admin center. |
1- Downloading the Microsoft Entra Connect Sync Installation File |
|
Local database |
SQL Server 2019 Express LocalDB was installed. |
From version 2.6.84.0 onwards, SQL Server 2022 Express LocalDB is installed. |
4- Install required components |
|
Entra ID sign-in in the wizard |
The user name and password were typed on the wizard screen. |
From version 2.6.91.0 onwards, the Windows Web Account Manager window opens, which supports passkeys and FIDO2. |
6- Connect to Microsoft Entra ID |
|
Role required for the installation |
Global Administrator was mandatory. |
From version 2.0.3.0 onwards, the installation can also be done with the Hybrid Identity Administrator role. If federation is going to be configured, the Domain Name Administrator role is also required. If Connect Health is going to be used, the installation must be done with Global Administrator. |
6- Connect to Microsoft Entra ID |
|
AD DS Connector account |
An Enterprise Admin or Domain Admin account could be entered as the Connector account. |
From version 1.4.18.0 onwards, the wizard does not accept these accounts. |
8- AD forest account |
|
Changing the OU selection |
It could be changed from the Select Containers window in Synchronization Service Manager. |
From version 2.6.91.0 onwards, this window is read-only. The change is made from the Customize synchronization options task in the wizard. |
10- Domain and OU filtering |
|
Source anchor on group objects |
Only objectGUID was used for group objects. |
From version 1.5.18.0 onwards, if mS-DS-ConsistencyGuid is populated on the group object, this value is used. If the value is empty, objectGUID is still used. |
11- Uniquely identifying your users |
|
PHS feature flag |
If the PHS feature flag in the cloud was turned off, it was turned on again automatically in the background. |
From version 2.6.84.0 onwards, there is no automatic re-enabling. The administrator must explicitly enable the flag again. |
13- Optional features |
|
Group Writeback |
Group Writeback v2 could be enabled as a Public Preview. |
v2 was deprecated and cannot be enabled since version 2.3.2.0. Microsoft Entra Cloud Sync is used for cloud security groups. |
13- Optional features |
|
Identity that connects to Entra ID |
A user account starting with Sync_ was created in the tenant, and the server connected with the user name and password of this account. |
From version 2.5.76.0 onwards, Application-Based Authentication is the default. The server connects with a certificate-based application identity. |
16- Configuring |
|
Kerberos encryption type |
The default Kerberos encryption type in AD DS was RC4. |
With the July 2026 Windows Server update, the default became AES-256. Seamless SSO problems can occur in environments that use RC4. |
19- Post-Installation Checklist |
Pre-Installation Checklist
Before I start the wizard, I go through the table below from beginning to end. Each row in the table shows a requirement that is needed in one step of the installation. A missing row causes me to stop in the middle of the wizard. The rows are ordered by the step in which I first meet the requirement.
|
Topic |
Requirement |
Where It Is Needed |
|
Version |
2.6.92.0, downloaded from the Microsoft Entra admin center. Version 2.6.79.0 was withdrawn after its release. If this version is installed, it is removed and the current version is installed. |
1- Downloading the Microsoft Entra Connect Sync Installation File |
|
Server |
.NET Framework 4.7.2 and TLS 1.2. The RSAT-AD-Tools feature for the ADSyncConfig module. A TPM 2.0 that is ready for use is recommended for the Application-Based Authentication certificate. |
2- Starting the Installation
8- AD forest account
16- Configuring |
|
Number of objects |
In environments with more than approximately 100,000 objects, an existing SQL Server instance is prepared instead of LocalDB. |
4- Install required components |
|
Entra ID account |
A cloud-only account in the onmicrosoft.com domain of the tenant. The Hybrid Identity Administrator or Global Administrator role must be assigned directly to the user. If federation is going to be configured, Domain Name Administrator is also needed, and if Connect Health is going to be used, Global Administrator. |
6- Connect to Microsoft Entra ID |
|
Active Directory accounts |
An Enterprise Admin account so that the wizard creates the Connector account, or a Connector account that was prepared in advance as a normal user object. For Seamless SSO, a Domain Administrator account in each forest that is not a member of Protected Users. |
8- AD forest account
14- Enable single sign-on |
|
UPN suffix |
The UPN suffix of the users must match a domain that is verified in Entra ID. Non-routable suffixes such as firatboyan.local cannot be verified. The UPN of the users is corrected before the installation. |
9- Microsoft Entra sign-in configuration |
|
Existing accounts in the tenant |
If cloud-only accounts were created in the tenant earlier, their UPN and primary SMTP addresses must match the on-premises values. Cloud accounts that hold an administrator role are not matched. |
11- Uniquely identifying your users
18- Initial Synchronisation and Verification |
|
Licence |
Microsoft Entra ID P1, P2 or Microsoft 365 Business Premium for Password Writeback. Microsoft Entra ID P1 or P2 for Device Writeback. |
13- Optional features |
The Decisions I Make During the Installation
Some of the screens in the wizard only ask for information, and some ask for a permanent decision. The table below shows together these decisions, the Microsoft recommendation, my choice in this installation and whether the choice can be changed after the installation. The details of each row are in the related step.
|
Decision |
Default or Microsoft Recommendation |
Choice in This Installation |
Can It Be Changed After the Installation? |
Step |
|
Installation path |
Express Settings for a single forest and PHS |
Customize |
No. Features can also be added with the wizard tasks on a server installed with Express. |
3- Express Settings |
|
Sign-in method |
PHS |
PTA and Seamless SSO |
Yes. The Change user sign-in task. |
5- User sign-in |
|
Sign-in attribute |
userPrincipalName |
mail (Alternate ID, for the lab only) |
No. |
9- Microsoft Entra sign-in configuration |
|
Domain and OU scope |
All domains and OUs |
Selected OUs |
Yes. The Customize synchronization options task. The objects of an OU that leaves the scope are deleted. |
10- Domain and OU filtering |
|
User matching |
Users are represented only once in a single forest |
Mail attribute (the old installation in the screenshot) |
No. |
11- Uniquely identifying your users |
|
Source anchor |
Let Azure manage the source anchor (mS-DS-ConsistencyGuid) |
Let Azure manage the source anchor |
No. The only exception is the supported migration from objectGUID to mS-DS-ConsistencyGuid. |
11- Uniquely identifying your users |
|
Group-Based Filtering |
Off, for pilots only |
Off |
It cannot be turned on again after it is turned off. |
12- Filter users and devices |
|
Optional features |
None selected |
Exchange Hybrid Deployment, PHS, Password Writeback |
Yes. The Customize synchronization options task. |
13- Optional features |
|
Staging mode |
Off |
Off |
Yes. The Configure staging mode task. |
15- Ready to configure |
1- Downloading the Microsoft Entra Connect Sync Installation File
To download the installation file, I sign in at entra.microsoft.com. On the date I took the screenshot, the menu path was Microsoft Entra Connect under Hybrid management and the Connect Sync tab inside it. In the current Microsoft documentation, the same page is reached through Entra Connect under Entra ID, and the download link is on the Manage tab of the Get started page.
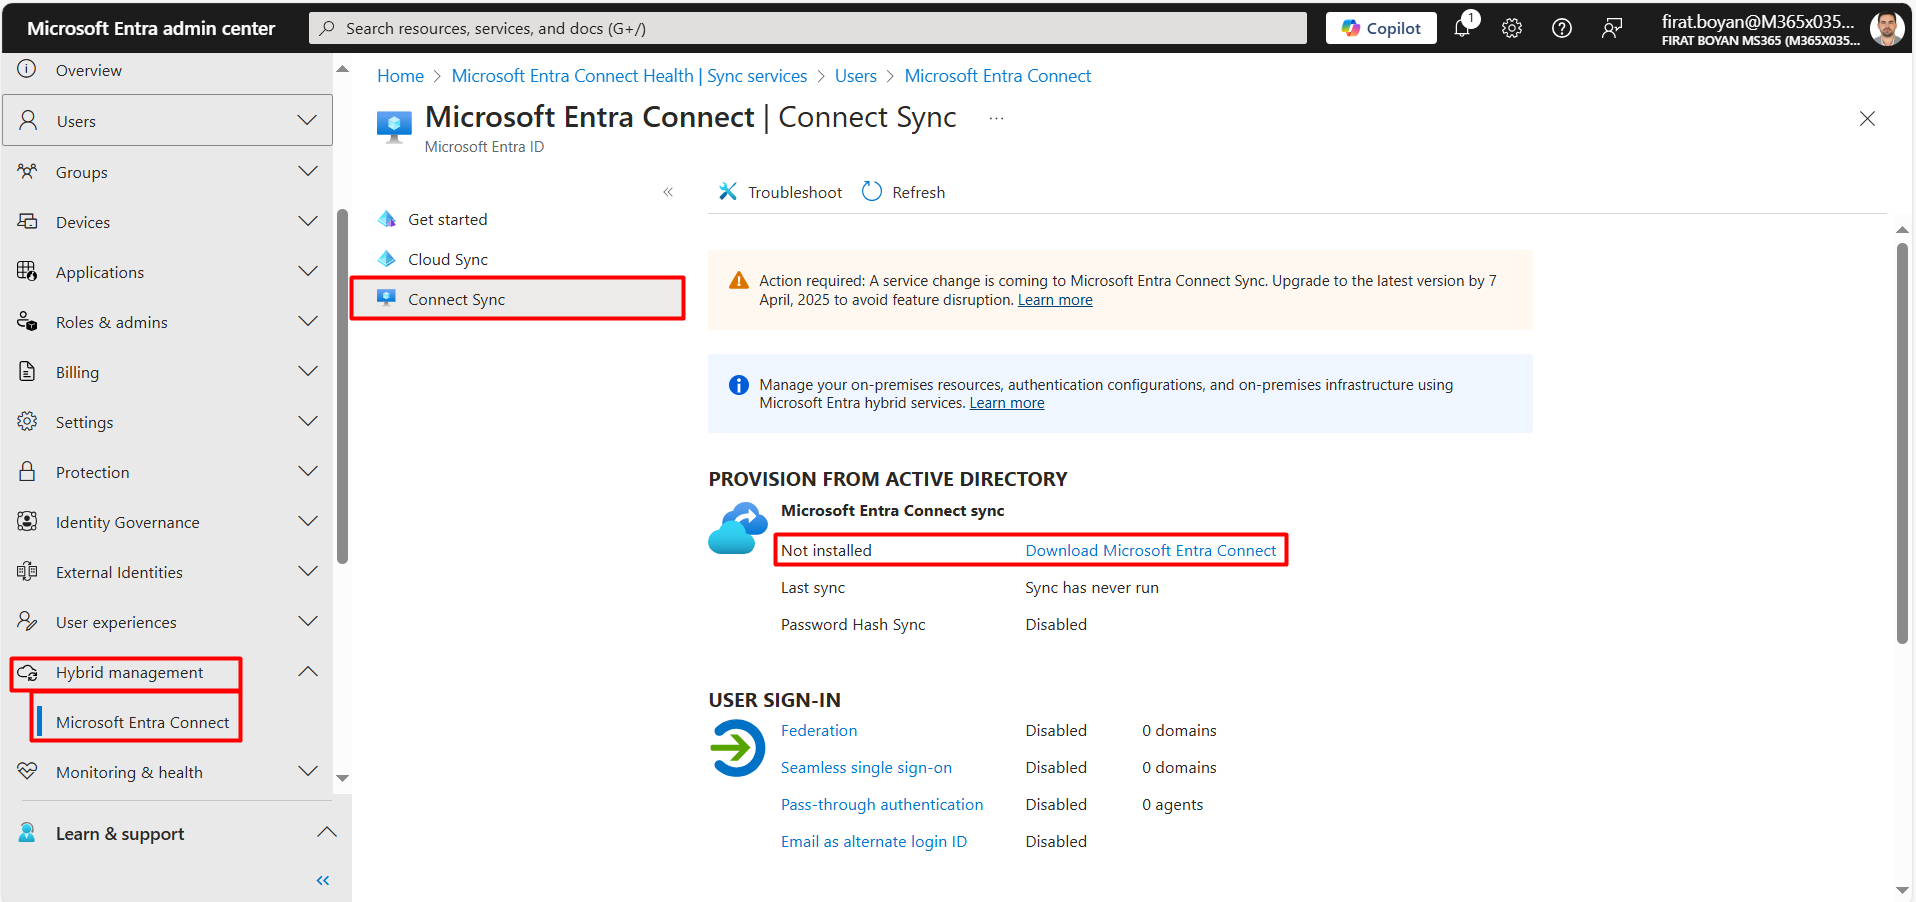
On the page that opens, I click the Download button and download the installation file.
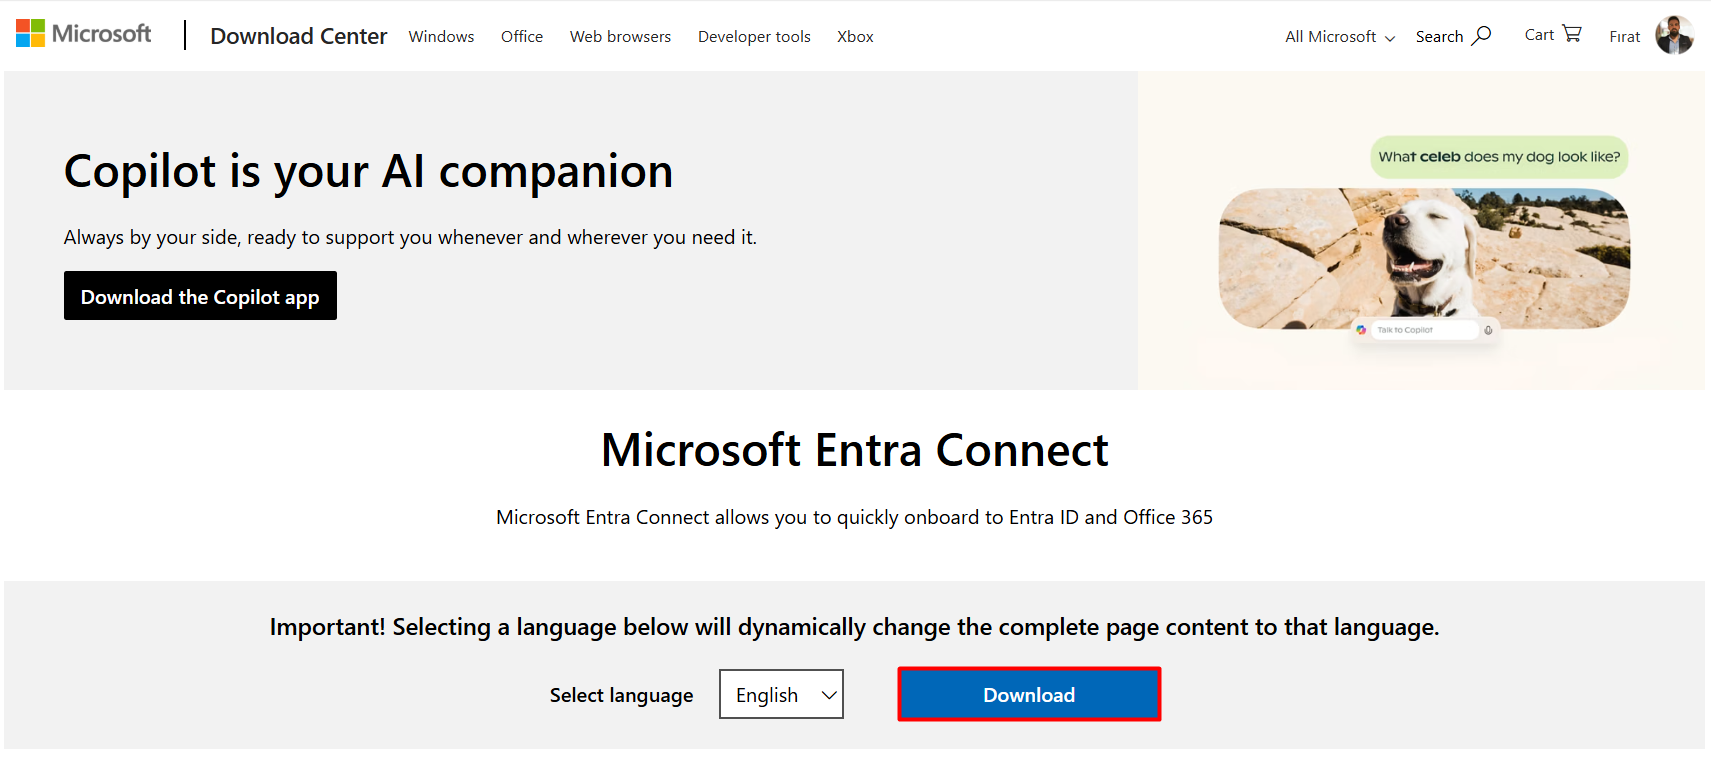
In old versions, the installation file was downloaded from the Microsoft Download Center. From version 2.5.3.0 onwards, the file is distributed only through the Microsoft Entra admin center.
2- Starting the Installation
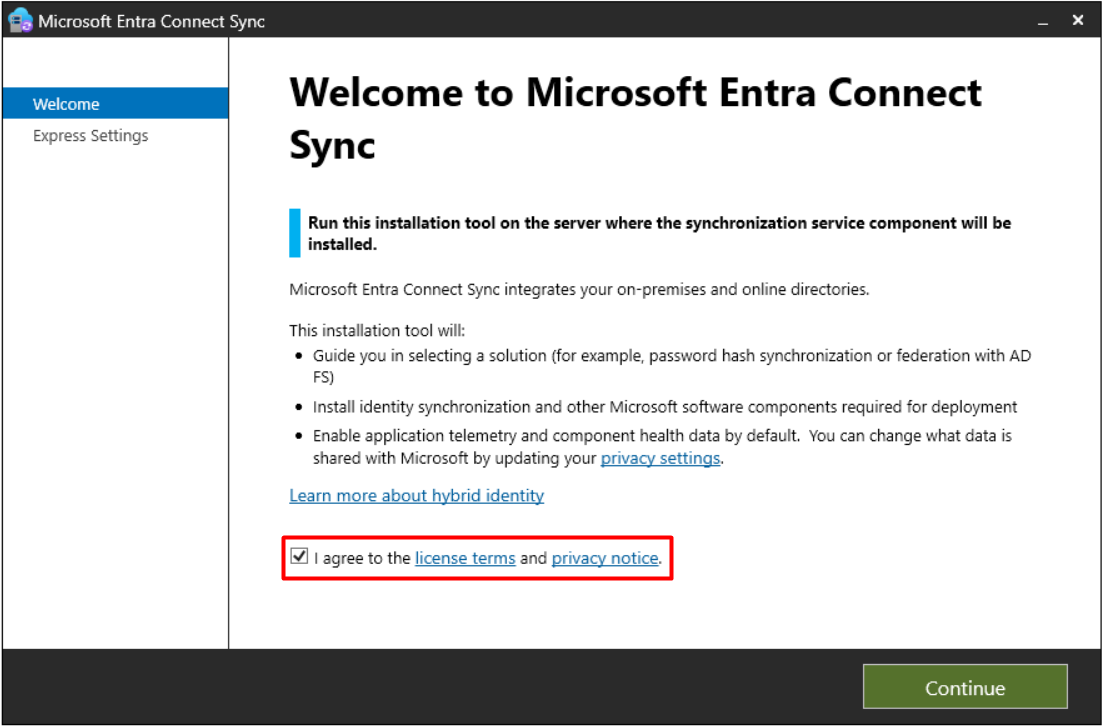
I run the installation file that I downloaded. The installation expects the .NET Framework 4.7.2 and TLS 1.2 requirements to be met on the server. If these 2 are missing, the wizard shows a warning on the first screens. I accept the licence agreement and click the Continue button to proceed.
3- Express Settings
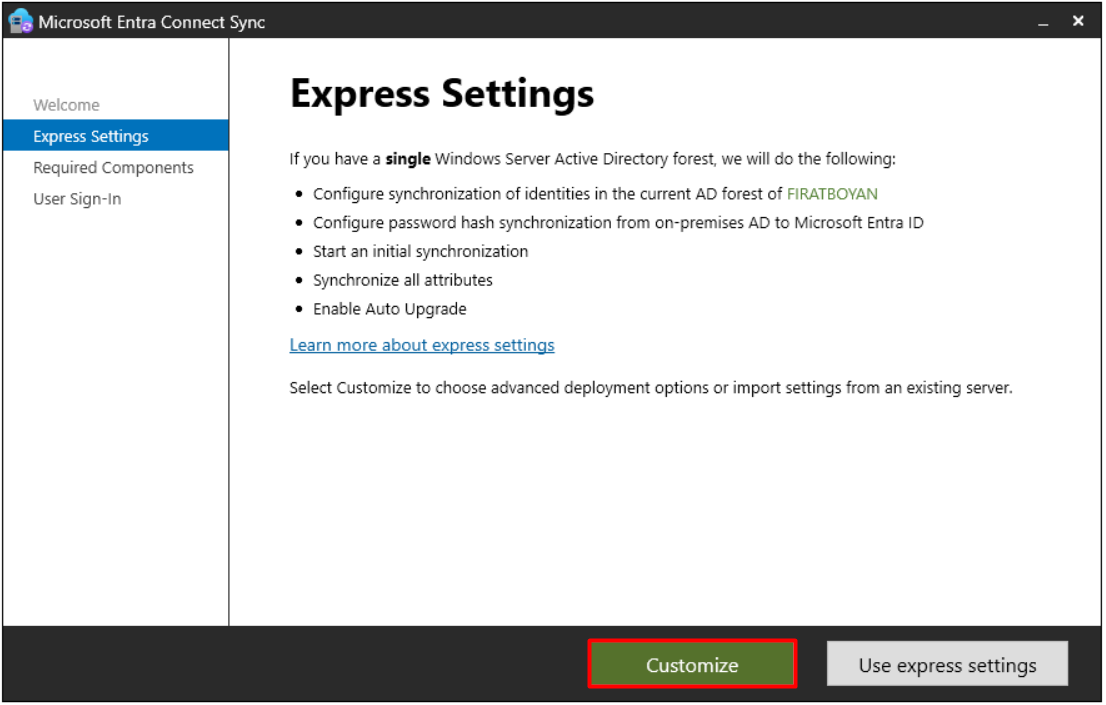
There are 2 paths on the Express Settings screen: Use express settings and Customize. The first completes the installation with the default settings, and the second allows me to configure each step separately.
Use Express Settings
Microsoft recommends this option for environments with a single-forest topology where Password Hash Synchronization is going to be used for authentication. In the express installation, the wizard asks me for 2 sets of credentials: a Hybrid Identity Administrator account for the Microsoft Entra ID side and an account that is a member of the Enterprise Admins group for the on-premises Active Directory side. The tasks that the wizard performs in the background with these 2 accounts are in the table below.
|
Task Performed |
Description |
|
AD DS Connector account |
An account whose name starts with MSOL_ is created in the Users container of the forest root domain. The Enterprise Admin account is used only during the installation. |
|
Permissions |
Replicate Directory Changes and Replicate Directory Changes All for Password Hash Synchronization; Read/Write all properties on User, iNetOrgPerson, Group and Contact objects for import and Exchange hybrid; Reset password as preparation for Password Writeback. |
|
Features enabled |
Automatic upgrade, Prevent accidental deletes and Microsoft Entra Connect Health. |
|
Initial synchronisation |
If the Start the synchronization process as soon as configuration completes box is left selected, the full synchronisation of users, groups and contacts starts immediately. |
The limit of approximately 100,000 objects does not belong to Express Settings. It belongs to the LocalDB database that is installed by default. In larger environments, an existing SQL Server is specified through the Customize path.
Customize
The Customize option is used for every topology and requirement that the express installation does not cover. The settings that I can define myself on this path, and the step in which the article covers each one, are in the table below.
|
Setting |
Description |
Step |
|
Configuration transfer |
I can import a configuration taken from another server with Import synchronization settings. |
4- Install required components |
|
Sign-in method |
I can choose between PHS, PTA, Federation with AD FS and Federation with PingFederate. |
5- User sign-in |
|
Multiple forests |
I can connect more than 1 AD forest to the same tenant. |
7- Connect your directories |
|
AD DS Connector account |
I can specify an account that I prepared in advance instead of letting the wizard create the account. |
8- AD forest account |
|
Domain and OU scope |
I can select the domains and Organizational Units (OU) that are going to be synchronised. |
10- Domain and OU filtering |
|
Optional Features |
I can turn on features such as Exchange Hybrid Deployment, Password Writeback, Device Writeback and Directory Extension Attribute Sync. |
13- Optional features |
Because I am going to use PTA, Seamless SSO, Exchange hybrid and Password Writeback in this installation, I proceed with Customize.
4- Install required components
If none of the boxes on the Install required components screen is selected, the wizard installs everything with the default settings. In this case, a LocalDB database is installed on the server itself, a Virtual Service Account (VSA) is created for the synchronisation service and 4 local groups are created on the server. Each option on the screen changes one of these defaults.
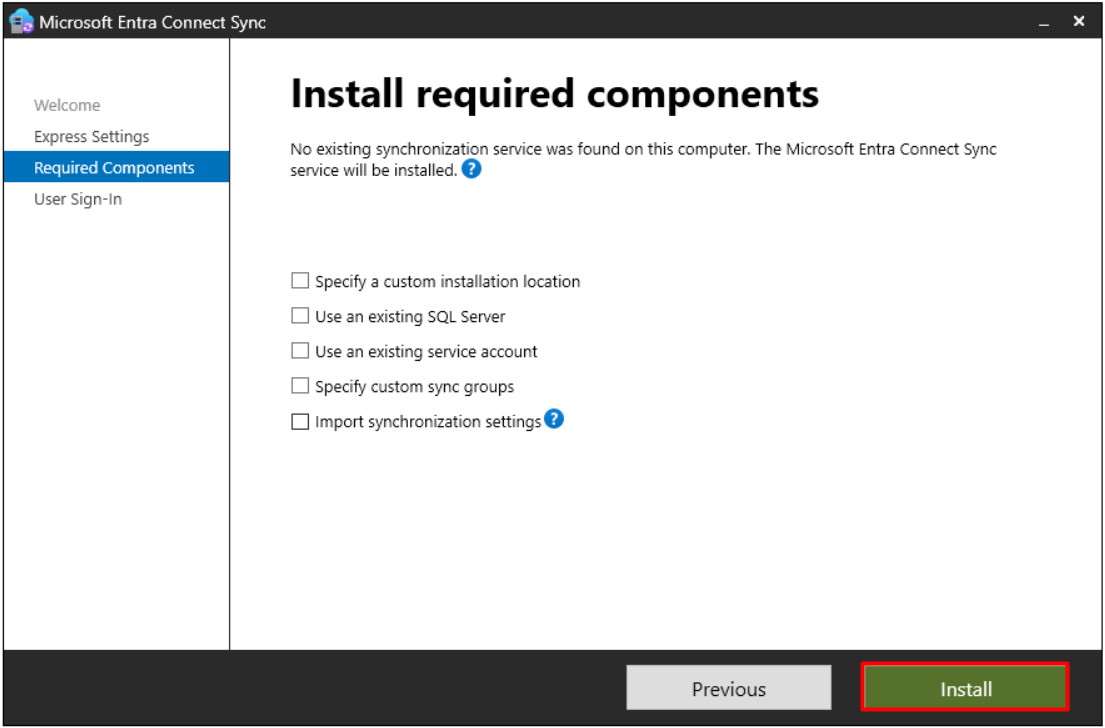
|
Option |
If Not Selected |
When It Is Selected |
|
Specify a custom installation location |
The installation is done to the default directories on the system drive. |
If space is limited on the system drive or the company standard requires a separate drive. |
|
Use an existing SQL Server |
SQL Server Express LocalDB is installed. |
If the number of objects exceeds approximately 100,000. |
|
Use an existing service account |
The ADSync service runs with a Virtual Service Account. |
If there is a remote SQL Server or a proxy that requires authentication. |
|
Specify custom sync groups |
4 local groups are created with the default names. |
If the groups were created in advance with their own names. |
|
Import synchronization settings |
The wizard continues with an empty configuration. |
If the settings of an existing server are going to be transferred to the new server. |
✅ Specify a custom installation location
If this option is not selected, the installation is done to 2 separate directories. The sync engine files are installed to the %ProgramFiles%\Microsoft Azure AD Sync directory, and the wizard and the ADSyncConfig module are installed to the %ProgramFiles%\Microsoft Azure Active Directory Connect directory. The name of the product changed, but the folder names did not. Do not look for a folder with the Entra name on the server, because the folders still have the Azure AD name.
In the default installation, the LocalDB database files are kept under the sync engine directory, so if the installation path is moved to another drive, the database is also created on that drive. This is why this option is selected in environments where space is limited on the system drive or where installing applications on a separate drive is the standard.
✅ Use an existing SQL Server
If this option is not selected, the wizard installs SQL Server Express LocalDB as the database, and Microsoft Entra Connect Sync keeps its own database on the same server. SQL Server Express has a size limit of 10 GB, and this limit is enough to manage approximately 100,000 objects. I explained the database choice and when this limit is exceeded in detail in my article Microsoft Entra Connect Installation - Part 1.
In environments where the number of objects exceeds this limit, this option is selected and an existing SQL Server instance is specified. The wizard asks for the server name, the instance name (if browsing is disabled on the instance, in the form of the instance name, a comma and the port number) and the database name. Whether the wizard creates the database or the SQL administrator must prepare it in advance depends on the SQL permissions of the account that performs the installation: with SA permissions the database is created during the installation, and with only DBO permissions the database must be prepared in advance. The restrictions that I pay attention to when an existing SQL Server is going to be used are in the table below.
|
Restriction |
Description |
|
Supported versions |
Versions up to SQL Server 2022 that run on Windows and are still in mainstream support are supported. |
|
Azure SQL Database |
Not supported. |
|
Collation |
It must be case-insensitive. |
|
Number of sync engines |
A SQL instance can have only 1 sync engine. |
In old versions, the wizard installed SQL Server 2019 Express LocalDB. From version 2.6.84.0 onwards, LocalDB is based on SQL Server 2022.
✅ Use an existing service account
The account that runs the synchronisation service (ADSync) is a Virtual Service Account by default. The VSA has no password, is managed by Windows and is designed for scenarios where the sync engine and SQL Server are on the same server. If a remote SQL Server is going to be used, Microsoft recommends a Group Managed Service Account (gMSA). If there is a proxy that requires authentication, a password-protected service account in the domain can also be used.
The ADSync service account and the AD DS Connector account are different accounts. The first runs the service on the server and can be a gMSA. The second connects to Active Directory and must be a normal user object. VSA, MSA and gMSA are not supported for this role.
✅ Specify custom sync groups
In the default installation, 4 local groups are created on the server. When this option is selected in the wizard, a box opens for each group. The groups that correspond to the boxes and their purposes are in the table below.
|
Box in the Wizard |
Group Created on the Server |
What Its Members Can Do |
|
Administrators |
ADSyncAdmins |
They have full rights in Synchronization Service Manager.
They can change the sync rules and other configurations.
The user who performs the installation is added to this group. |
|
Operators |
ADSyncOperators |
They can run the connectors and start the Import, Synchronization and Export operations manually.
They can see the synchronisation statistics of each completed operation.
They can save to a file the past synchronisation records (Run History) listed on the Operations tab. |
|
Browse |
ADSyncBrowse |
They can query the matching information of a user through WMI during a password reset. |
|
Password Reset |
ADSyncPasswordSet |
They can perform all password management operations through WMI. |
A user who is added to the ADSyncOperators or ADSyncPasswordSet group must also be added to the ADSyncBrowse group. Adding the user to only one of these 2 groups is not enough.
The option is needed only when I want to create the groups myself before the installation and use them with the names that I gave them. In this case, I type my own groups into the boxes. The installation does not create the 4 groups and uses the ones that I specified. The groups that I specify must be local groups on the server, and groups in the domain cannot be used.
✅ Import synchronization settings
This option transfers the settings of a working Microsoft Entra Connect Sync server to the newly installed server. It is used when installing a second server with the same configuration or when replacing the existing server with a new one. The imported file is a JSON file that the source server produces automatically. Each time the configuration changes, the wizard writes the settings to the %ProgramData%\AADConnect folder with the name Applied-SynchronizationPolicy-*.JSON. The last part of the file name is the date and time information.
This option cannot be used in every case, and it does not transfer every setting. The restrictions are in the table below.
|
Restriction |
Description |
|
New installation only |
The settings can be transferred only to a newly installed server. |
|
Existing database |
It cannot be selected together with the option to use an existing Microsoft Entra Connect Sync database. |
|
Wizard changes only |
Only the changes made through the wizard are written to the file automatically. Changes made with PowerShell, Synchronization Service Manager or Synchronization Rules Editor are not reflected in the file. |
|
The file is not edited manually |
Importing a JSON file that was created or edited manually is not supported. |
|
Settings that are not transferred |
Device Writeback, the synchronised object types, the selected attributes and custom run profiles are not applied by the import. These are configured manually on the new server after the installation. |
|
Custom sync rules |
To avoid conflicts, the precedence value of custom rules must be between 0 and 99. |
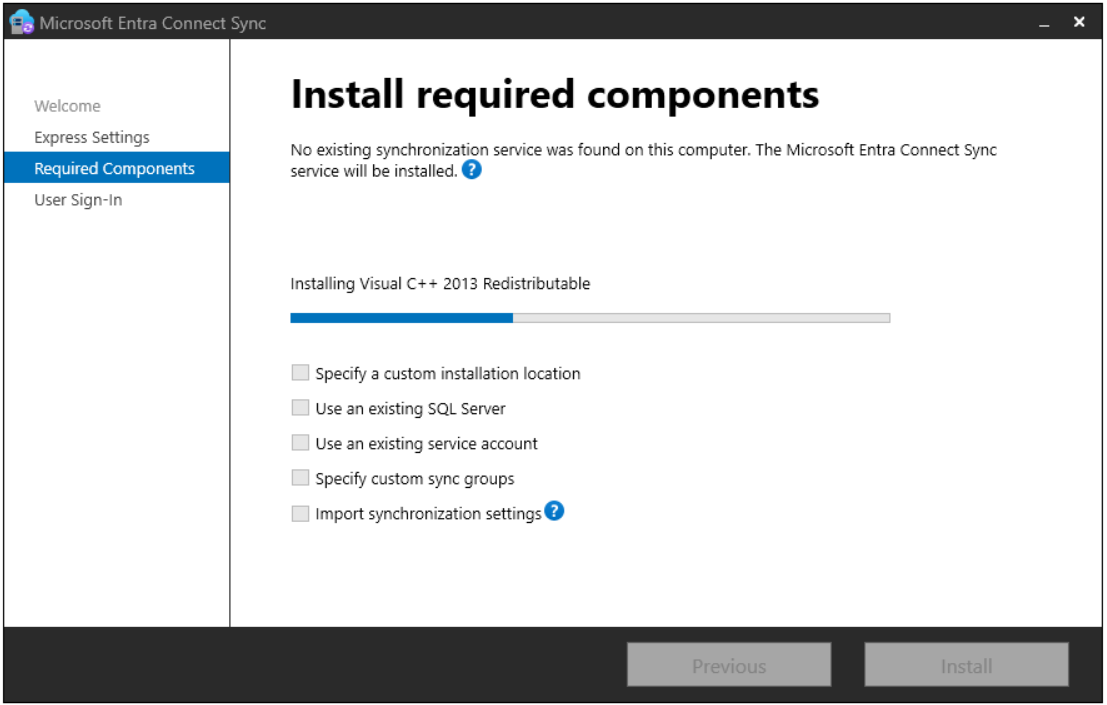
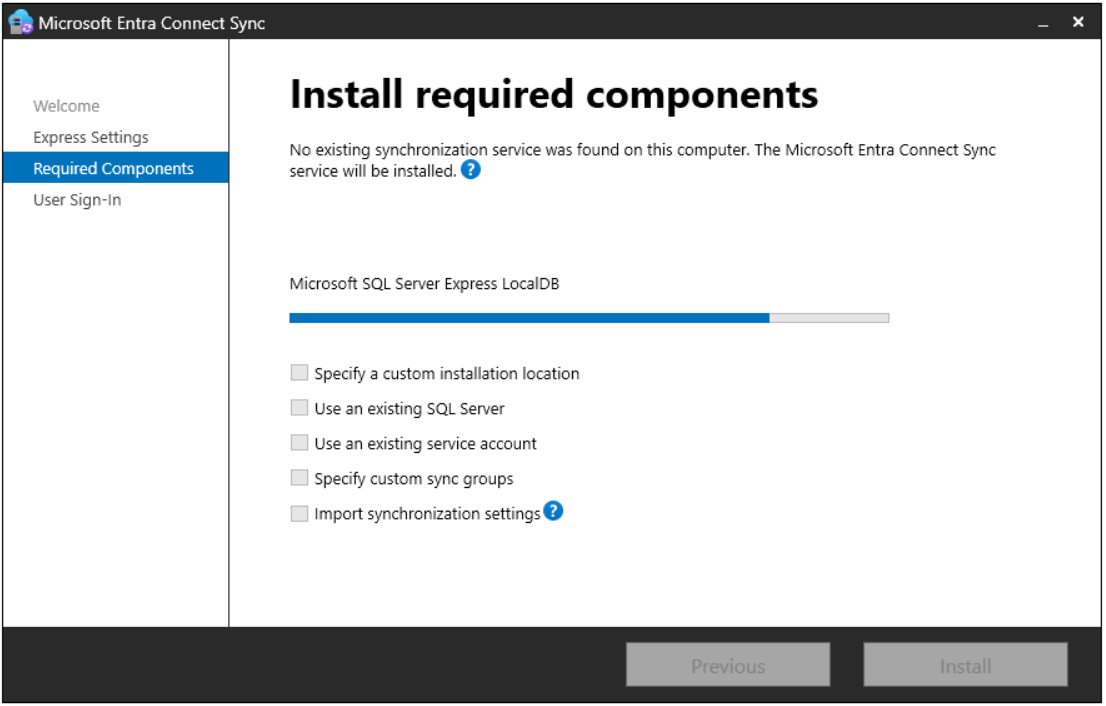
If there is no remote SQL Server, custom service account or configuration to import, it is enough to continue without selecting any box. I also press the Install button without selecting any option.
5- User sign-in
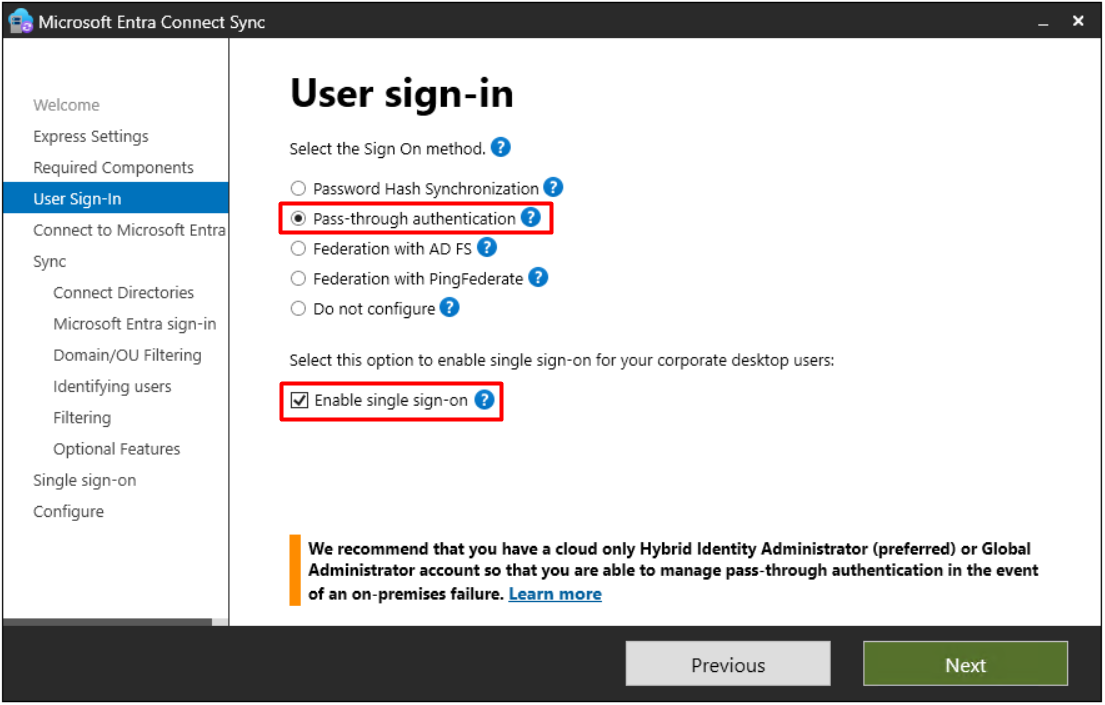
On the User sign-in screen, I select how users sign in to Microsoft Entra ID. The choice determines where the password is validated: in the cloud, in on-premises Active Directory or in a federation service. Here I focus on what each option means for the installation.
✅ Password Hash Synchronization (PHS)
Password Hash Synchronization allows users to sign in to the cloud with their on-premises passwords. Microsoft Entra Connect Sync reads the password hashes in Active Directory from the domain controller, hashes each hash again to produce a derivative and sends this derivative to Microsoft Entra ID over an encrypted connection. The plain-text password and the original hash in Active Directory are not sent to Entra ID at any stage.
When the user signs in, the password that the user types goes through the same process on the Entra ID side and is compared with the stored derivative. If the 2 match, the user is signed in. For this reason, there is no need to ask Active Directory for validation.
PHS appears on 2 separate screens in the wizard and has a different role on each one. If I select PHS on the User sign-in screen, the primary sign-in method becomes PHS. If I select PTA or federation on this screen, that becomes the primary method, and I can still turn on PHS as an additional feature on the Optional features screen. PTA has no such second use and can only be the primary method. The difference between the 2 uses is in the table below.
|
Topic |
When PHS Is the Primary Method |
When PHS Is an Additional Feature (Primary Method Is PTA) |
|
Screen where it is selected |
User sign-in |
Optional features |
|
Who validates the password |
Entra ID validates it with the hash that it holds. Active Directory is not asked. |
Active Directory validates it. PHS only keeps the hashes ready in Entra ID and does not take part in the validation. |
|
Authentication Agent |
Not installed. |
Installed for PTA. |
|
If the on-premises environment becomes unreachable |
Users continue to sign in. |
Users cannot sign in. The method must be switched to PHS manually. |
|
Account state changes |
A disabled account can access the cloud until this state is synchronised. Password expiry and account lockout are not synchronised. |
They apply at the next sign-in attempt, because the validation is done in Active Directory. |
2 properties apply regardless of the screen from which PHS is turned on.
The synchronisation frequency is fixed. Password hashes are synchronised every 2 minutes, and this frequency cannot be changed.
The leaked credentials report requires PHS. The Users with leaked credentials report of Microsoft Entra ID Protection requires PHS to be enabled. For this reason, Microsoft recommends enabling PHS as well, even when PTA or federation is used.
✅ Pass-through Authentication (PTA)
Pass-through Authentication allows users to sign in to the cloud with their on-premises passwords, but it does not validate the password in the cloud. The user types the password on the Entra ID sign-in page. Entra ID encrypts the password and forwards the validation request to the Authentication Agent that runs in the on-premises environment.
The Authentication Agent receives the request over the outbound connection that it established itself, decrypts the password and has Active Directory validate it. The response from the domain controller returns to Entra ID over the same path. If the response is positive, the user is signed in. For this reason, the password hash does not need to be stored in the cloud. The results of selecting PTA for the installation are as follows.
On-premises rules are applied immediately. If the account is disabled, locked out, has an expired password or the user tries to sign in outside the permitted Logon Hours, access is denied.
Validation depends on the on-premises environment. Because every request is sent to Active Directory, users cannot sign in when the on-premises environment or the Authentication Agents are unreachable.
No inbound connection is required. The agent uses only ports 443 and 80 in the outbound direction.
More than 1 agent is required. The first Authentication Agent is installed on the Microsoft Entra Connect Sync server itself. Microsoft recommends running at least 3 Authentication Agents in production environments.
The password hash is not sent to the cloud. This is true only when PTA is used alone. Because I am also going to turn on PHS on the Optional features screen, the hash derivative is synchronised to Entra ID in my installation.
PHS is not an automatic backup for PTA. When the PTA infrastructure is unreachable, Entra ID does not switch to PHS automatically. The switch is made by changing the sign-in method manually in the Change user sign-in task in the wizard. Servers that run an Authentication Agent must be treated as Tier 0 systems.
✅ Federation with AD FS
With this option, authentication is not done in Microsoft Entra ID but in the Active Directory Federation Services (AD FS) infrastructure in the on-premises environment. When the user wants to sign in, Entra ID redirects the user to AD FS. The validation takes place in AD FS, and AD FS issues a token. Entra ID trusts this token and signs the user in. The results of selecting AD FS for the installation are as follows.
Additional servers and a certificate are required. To configure AD FS with the wizard, the Federation and Web Application Proxy servers need Windows Server 2012 R2 or a later operating system, and a TLS/SSL certificate is needed for the federation service name.
Validation depends on the on-premises environment. When AD FS is unreachable, users cannot sign in.
PHS can be turned on as a backup. PHS can be enabled separately as an additional feature on the Optional features screen. In this way, a backup is ready to be put into use when there is an outage in the federation service.
The Microsoft recommendation is PHS. Microsoft recommends the default PHS option for most organisations that want users to sign in to Microsoft 365 and Entra ID based resources.
The migration can be tested gradually. The migration from federation to cloud authentication can be tested first on selected user groups with the Staged Rollout feature.
✅ Federation with PingFederate
The logic of this option is the same as AD FS. Authentication is again not done in Microsoft Entra ID but on a federation server in the on-premises environment. The only difference is that PingFederate is used as the federation server instead of AD FS. The results of selecting PingFederate for the installation are as follows.
A version and a certificate are required. Configuration with the wizard requires PingFederate 8.4 or a later version and a TLS/SSL certificate for the federation service name.
The settings are sent to the PingFederate administrator. The wizard exports the federation settings. The PingFederate administrator applies these settings to the PingFederate server.
The wizard verifies the server. The wizard verifies the metadata of the PingFederate server.
✅ Do not configure
With this option, the wizard does not install or configure any sign-in method. Only directory synchronisation is done, which means that users and groups are transferred to Entra ID but the wizard does not handle how users sign in. It is preferred if the environment already has a third-party federation server or another solution that handles sign-in. If a method needs to be added later, the wizard is run again and the Change user sign-in task is used.
✅ Enable single sign-on
This box turns on the Seamless SSO feature. Seamless SSO allows a user who signed in to Windows on a domain-joined device in the corporate network to access Entra ID based services without typing the password again. The points to know about this option are as follows.
It works together with PHS or PTA. It is not a sign-in method by itself and is turned on next to the primary method. It does not apply to AD FS, because AD FS already provides the same experience.
It creates an account in Active Directory. A computer account named AZUREADSSOACC is created in each AD forest that is synchronised to Entra ID, and the Kerberos decryption key of this account is shared with Entra ID. If there is more than 1 forest, each account has its own key.
It is not used on Entra joined and hybrid joined devices. Seamless SSO requires the device to be domain-joined, but on Microsoft Entra joined and Microsoft Entra hybrid joined devices, SSO works through the Primary Refresh Token (PRT). I explained how the hybrid join registration proceeds in the background in my article on the hybrid join and SCP registration process.
The recommended method changes with the operating system. Microsoft recommends PRT-based SSO for Windows 10, Windows Server 2016 and later, and Seamless SSO for Windows 7 and Windows 8.1. If both are turned on, PRT-based SSO takes priority.
The client side is configured separately. The wizard sets up only the server side. For browsers to send the Kerberos ticket to Entra ID, an intranet zone setting deployed with Group Policy is required. I explain this task in the post-installation list in step 19.
I explained in detail how the hash is derived in PHS, how the Authentication Agent receives the request in PTA and how Seamless SSO works with Kerberos in my article Microsoft Entra ID Seamless SSO, the Difference Between PHS and PTA, and Kerberos.
Because I want authentication to be done in Active Directory in this installation, I select the Pass-through Authentication and Enable single sign-on options. I am going to turn on PHS as an additional feature on the Optional features screen in step 13. In this way, the hashes are ready in the cloud when I need to switch the method to PHS manually, and the leaked credentials report works.
6- Connect to Microsoft Entra ID
In the Connect to Microsoft Entra ID step, the wizard asks me to sign in with an authorised account to connect to the tenant.
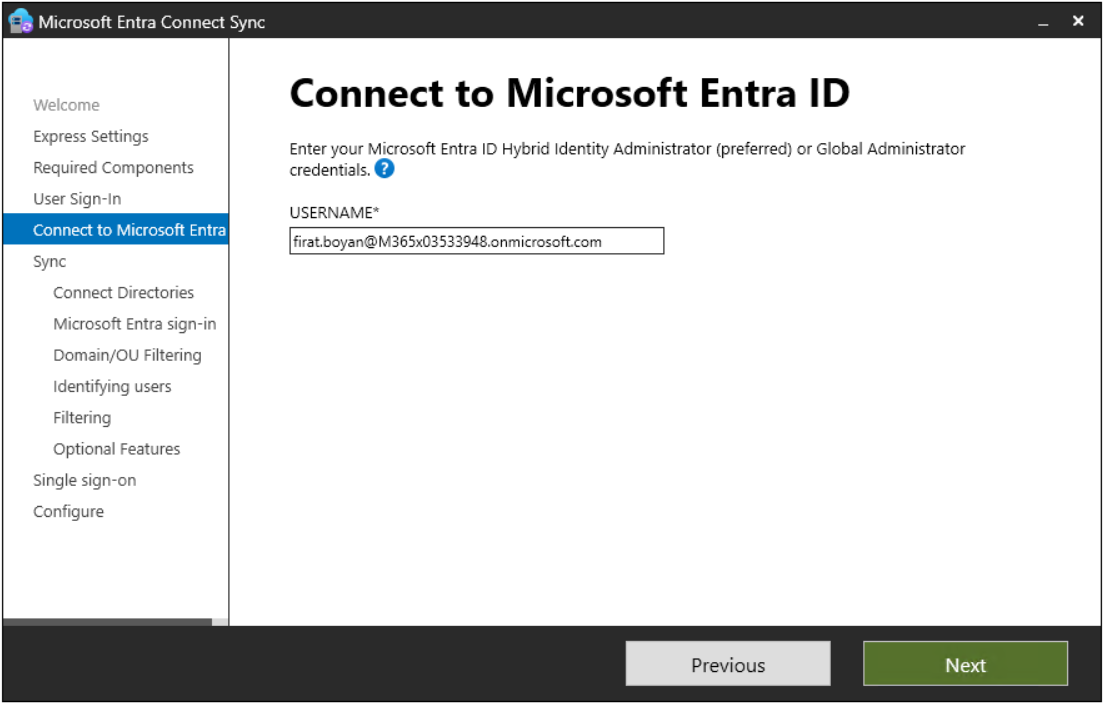
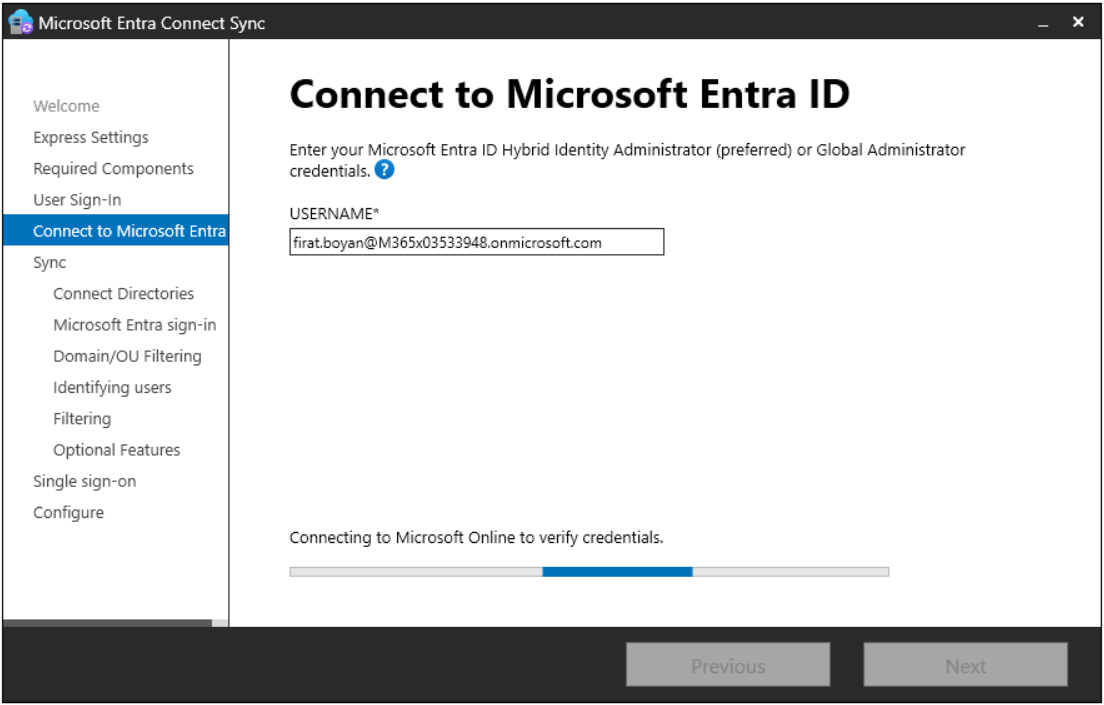
The images above belong to an old version. From version 2.6.91.0 onwards, the wizard opens the Windows Web Account Manager window, which supports passkeys, FIDO2 security keys and passwords. If MFA is enabled on the account, the verification is completed in this window.
Which Account Should Be Used?
The account must have the Global Administrator or Hybrid Identity Administrator role in the tenant. The conditions that I pay attention to when selecting the account are in the table below. As the account that meets these conditions, I sign in with a cloud-only administrator account in the onmicrosoft.com domain of the tenant.
|
Condition |
Description |
|
Role assignment |
The role must be assigned directly to the user. A role given through group membership is not accepted. |
|
Account type |
The account must be a work or school account. A personal Microsoft account cannot be used. |
|
Source of the account |
Microsoft recommends not using accounts synchronised from on-premises for role assignments. A cloud-only administrator account is preferred. |
|
Federation |
If AD FS or PingFederate is going to be configured, the account must either be a Global Administrator or have the Hybrid Identity Administrator and Domain Name Administrator roles together. |
|
After the installation |
The Hybrid Identity Administrator role is not required after the initial installation. |
If Microsoft Entra Connect Health is going to be used for synchronisation, the installation must be done with a Global Administrator account. In an installation with Hybrid Identity Administrator, the Health agent is installed but remains disabled.
7- Connect your directories
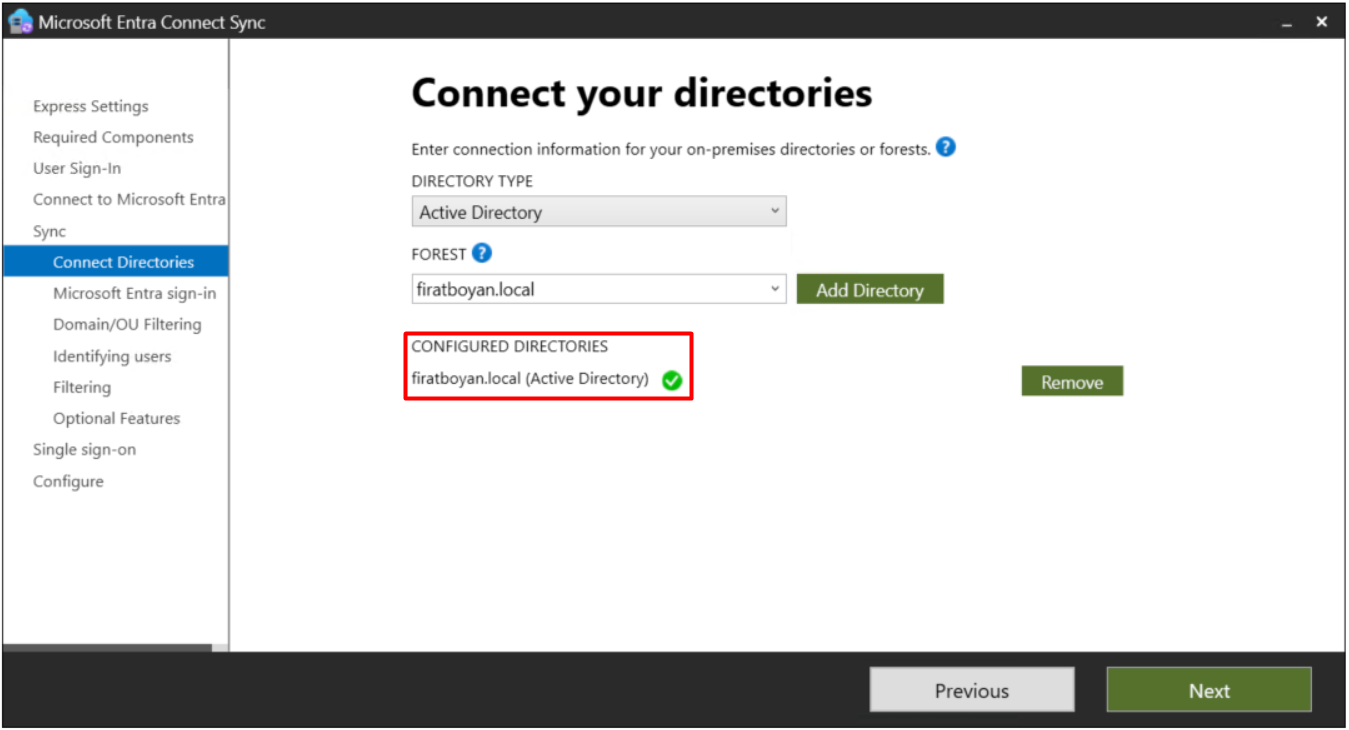
In the Connect your directories step, I add the on-premises directory. Active Directory is selected as the Directory Type, and the Forest field shows firatboyan.local. If more than 1 forest is going to be synchronised, each one is added separately from this screen. I press the Add Directory button.
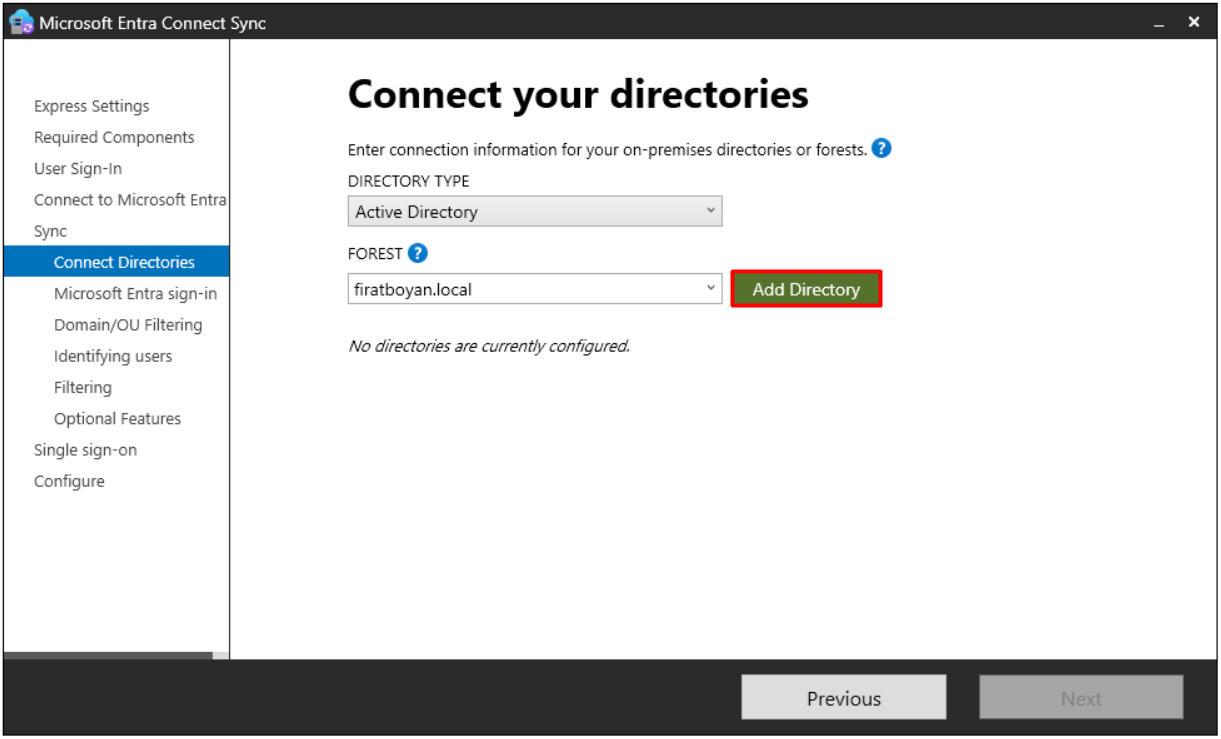
If an error occurs in this step, it is necessary to check first that the forest name resolves correctly and that the server can reach the domain controllers over the network.
8- AD forest account
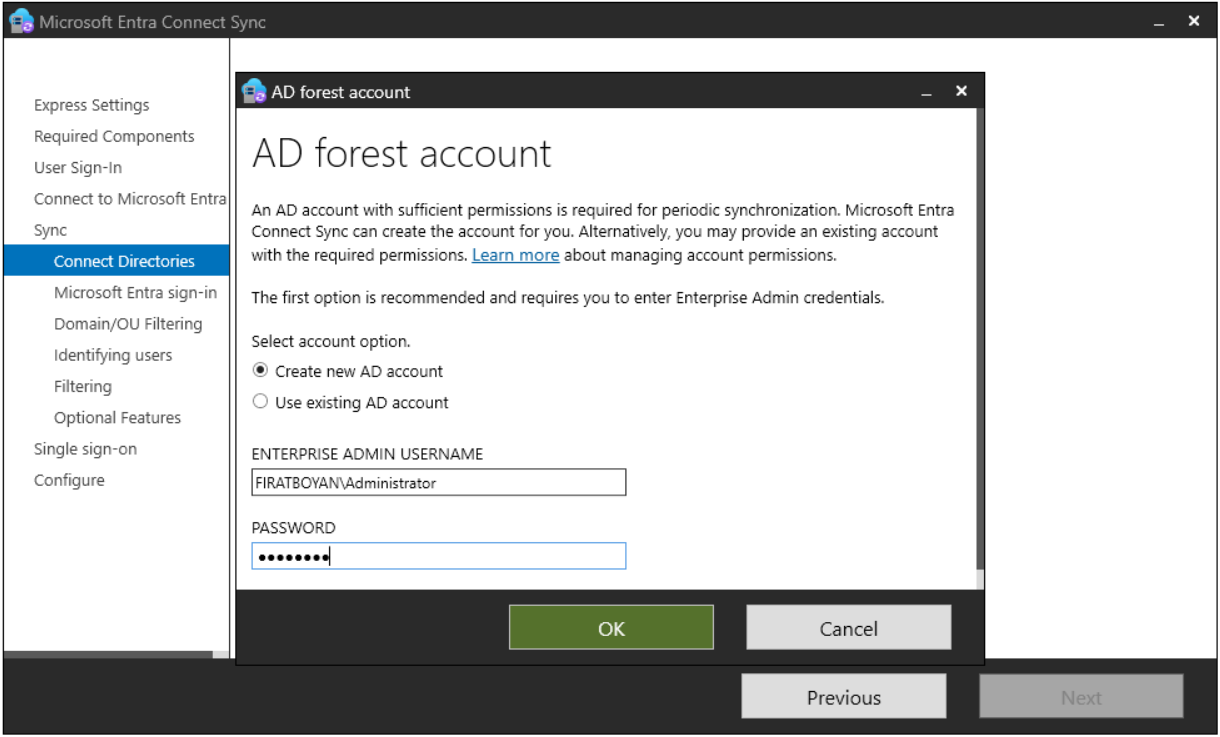
In the AD forest account window that opens after Add Directory, I specify the account that connects to Active Directory during synchronisation. Microsoft calls this account the AD DS Connector account. There are 2 options: Create new AD account and Use existing AD account.
1️⃣ Create new AD account
With this option, I enter the user name and password of an Enterprise Admin account. The wizard uses this account to create an account starting with MSOL_ in Active Directory and assigns the permissions required for synchronisation to this account itself. The Enterprise Admin account is used only to create the account, and the Connector account that is created performs the synchronisation. With this option, there is no need to grant the permissions manually.
2️⃣ Use existing AD account
With this option, I specify an account that I prepared in advance. The account can be a normal user account, because the default read permissions are enough for basic synchronisation. However, each feature that is turned on requires additional permissions, and with this option preparing the permissions is my responsibility.
There are 2 restrictions. The first is the privilege level: from version 1.4.18.0 onwards, the wizard rejects an Enterprise Admin or Domain Admin account as the Connector account and requires either that it creates the account itself or that a synchronisation account with the correct permissions is specified. The second is the account type: the Connector account must be created in Active Directory as a normal user object before the installation. VSA, MSA and gMSA are not supported.
I proceed with this option. The preparation consists of 5 sub-steps: creating the account, granting the read and PHS permissions, granting the write permissions, verifying the permissions and entering the account in the wizard.
8.1- Creating the Connector Account
Because there is no Connector account ready in my environment, I create a user account named Entra ID Sync Admin.
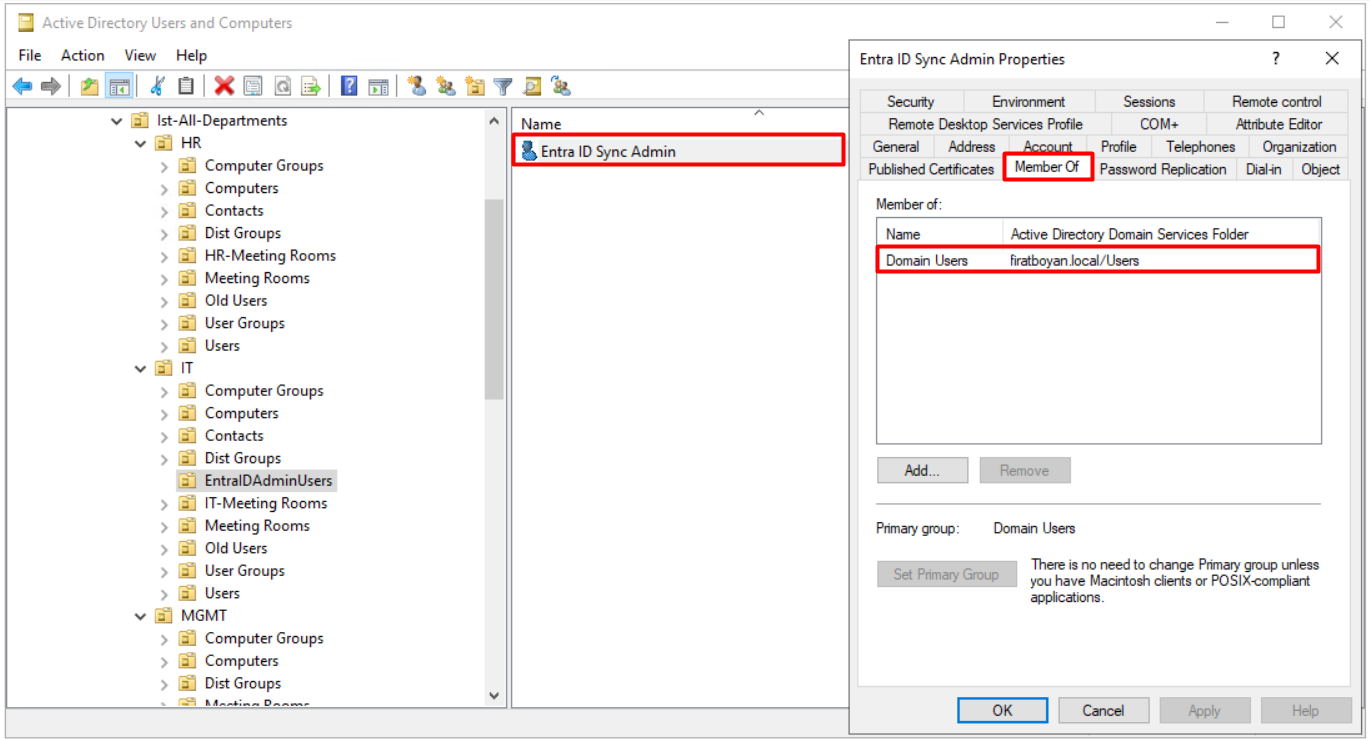
8.2- Read and Password Hash Synchronization Permissions
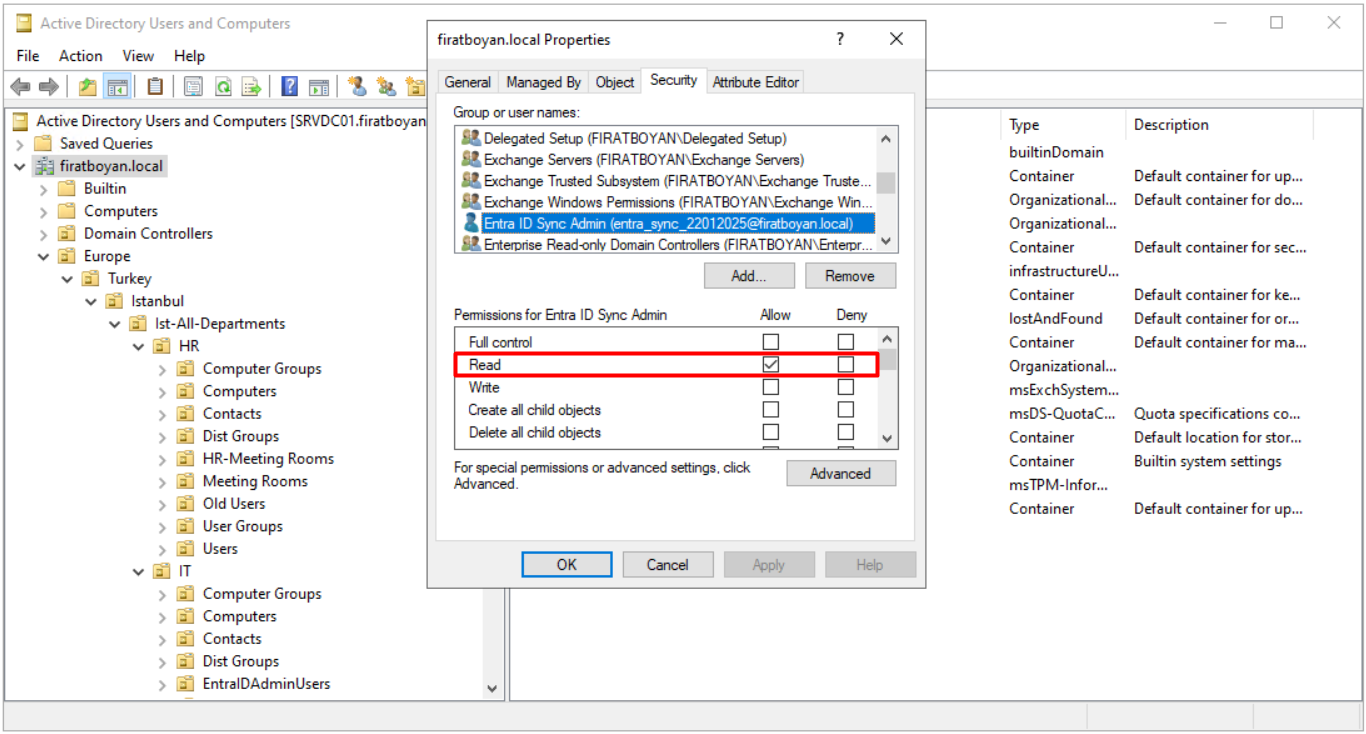
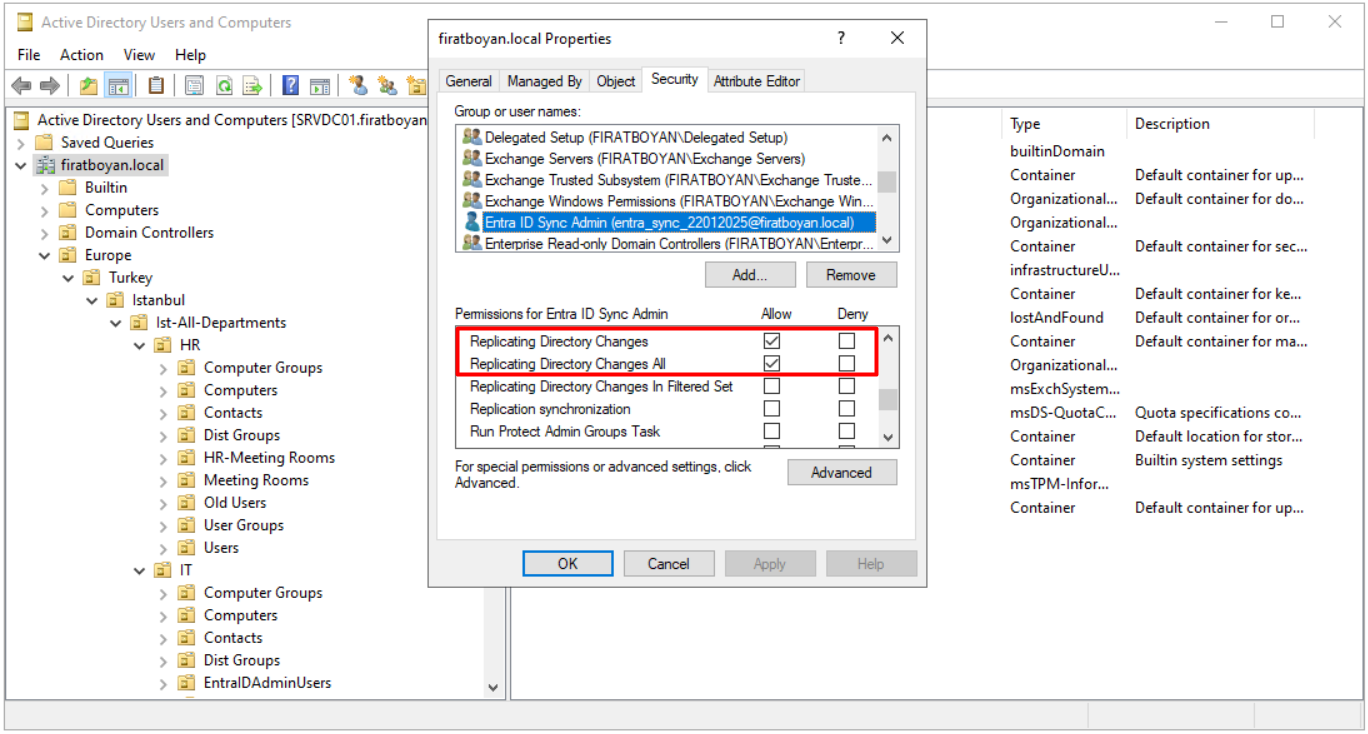
On the Security tab of the Properties window at the domain level, I grant this account the Read, Replicating Directory Changes and Replicating Directory Changes All permissions.
|
Permission |
What It Gives the Account |
Read |
The account sees the User, Group and Contact objects in Active Directory and reads their attribute values. It cannot change any value. |
Replicating Directory Changes |
The account learns from the domain controller which objects changed since the last read. In this way, it retrieves only the changed objects in each synchronisation instead of scanning all objects from the beginning. |
Replicating Directory Changes All |
The account also retrieves the password hashes that cannot be seen with the normal read permission. Password Hash Synchronization requires the 2 Replicating permissions together. |
The same 3 permissions can also be granted without the GUI, with 2 commands in the ADSyncConfig module that I introduce in step 8.3. Set-ADSyncBasicReadPermissions grants the Read and Replicating Directory Changes permissions required for basic read, and Set-ADSyncPasswordHashSyncPermissions grants the Replicating Directory Changes and Replicating Directory Changes All permissions. The Replicating Directory Changes permission is common to both commands, because each command is designed to grant all the permissions required for its own feature without the other. Anyone who prefers not to grant them manually from the GUI can run the 2 commands below after loading the module.
Set-ADSyncBasicReadPermissions -ADConnectorAccountName "HESAP_ADI" -ADConnectorAccountDomain "firatboyan.local"

Set-ADSyncPasswordHashSyncPermissions -ADConnectorAccountName "HESAP_ADI" -ADConnectorAccountDomain "firatboyan.local"
8.3- Write Permissions with the ADSyncConfig Module
The permissions that I granted up to this point are enough for the account to read Active Directory and retrieve the password hashes, but none of them gives the right to change the attribute values of User, Group and Contact objects. However, 3 choices that I make in the later steps of the installation require write permission. The table below shows which choice requires write permission and why.
|
Choice |
Why It Requires Write Permission |
Step |
|
mS-DS-ConsistencyGuid as the source anchor |
The value of this attribute is written to the user account. |
11- Uniquely identifying your users |
|
Exchange Hybrid Deployment |
Exchange attributes are written to user, group and contact objects. |
13- Optional features |
|
Password Writeback |
A password that is reset in the cloud is written to the user account in Active Directory. |
13- Optional features |
Instead of granting these permissions manually one by one, I use the ADSyncConfig PowerShell module from Microsoft. The module was introduced with build 1.1.880.0 and is in the AdSyncConfig.psm1 file in the installation directory. The module works like a toolbox: Import-Module opens the box, and the Set-ADSync commands inside the box grant the permission. Because the module requires the Active Directory PowerShell tools, I first install the RSAT-AD-Tools feature. The block below does not assign permissions to the account. It is the prerequisite for the commands in the rest of this step.
Install-WindowsFeature RSAT-AD-Tools

Import-Module "C:\Program Files\Microsoft Azure Active Directory Connect\AdSyncConfig\AdSyncConfig.psm1"

Get-Command -Module AdSyncConfig
The table below shows which permission each of the 5 permission commands in the module assigns on which object.
|
Feature |
Cmdlet |
Permission Assigned |
|
Basic read |
Set-ADSyncBasicReadPermissions |
Read all properties on descendant Device, InetOrgPerson, Computer, foreignSecurityPrincipal, Group, User and Contact objects; Replicating Directory Changes on the domain root |
|
Password Hash Synchronization |
Set-ADSyncPasswordHashSyncPermissions |
Replicating Directory Changes and Replicating Directory Changes All on the domain root |
|
mS-DS-ConsistencyGuid (source anchor) |
Set-ADSyncMsDsConsistencyGuidPermissions |
Read/Write property for mS-DS-ConsistencyGuid on descendant User objects |
|
Password Writeback |
Set-ADSyncPasswordWritebackPermissions |
Reset Password, and Write property for lockoutTime and pwdLastSet, on descendant User objects |
|
Exchange Hybrid Deployment |
Set-ADSyncExchangeHybridPermissions |
Read/Write all properties on descendant User, InetOrgPerson, Group and Contact objects |
Because I covered the first 2 commands in the table with the GUI in step 8.2, I run the remaining 3 commands. I replace the HESAP_ADI expression in the commands with the name of the Connector account, and firatboyan.local is the AD domain where the account is located. By default, the cmdlets assign permissions from the domain root downwards. To limit the scope to a specific OU, the form with the -ADConnectorAccountDN and -ADobjectDN parameters is used.
Set-ADSyncMsDsConsistencyGuidPermissions -ADConnectorAccountName "HESAP_ADI" -ADConnectorAccountDomain "firatboyan.local"

Set-ADSyncPasswordWritebackPermissions -ADConnectorAccountName "HESAP_ADI" -ADConnectorAccountDomain "firatboyan.local"

Set-ADSyncExchangeHybridPermissions -ADConnectorAccountName "HESAP_ADI" -ADConnectorAccountDomain "firatboyan.local"
The Set-ADSyncPasswordWritebackPermissions command grants the Reset Password, lockoutTime and pwdLastSet permissions. The Unexpire Password permission that Password Writeback also requires is not in the list of this command. If it is not defined on the domain root, it is granted manually. The details are in step 13.
8.4- Verifying the Permissions
The same module has 2 more commands to check the permissions. Get-ADSyncADConnectorAccount shows which account is used as the Connector account, and Show-ADSyncADObjectPermissions lists all the permissions defined on the domain for all accounts. The 2 commands work independently of each other. I use the account name that I learn from the first command to find the rows that belong to the Connector account in the output of the second command.
Get-ADSyncADConnectorAccount

Show-ADSyncADObjectPermissions -ADobjectDN "DC=firatboyan,DC=local"
The module also has the Set-ADSyncRestrictedPermissions command. This command disables inheritance on the Connector account object and restricts the permissions. After the command runs, only the administrator groups can change the account object.
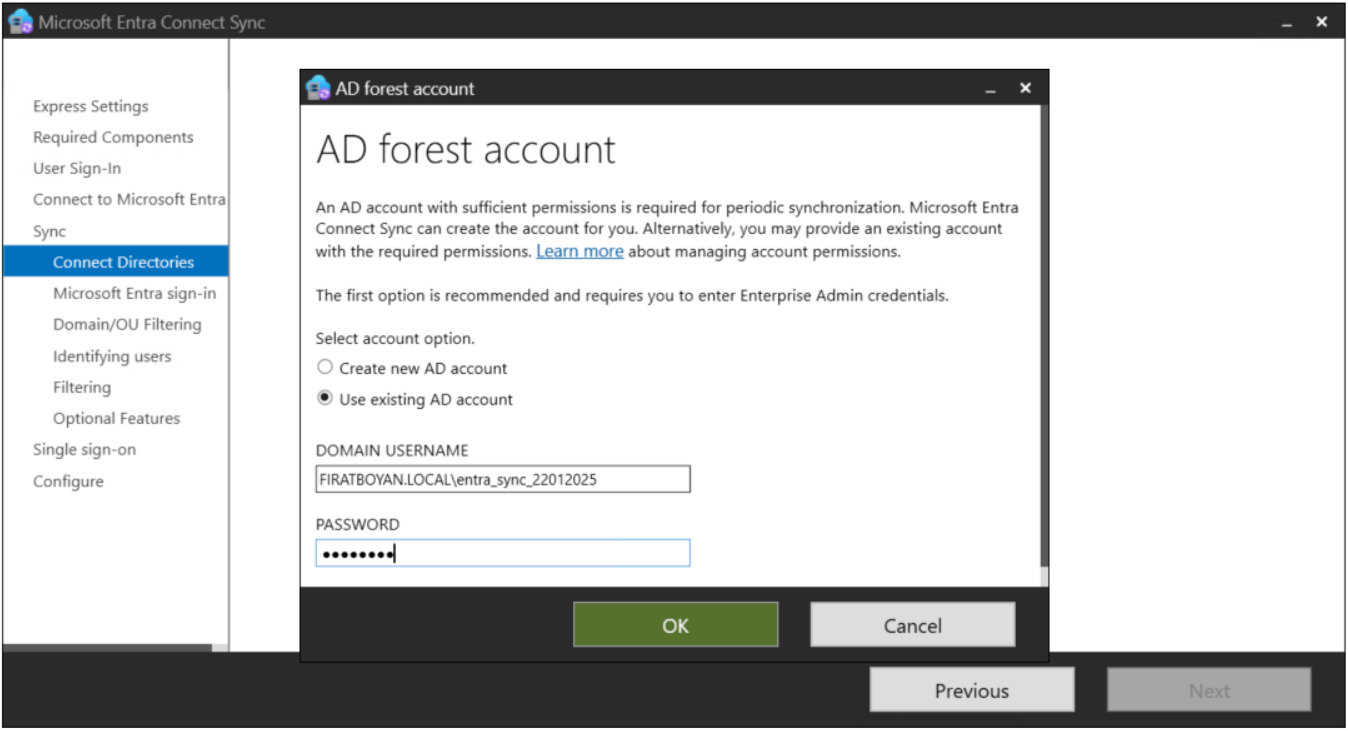
8.5- Entering the Account in the Wizard
Now that the permissions are ready, I select the Use existing AD account option, enter the details of the account that I created and complete the process of adding the directory.
9- Microsoft Entra sign-in configuration
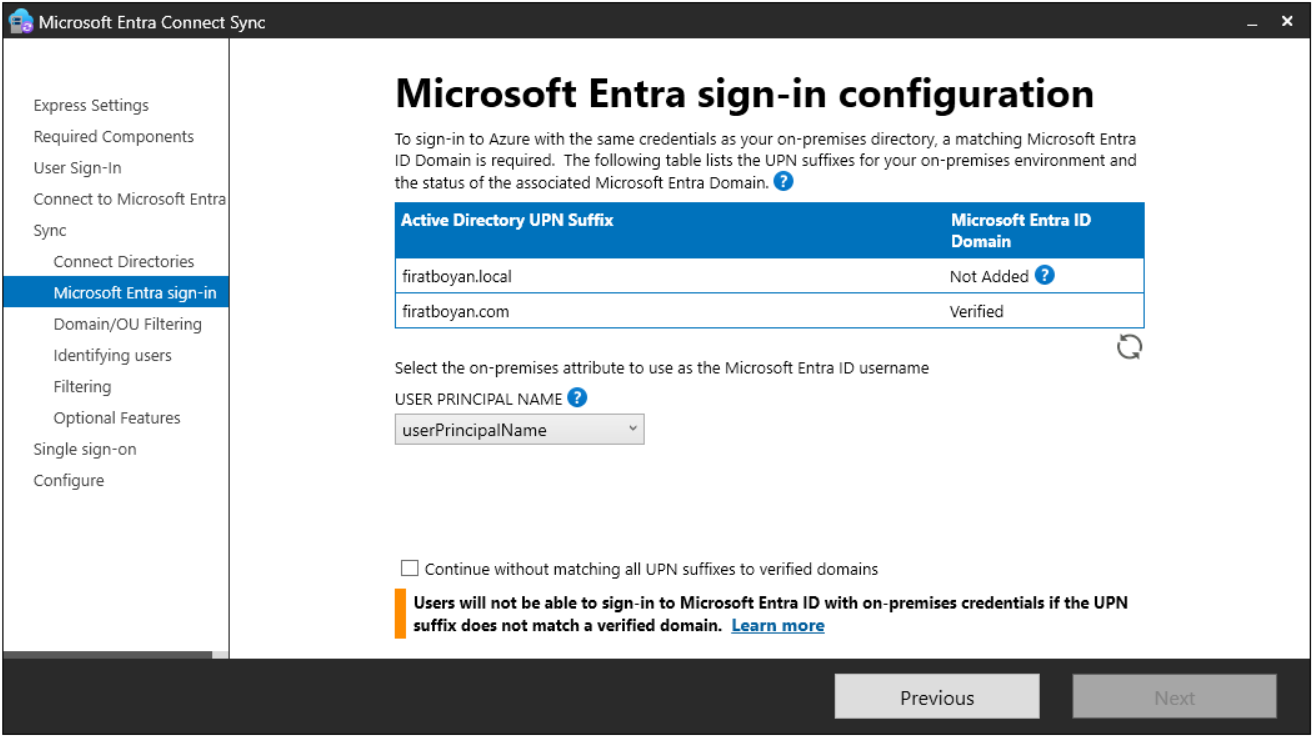
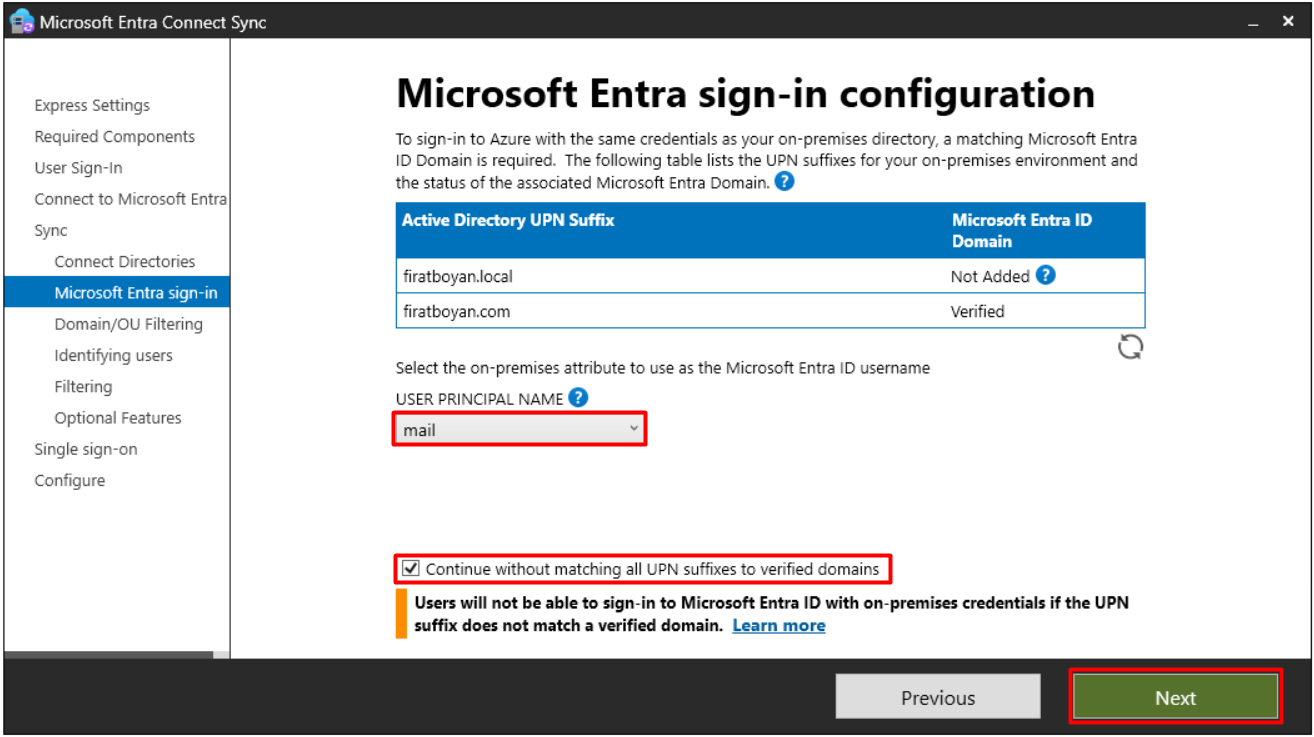
In the Microsoft Entra sign-in configuration step, the wizard lists the UPN suffixes in Active Directory and shows whether they match a domain that is verified in Entra ID. On the same screen, I select the attribute that is used as the sign-in name in the cloud. The UPN suffix does not determine the authentication method. It determines the name that the user types when signing in.
There are 2 UPN suffixes in my environment: firatboyan.local and firatboyan.com. Only firatboyan.com is verified in Entra ID. A non-routable domain such as firatboyan.local cannot be verified in Entra ID.
Continue without matching all UPN suffixes to verified domains
If the list contains a suffix in the Not Added or Not Verified state, the wizard requires this box to be selected in order to continue. The box does not allow users with an unverified suffix to sign in with their own UPNs. It allows the installation to proceed.
The behaviour that is independent of the box is this: if the UPN suffix of a user does not match a domain that is verified in Entra ID, Entra ID replaces this suffix with the default onmicrosoft.com domain of the tenant. This means that the object is created in the cloud, but the sign-in name is not the address that the user expects. If the selected method is PTA, there is 1 more condition: at least 1 verified domain must exist to continue the installation.
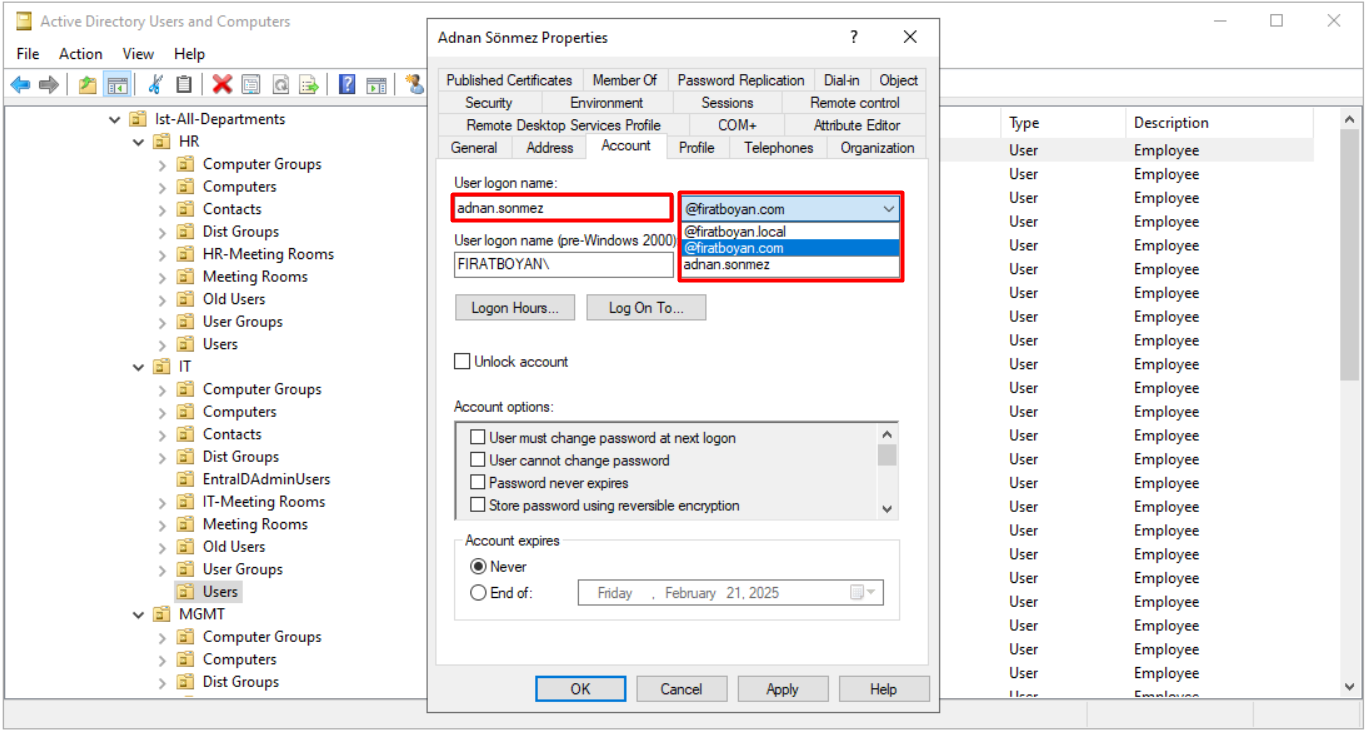
The permanent solution is to update the UPN value of the users with the @firatboyan.local suffix to the verified @firatboyan.com suffix. The new suffix must first be defined as a UPN suffix in the Active Directory Domains and Trusts console. For the bulk change, I use the method in my article on changing the UPN of Active Directory users with PowerShell.
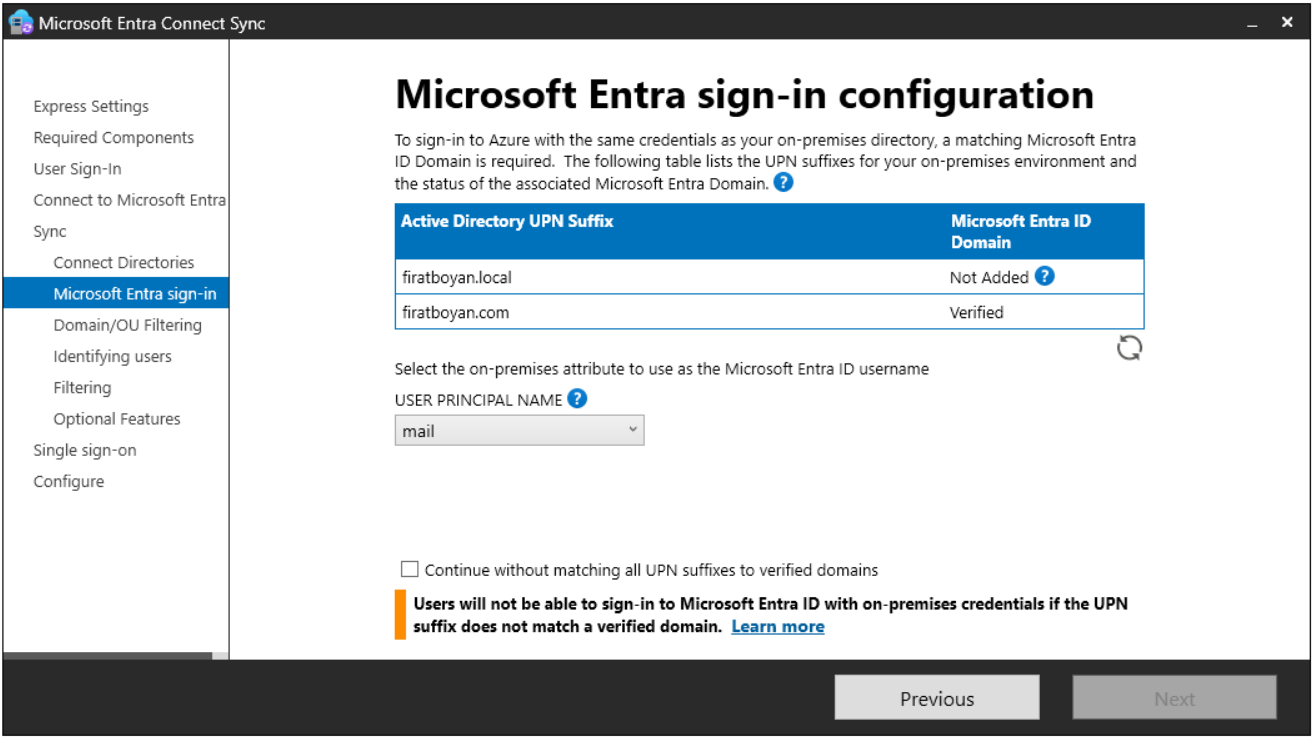
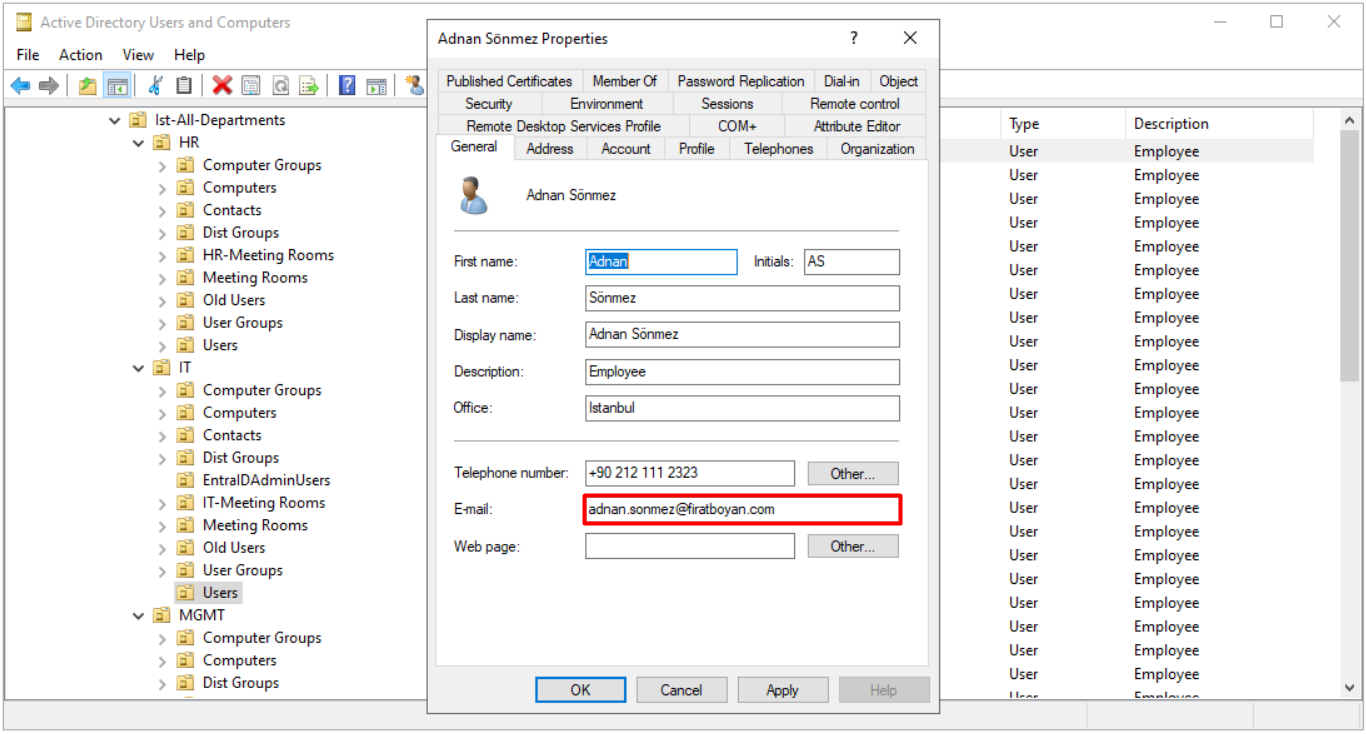
Selecting mail Instead of userPrincipalName: Alternate ID
In the User Principal Name list on the screen, the default attribute is userPrincipalName, and Microsoft recommends keeping this default. If userPrincipalName has a non-routable suffix and cannot be verified, another attribute such as mail can be selected. Using an attribute other than userPrincipalName is called Alternate ID. This choice does not change how synchronisation works. It determines the attribute from which the cloud sign-in name of the user is taken. The restrictions to know before using Alternate ID are in the table below.
|
Restriction |
Description |
|
Format |
The attribute value must comply with the RFC 822 format, and the domain part must be verified in Entra ID. |
|
Attribute type |
The attribute cannot be defined as multivalued in Active Directory. |
|
Sign-in method |
Alternate ID can be used with PHS, PTA and federation. |
|
Workload compatibility |
Alternate ID is not compatible with all Microsoft 365 workloads. The method that Microsoft recommends is to make the UPN value the same as the primary SMTP address of the user. |
|
Permanence |
The attribute selection on this screen cannot be changed from the wizard after the installation. |
To see the users whose mail attribute is empty, I use the PowerShell command below.
Get-ADUser -Filter * -Properties mail | Where-Object { -not $_.mail } | Select-Object SamAccountName, UserPrincipalName
In production: The UPNs are corrected and the default userPrincipalName is used.
In this lab: To show the Alternate ID behaviour, I select the mail attribute and continue.
10- Domain and OU filtering
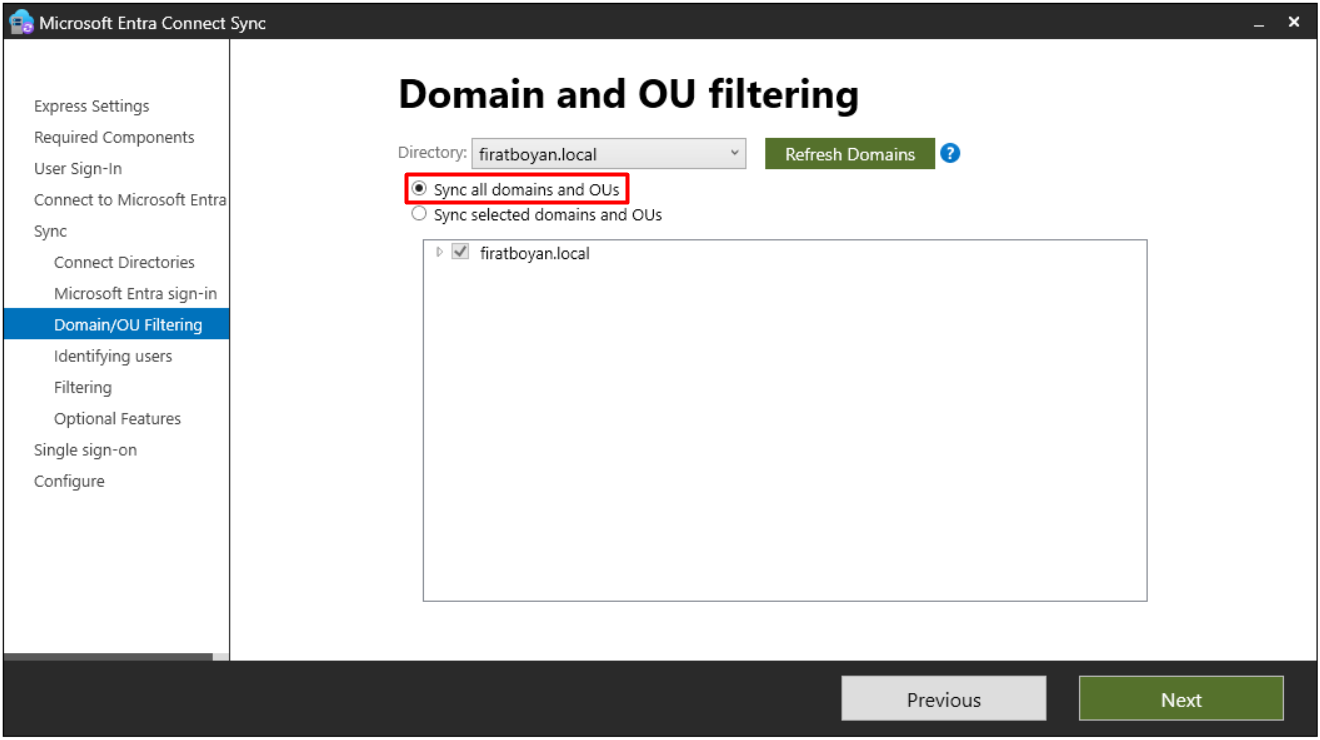
In the Domain and OU filtering step, I define which domains and OUs are synchronised.
10.1- The default option is Sync all domains and OUs. In this case, all domains and OUs are in the synchronisation scope.
10.2- With the Sync selected domains and OUs option, only the OUs that I select are synchronised. I use this option to keep out of scope the OUs that contain service accounts or objects that must not be synchronised.
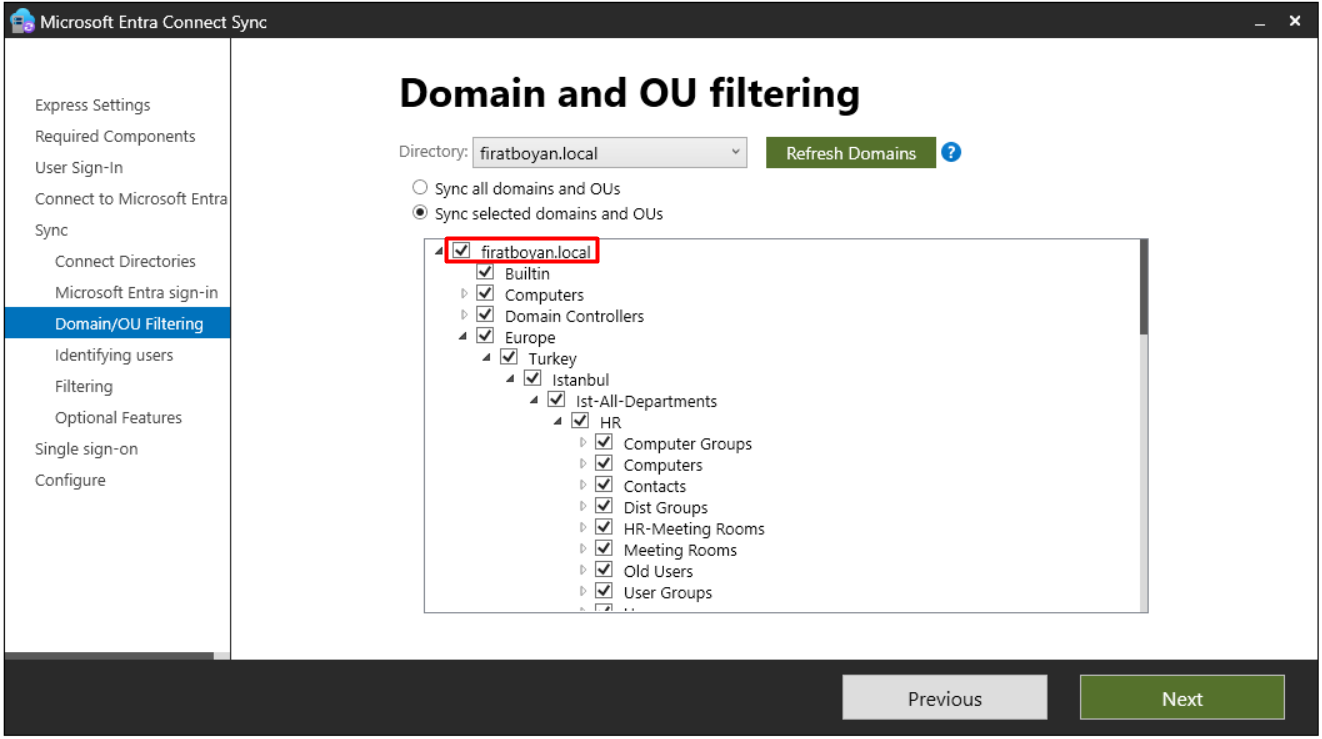
10.3- First, I clear the check box at the firatboyan.local level to remove all selections, and then I select only the OUs that I want to synchronise.
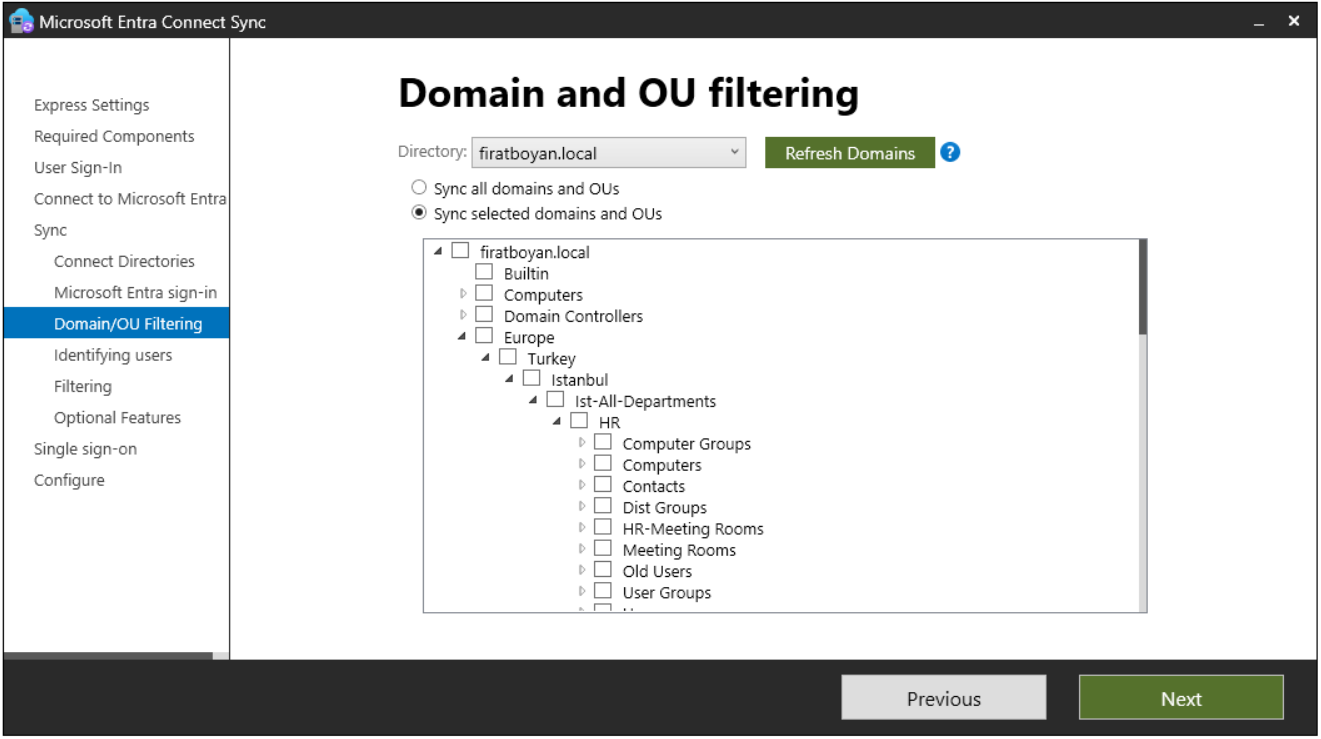
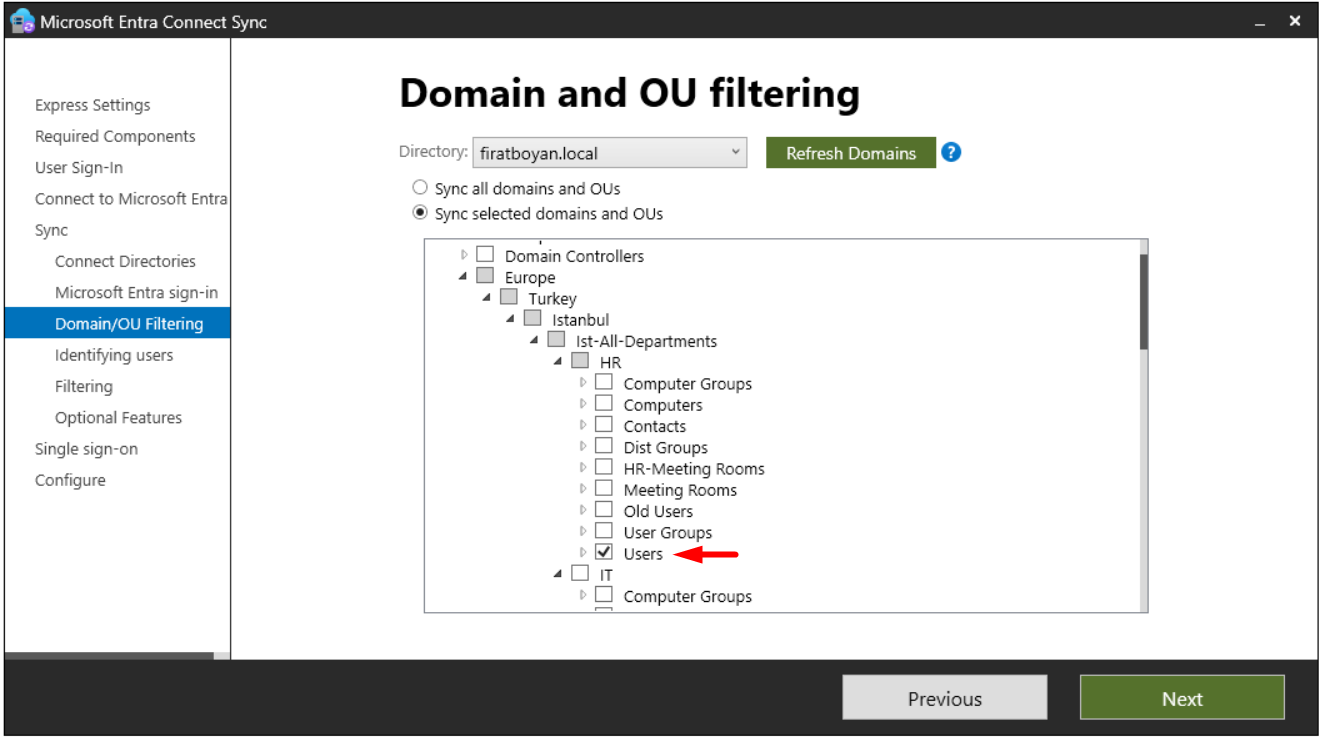
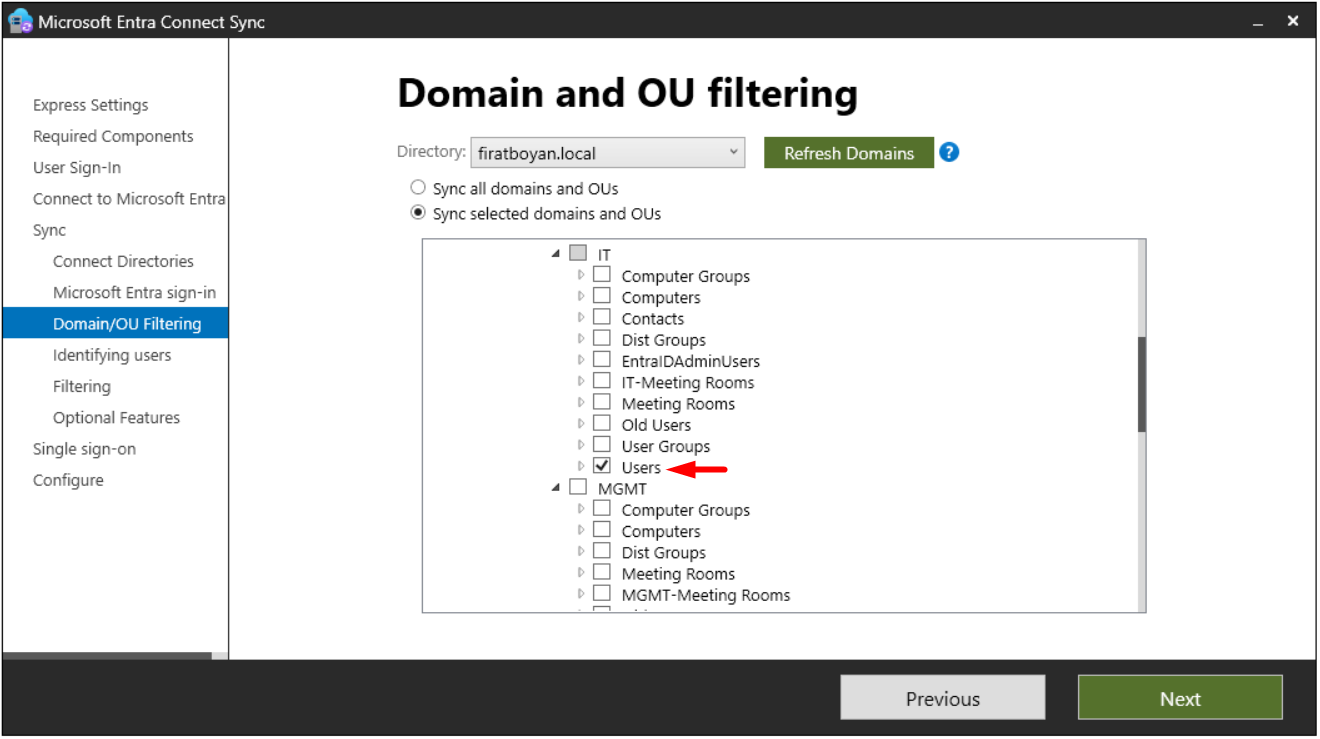
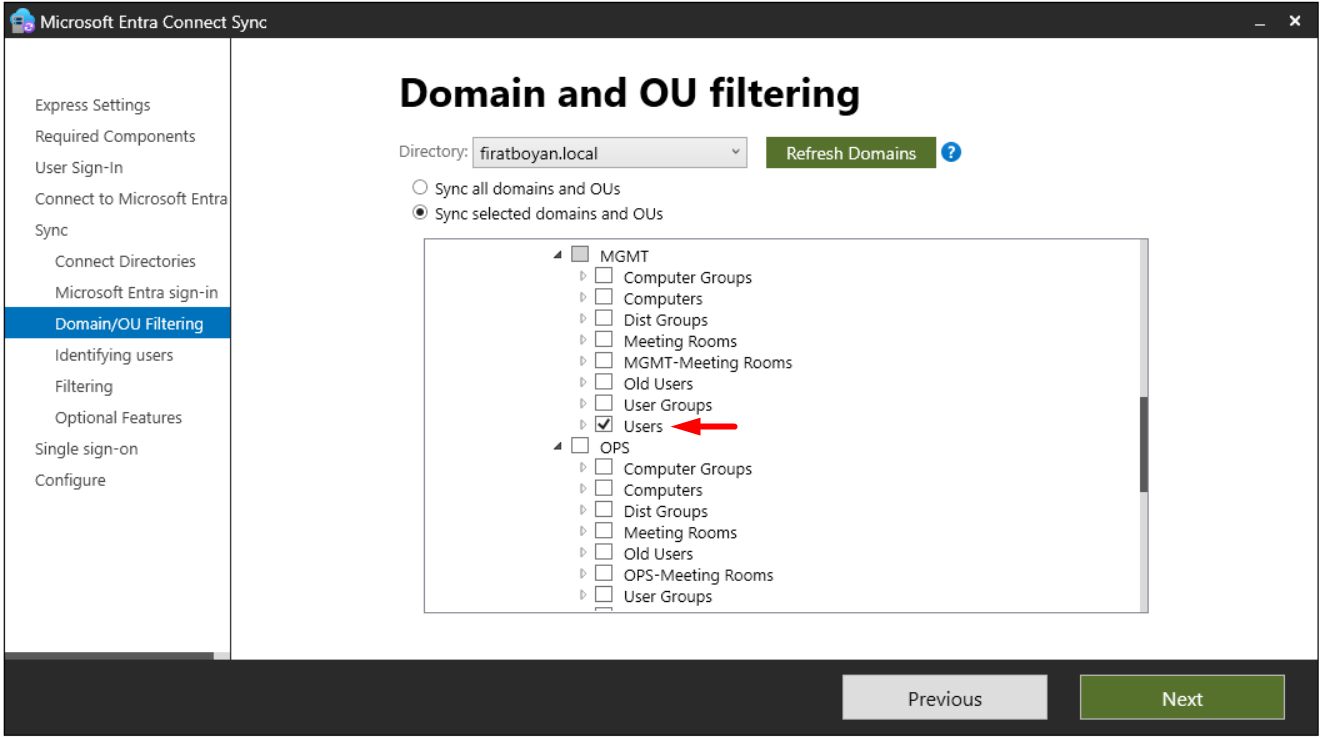
The points that I pay attention to when selecting OUs are as follows.
Some OUs are required for functionality. For example, if hybrid join is going to be used, the OUs that contain the computer objects must also be in scope.
The OU of the filter group must be in scope. If Group-Based Filtering is going to be used, the OU that contains the filter group must be selected, because OU filtering is evaluated before Group-Based Filtering.
Unreachable domains appear unselected. Domains that cannot be reached because of a firewall appear in the list unselected and with a warning.
The behaviour of new OUs is defined on this screen. In 1.1.524.0 and later, I can choose myself whether newly created OUs are synchronised. In older versions, new OUs were synchronised by default.
In old versions, the OU selection could be changed from the Select Containers window in Synchronization Service Manager. With version 2.6.91.0, this window became read-only, and the change is made from the Customize synchronization options task in the wizard.
If the check box of an OU that was synchronised earlier is cleared, the objects in that OU are deleted from Microsoft Entra ID. It is necessary to check the affected objects before changing the OU selection.
11- Uniquely identifying your users
In the Uniquely identifying your users step, I make 2 separate decisions: how users are identified in the on-premises directories and which attribute is used to match them with Entra ID (the source anchor). The user matching setting cannot be changed after the installation. The same rule applies to the source anchor, and I explain the only exception at the end of the section.
✅ Users are represented only once across all directories
With this option, each user is created as a separate object in Entra ID, and the objects are not joined in the metaverse. This is the correct option for single-forest environments and for structures where each user exists only once across all forests.
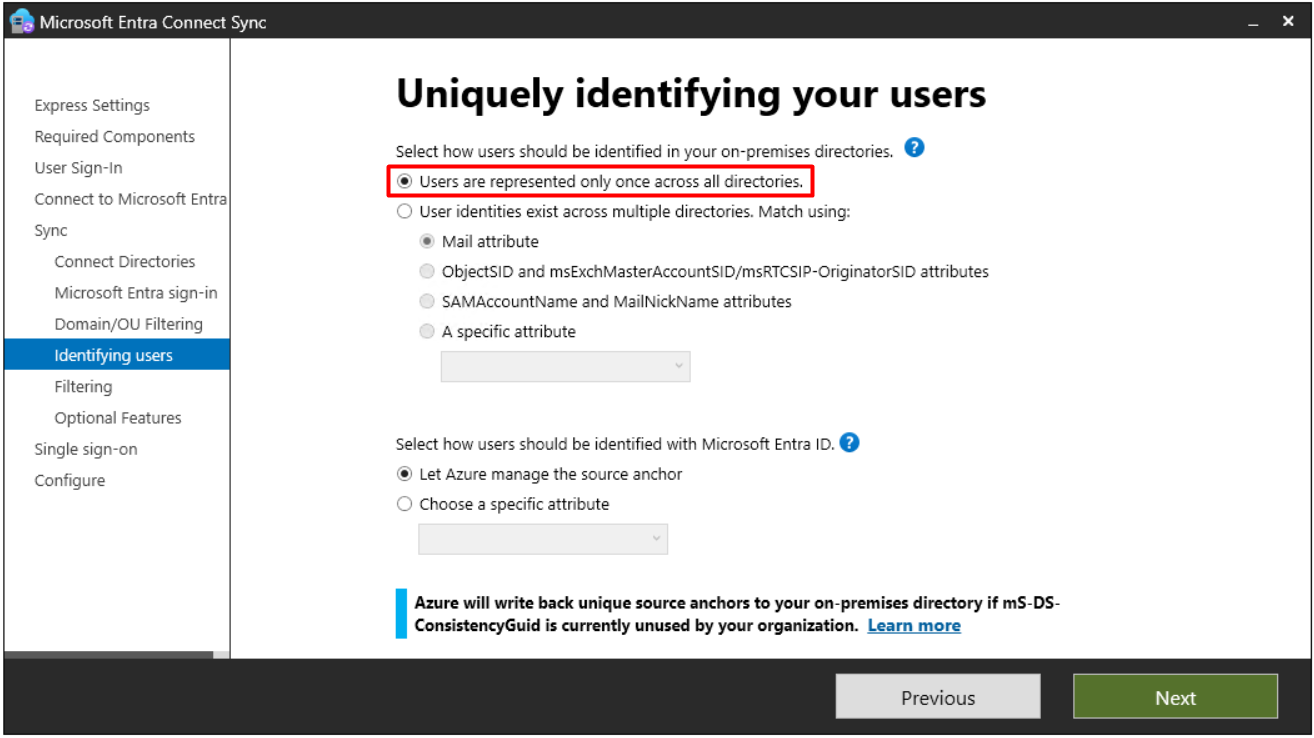
✅ User identities exist across multiple directories. Match Using:
If the same person is represented in more than 1 forest, the attribute that is used to join these objects is selected here. The options are in the table below.
|
Option |
Description |
|
Mail attribute |
It joins users and contacts whose mail attribute has the same value in different forests. It is used if the contacts were created with GALSync. User objects whose mail attribute is empty are not synchronised to Entra ID. |
|
ObjectSID and msExchMasterAccountSID / msRTCSIP-OriginatorSID attributes |
It joins the enabled user in the account forest with the disabled user in the resource forest. In Exchange, this structure is known as a linked mailbox. It can also be used if only Lync is used and there is no Exchange in the resource forest. |
|
sAMAccountName and MailNickName attributes |
It joins on the attributes where the sign-in ID of the user is expected to be found. |
|
A specific attribute |
It joins on an attribute that I select myself. Only attributes that already exist in the metaverse can be selected, and user objects whose selected attribute is empty are not synchronised. |
In production: In a single-forest environment, the correct option is Users are represented only once across all directories.
In this lab: In the old installation where I took the screenshot, I continued with the Mail attribute option in this section.
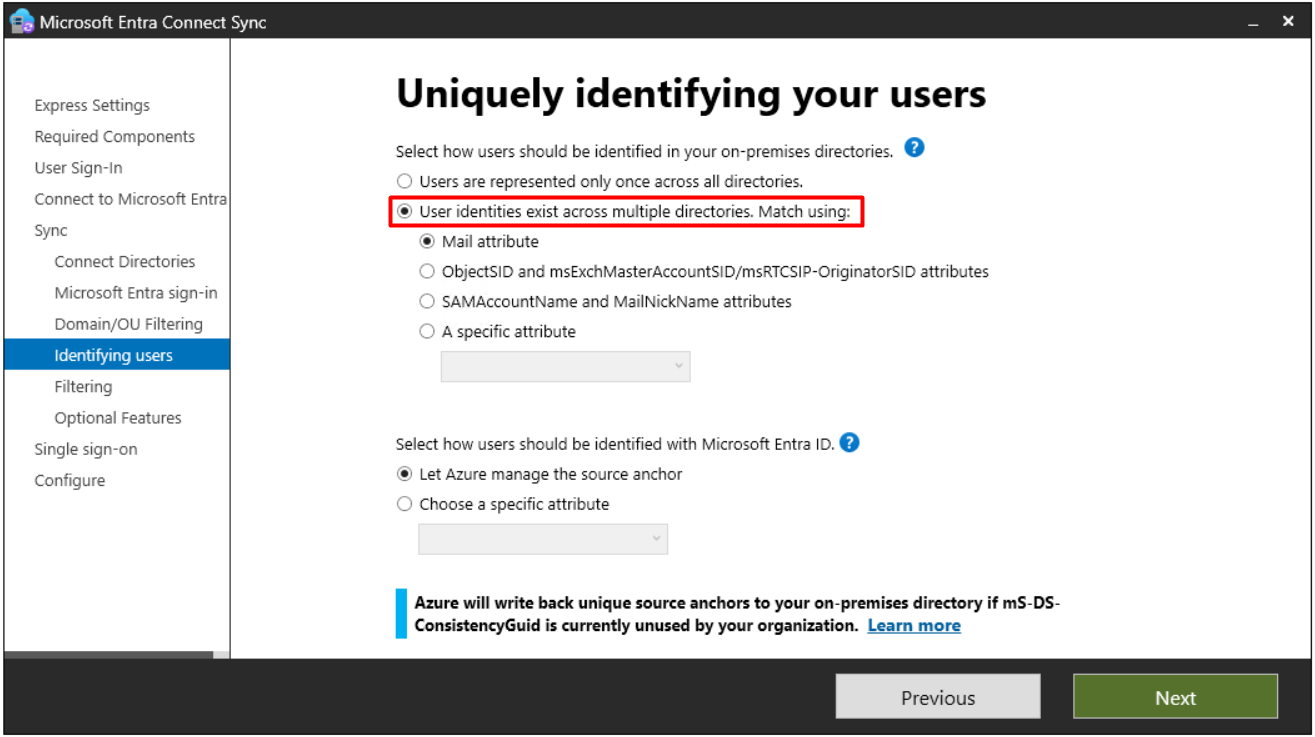
When Mail attribute is selected, users whose mail value is empty are not synchronised to Entra ID, and this setting cannot be changed after the installation.
Hard Match and Soft Match
If cloud-only accounts were created in the tenant earlier, Entra ID tries to match the incoming objects with the existing objects when synchronisation starts. 3 attributes are used in this process: userPrincipalName, proxyAddresses and sourceAnchor/immutableID. A match on userPrincipalName or proxyAddresses is called a soft match, and a match on sourceAnchor is called a hard match. For proxyAddresses, only the value with the SMTP: prefix, which is the primary email address, is considered.
When a match is found, the object in the cloud becomes an object managed from on-premises, and the attributes that have a value on-premises overwrite the values in the cloud. For security reasons, Entra ID does not match cloud users that have an administrator role with on-premises users.
✅ Select how users should be identified with Microsoft Entra ID
The source anchor is selected in the lower part of the screen. The source anchor is the primary key that does not change during the lifetime of an object and links the on-premises object to its counterpart in Entra ID. In federation scenarios and in some Entra ID interfaces, it also appears with the name immutableID.
✔ Let Azure manage the source anchor
With this option, the wizard determines the attribute. The logic works as follows: if the tenant has source anchor information from a previous installation, that is used. If not, the wizard checks whether the mS-DS-ConsistencyGuid attribute is populated on the objects in the directory. If it is not populated on any object, mS-DS-ConsistencyGuid is selected as the source anchor. If it is populated on 1 or more objects, the wizard concludes that this attribute is used by other applications and returns to objectGUID.
When mS-DS-ConsistencyGuid is selected, this attribute is used as the source anchor for user objects. If the attribute is empty on a user object, Microsoft Entra Connect Sync writes the objectGUID value of the object to the mS-DS-ConsistencyGuid attribute in on-premises Active Directory and only then sends the object to Entra ID. This is the reason why I gave the Connector account write permission for this attribute in step 8.3. For group objects, from version 1.5.18.0 onwards, if mS-DS-ConsistencyGuid is populated, this value is used as the immutableID. However, Microsoft Entra Connect Sync does not write this value to Active Directory itself for group objects.
The benefit of this approach appears in moves between forests. objectGUID changes when the object is moved to another forest or domain. Because mS-DS-ConsistencyGuid is a writable attribute, the value on the source object can be transferred to the target object, and the link with the object in the cloud is preserved.
✔ Choose a specific Attribute
With this option, I define an existing Active Directory attribute as the source anchor myself. The selected attribute must not change during the lifetime of the object. Attributes that can change when a person marries or changes role are not suitable. The attribute value cannot contain the @ character, so the email address and userPrincipalName cannot be used. The value is case-sensitive.
I continue with the Let Azure manage the source anchor option.
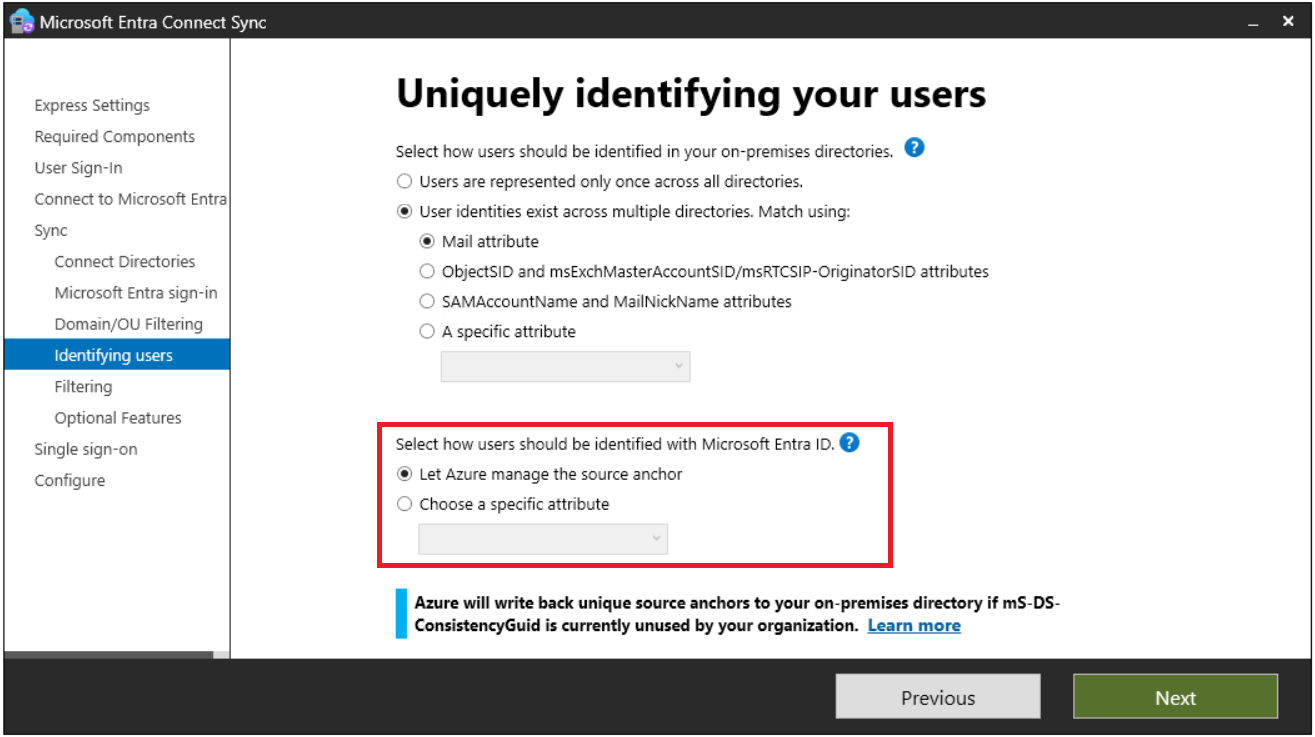
The source anchor is defined in the initial installation. When the wizard is run again, this option is read-only, and to change it the product must be uninstalled and installed again. The only exception is migrating an existing installation that uses objectGUID to mS-DS-ConsistencyGuid with the Configure Source Anchor task.
The conditions of this exception are as follows: the version must be 1.1.552.0 or later, the directory must not contain any object with a populated mS-DS-ConsistencyGuid value and the Connector account must have write permission for this attribute. If the directory contains an object with a populated value, the wizard concludes that the attribute is used by another application and returns an error. If I am sure that the attribute is really unused, I can skip this check by starting the wizard with the /SkipLdapSearch parameter. If AD FS is managed outside Microsoft Entra Connect or there is a third-party federation server, the ImmutableID claim rules are updated manually after the migration.
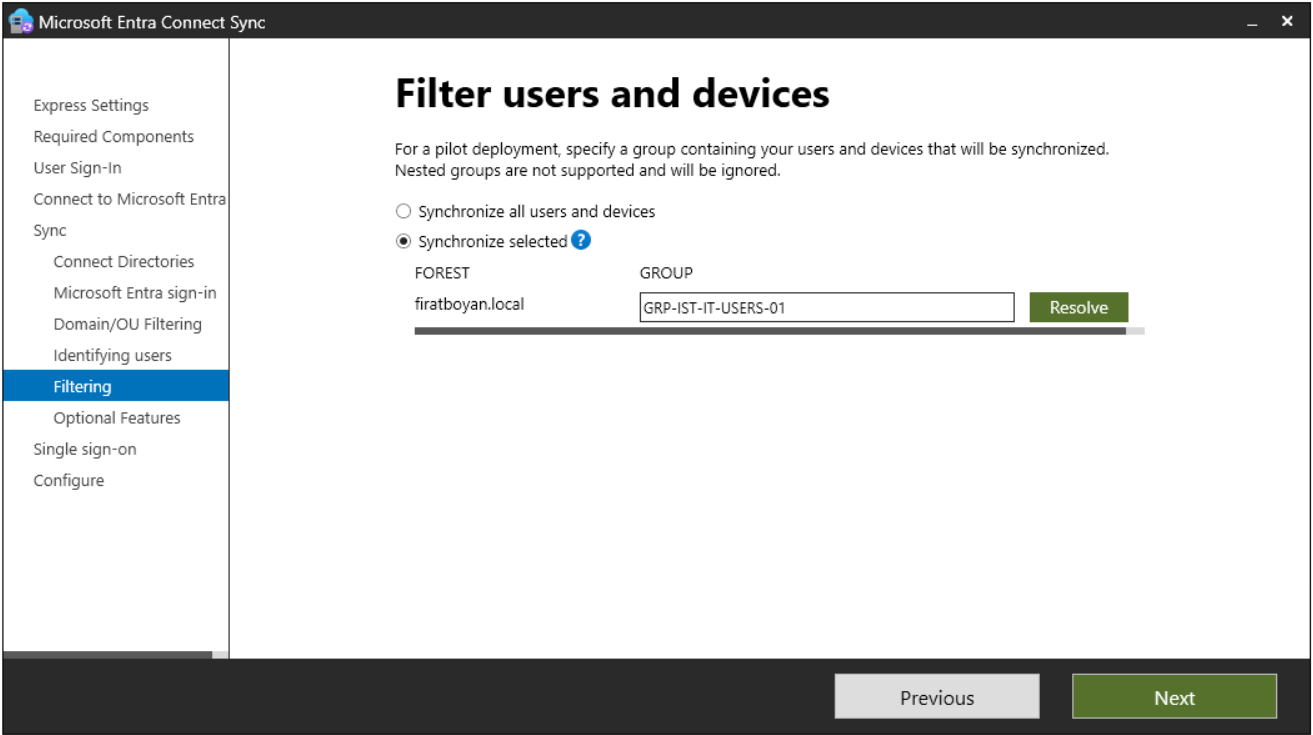
12- Filter users and devices
The Filter users and devices step offers the possibility to narrow the synchronisation scope according to a single group.
✅ Synchronize all users and devices
All objects in the domain and OU scope that I selected in the previous step are synchronised, and no additional group-based filter is applied. This is the option to use if no pilot migration is being done.
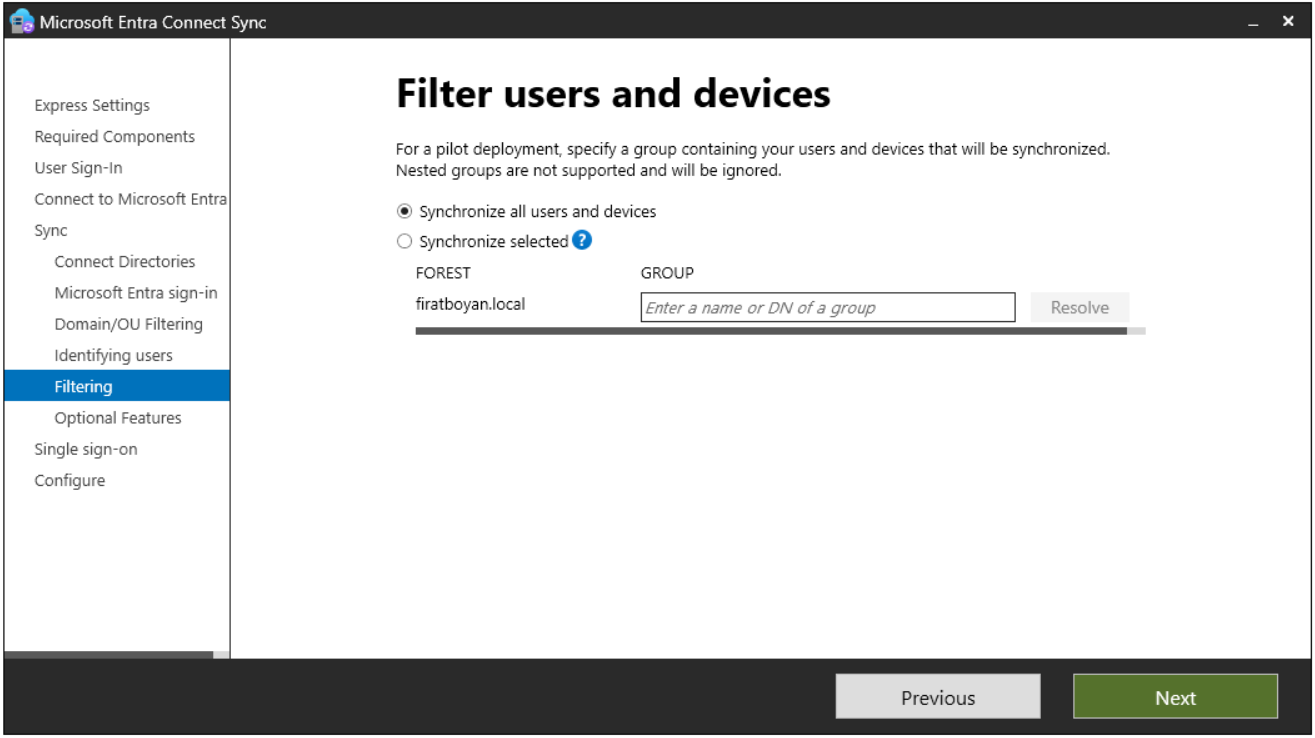
✅ Synchronize selected
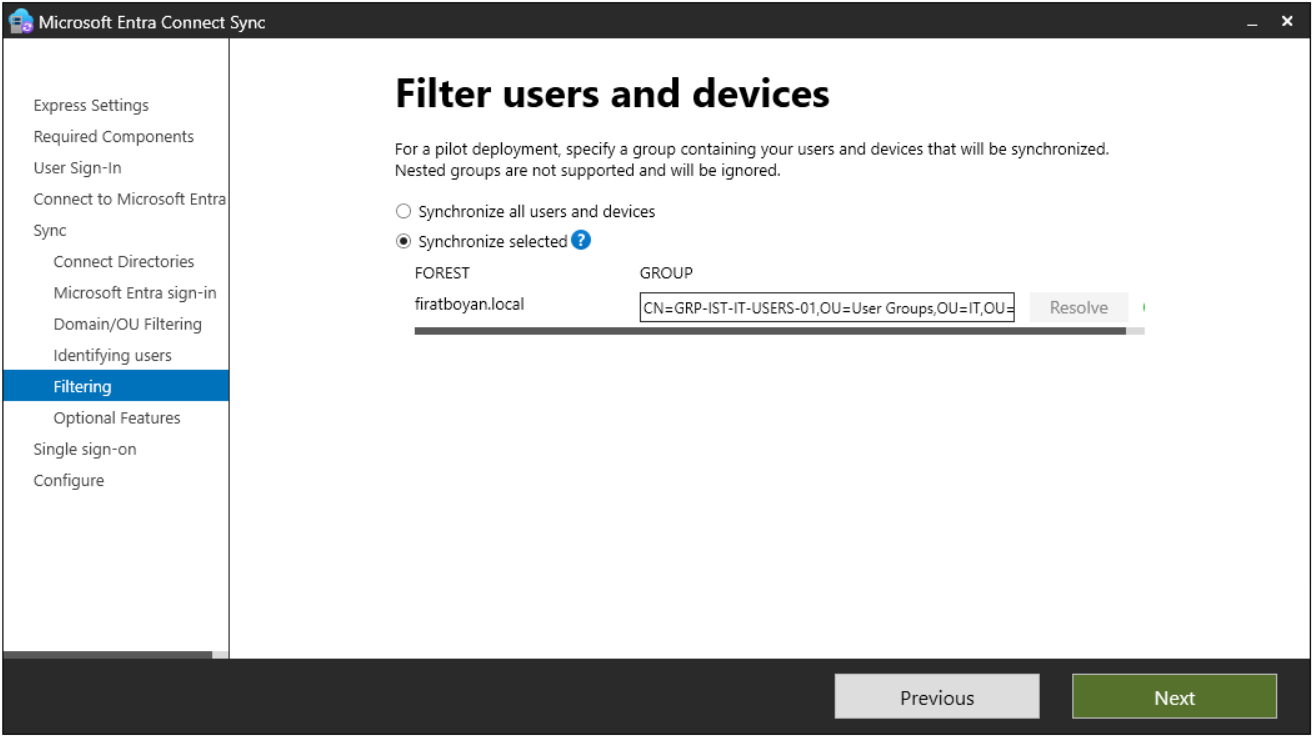
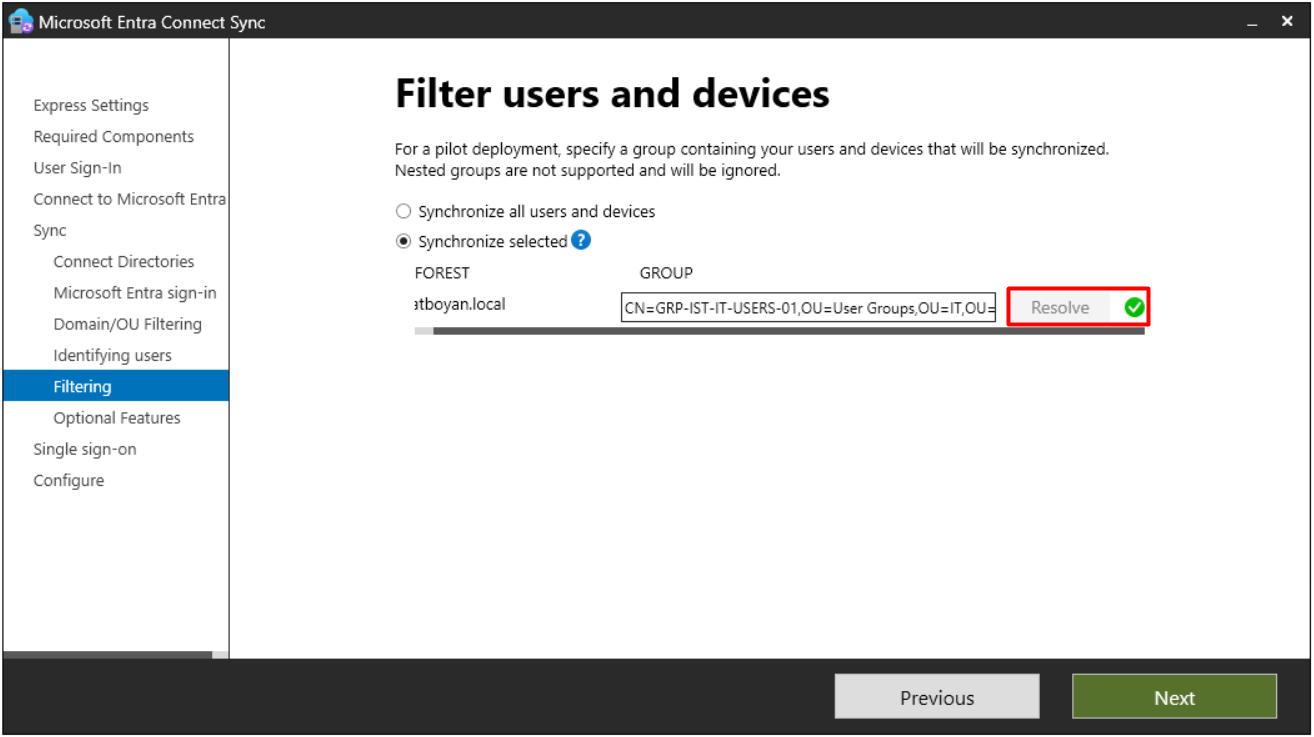
With this option, only the direct members of the group that I specify are synchronised. Users, groups, contacts and computers must be direct members of the group, and nested group membership is not resolved. When another group is added to the group as a member, only that group itself enters the scope and its members do not. When I type the group name in the Group field and press the Resolve button, the wizard verifies the group and converts it to the Distinguished Name (DN) format.
Group-Based Filtering is for pilot deployments only and can be configured only in the initial installation. It cannot be turned on again after it is turned off. In a production environment, other filtering methods such as OU filtering must be used for the scope.
13- Optional features
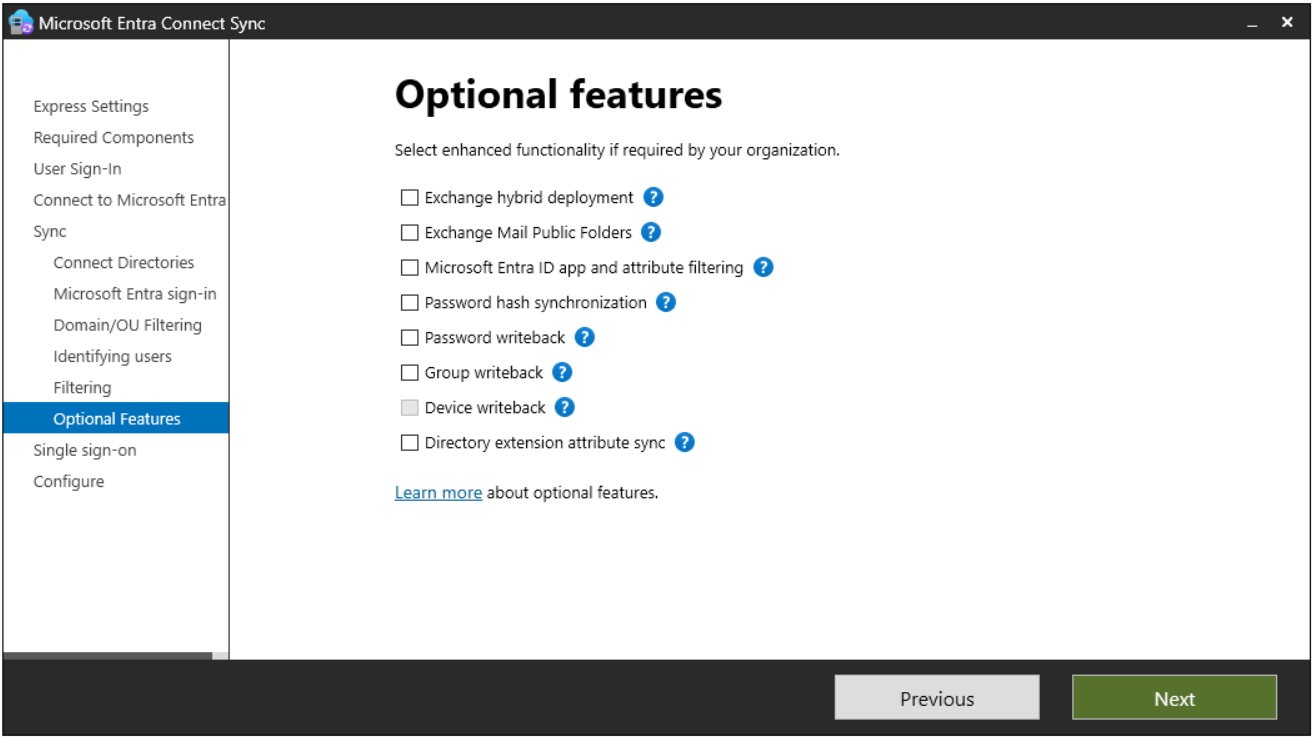
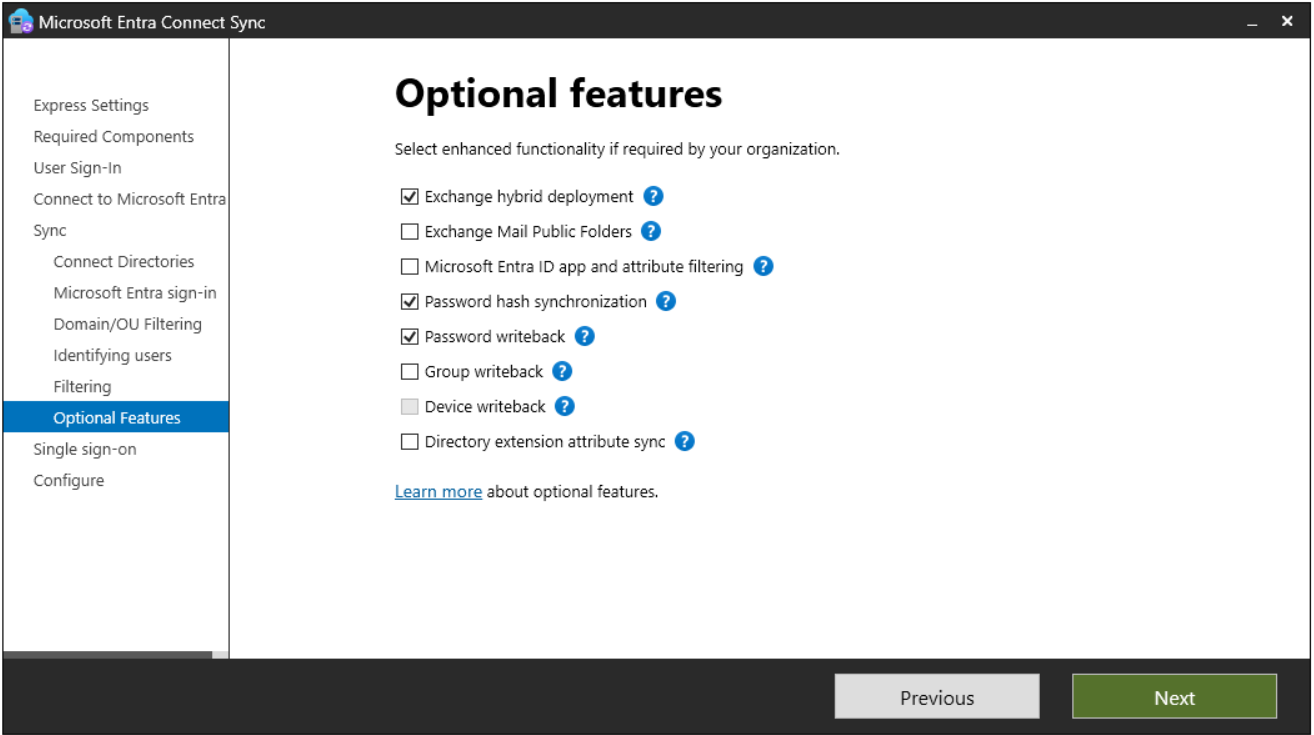
Each option on the Optional features screen adds a new data flow to synchronisation. Some work only towards the cloud, and some work from the cloud towards on-premises. Because each feature that works in the write direction requires additional permissions on the Connector account, I turn on only the ones that I need.
✅ Exchange Hybrid Deployment
This is the option that allows on-premises Exchange and the mailboxes in Exchange Online to work together. When it is enabled, Microsoft Entra Connect Sync writes a specific set of attributes back from Entra ID to on-premises Active Directory.
The Exchange hybrid writeback list in the Microsoft documentation consists of 9 attributes: msDS-ExternalDirectoryObjectID, msExchArchiveStatus, msExchBlockedSendersHash, msExchSafeRecipientsHash, msExchSafeSendersHash, msExchUCVoiceMailSettings, msExchUserHoldPolicies, proxyAddresses and publicDelegates. For proxyAddresses, only the x500 address from Exchange Online is added. Depending on the Exchange version, fewer attributes may be synchronised.
✅ Exchange Mail Public Folders
It allows mail-enabled public folder objects to be synchronised from on-premises Active Directory to Entra ID. Synchronising groups that have public folders among their members is not supported, and a synchronisation error occurs if this is attempted.
✅ Microsoft Entra ID App and Attribute Filtering
It is used to narrow the set of attributes synchronised to Entra ID, and it adds 2 pages to the wizard. On the first page, the services in use are selected. On the second page, the attributes to synchronise are listed according to these services, and the unwanted ones can be cleared. Because removing an attribute can affect the function of the related service, it is necessary to check the attribute requirements of the services before turning on this option.
✅ Password Hash Synchronization
If PTA or federation was selected as the sign-in method, PHS can be enabled additionally from this screen. Turning on PHS while PTA is selected serves 2 purposes: it provides support for legacy clients and a backup, and it makes the leaked credentials report of Entra ID Protection work. PHS is one-way, and Password Writeback is required for a password change made in the cloud to be reflected in Active Directory.
In old versions, if the PHS feature flag in the cloud was turned off, Microsoft Entra Connect Sync turned it on again automatically in the background. This behaviour was removed with version 2.6.84.0. If the flag is off, the administrator must explicitly enable it again.
✅ Password Writeback
It allows password changes made in Entra ID to be written to on-premises Active Directory. Azure Service Bus Relay is used as the communication channel. All communication is outbound over port 443, and no inbound firewall rule is required.
The operations that are written back are as follows: a reset that the user performs from the Self-Service Password Reset portal, a voluntary or forced password change by the user, and a reset that the administrator performs from the Microsoft Entra admin center. Before the new password is written to Active Directory, it is checked against the on-premises AD DS policy. History, complexity, age, password filters and other password restrictions defined in AD DS (for example Fine-Grained Password Policy) are included in this check. The 3 conditions required for the feature to work are in the table below.
|
Condition |
Description |
|
Licence |
On-premises writeback requires Microsoft Entra ID P1, P2 or Microsoft 365 Business Premium. |
|
Permissions |
The Connector account must have the Reset password and Change password permissions and write permission for lockoutTime and pwdLastSet. If it is not already defined, the Unexpire Password extended right is also granted on the root object of each domain in the forest. I assigned the permissions on User objects with Set-ADSyncPasswordWritebackPermissions in step 8.3. |
|
Minimum password age |
For users to change or reset their passwords more than once a day, this setting must be 0. The setting is under Computer Configuration > Policies > Windows Settings > Security Settings > Account Policies. |
✅ Group Writeback
This option allows Microsoft 365 groups to be represented in on-premises Active Directory, and it can be used only if there is Exchange in on-premises Active Directory. Because the source is the cloud, the flow is from Entra ID to Active Directory.
In old versions, Group Writeback v2 also wrote cloud security groups to Active Directory as a Public Preview. v2 was deprecated and cannot be enabled since version 2.3.2.0. For cloud security groups, the Group Provisioning feature of Microsoft Entra Cloud Sync is used, which can run side by side with Connect Sync. v1 continues to work for Microsoft 365 groups.
✅ Device Writeback
It allows the device objects in Entra ID to be written to on-premises Active Directory. Microsoft states that it is required for 2 scenarios: deploying Windows Hello for Business with the Hybrid Certificate Trust model, and applying device-based Conditional Access to applications protected by AD FS (2012 R2 or later). A Microsoft Entra ID P1 or P2 subscription is required, and the devices must be in the same forest as the users. If these 2 scenarios do not exist, there is no need to turn on the option.
✅ Directory Extension Attribute Sync
It allows attributes that are not in the default synchronisation set to be carried to Entra ID. When the option is selected, the Directory Extensions page is added to the wizard, and the attributes to synchronise are selected there. The Available Attributes field is case-sensitive.
I select the Exchange hybrid deployment, Password hash synchronization and Password writeback options and continue. In my environment, on-premises Exchange and Exchange Online work together, I want PHS to be ready next to PTA, and password resets made in the cloud must be written to Active Directory.
14- Enable single sign-on
Because I selected the Enable single sign-on box in the User sign-in step, the wizard now asks for the Seamless SSO configuration. The screen lists the synchronised forests, and my environment has only firatboyan.local. For the AZUREADSSOACC computer account to be created, the Domain Administrator credentials of each forest are entered on this page. Forests where Seamless SSO is not wanted can be skipped. These credentials are used only to enable the feature and are not stored in Microsoft Entra Connect or in Entra ID.
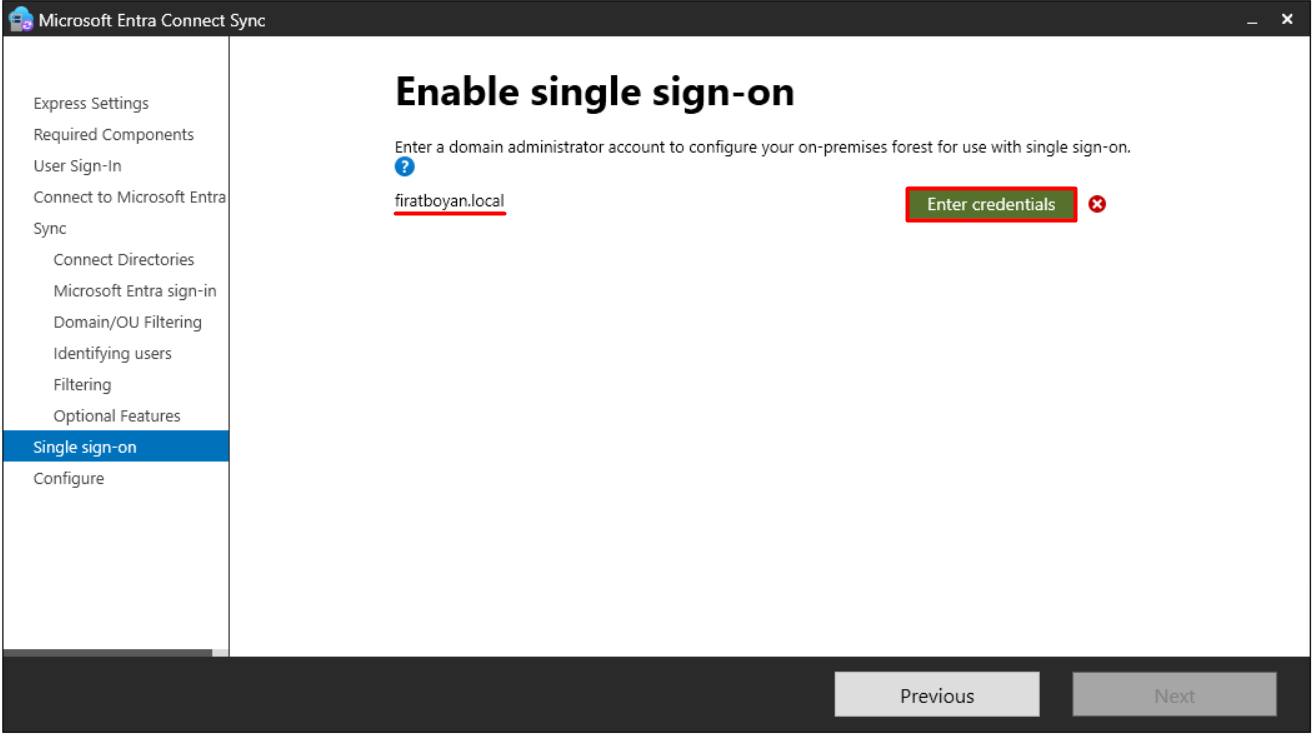
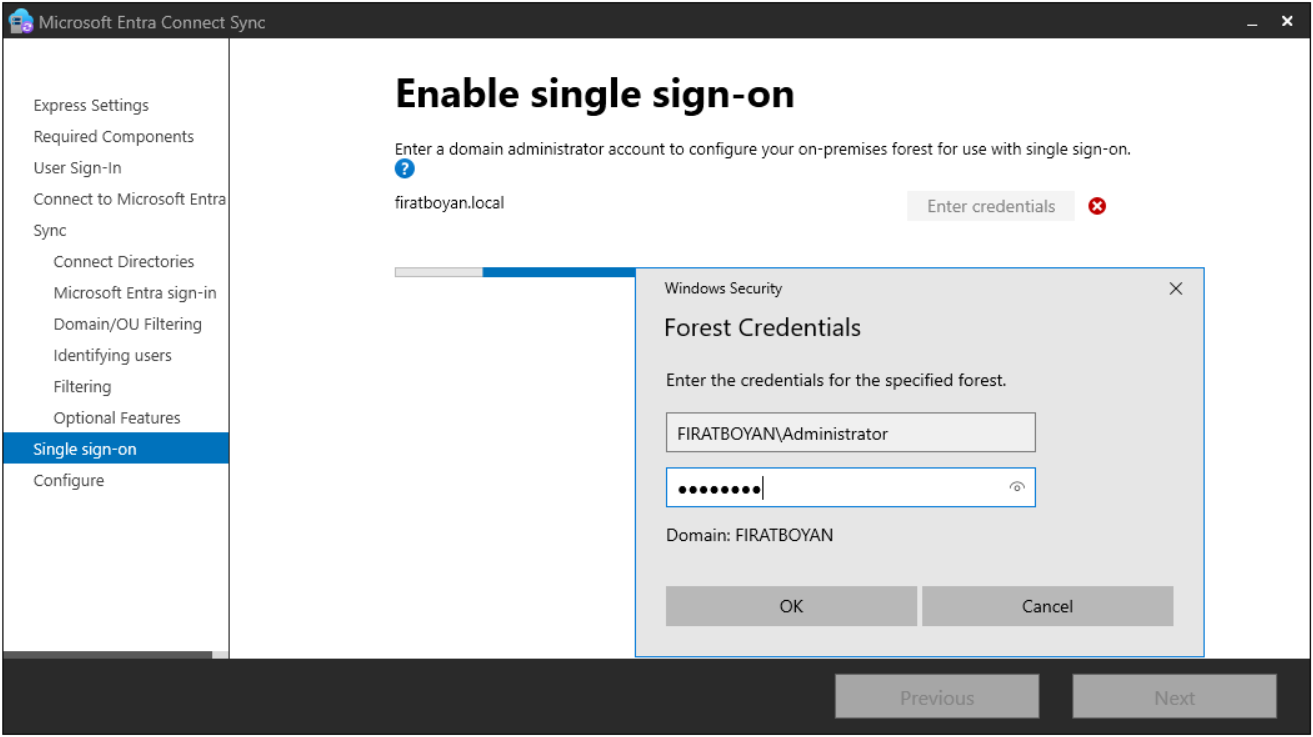
I click the Enter credentials button, enter the credentials of the FIRATBOYAN\Administrator account and press the OK button.
When the verification is complete, a green check mark appears next to the button and the Next button becomes active.
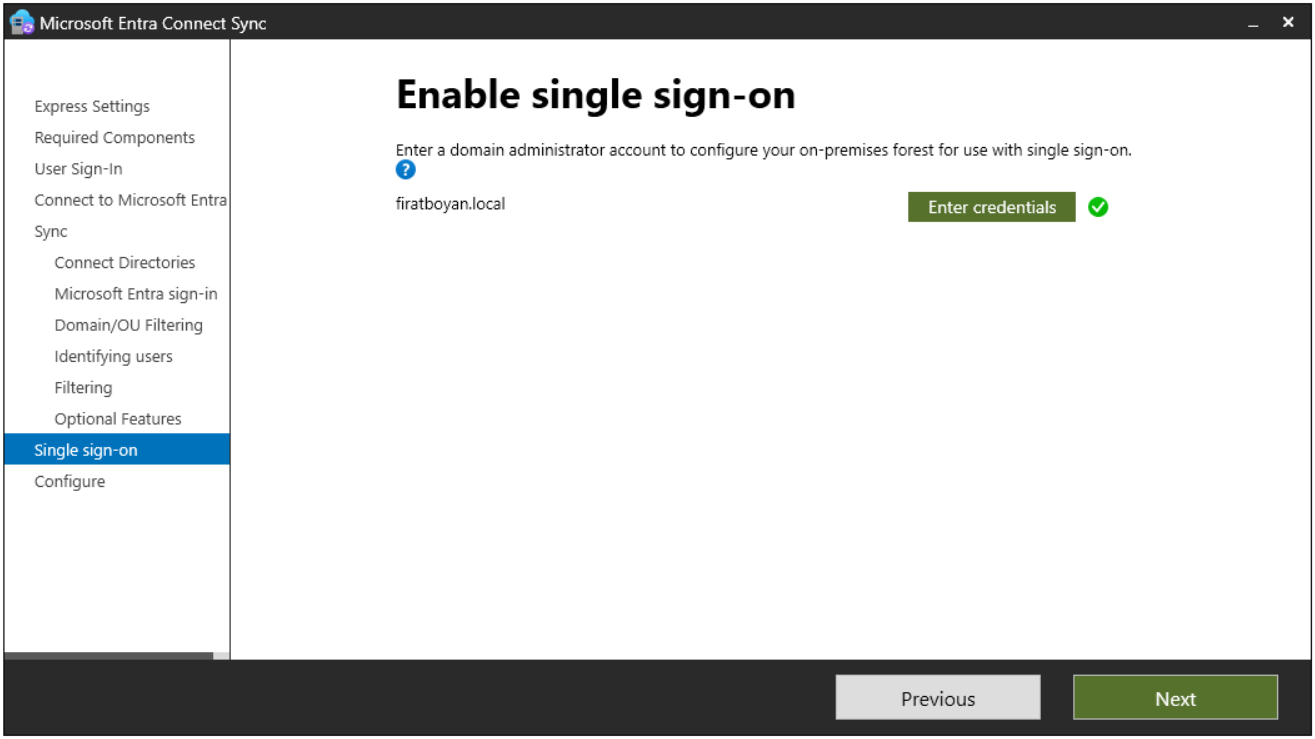
The green check mark shows only that the server side is complete. Seamless SSO does not work on clients until the intranet zone setting is deployed with Group Policy. This task is in the post-installation list in step 19.
15- Ready to configure
The Ready to configure screen lists the operations that the wizard performs when the Install button is pressed.
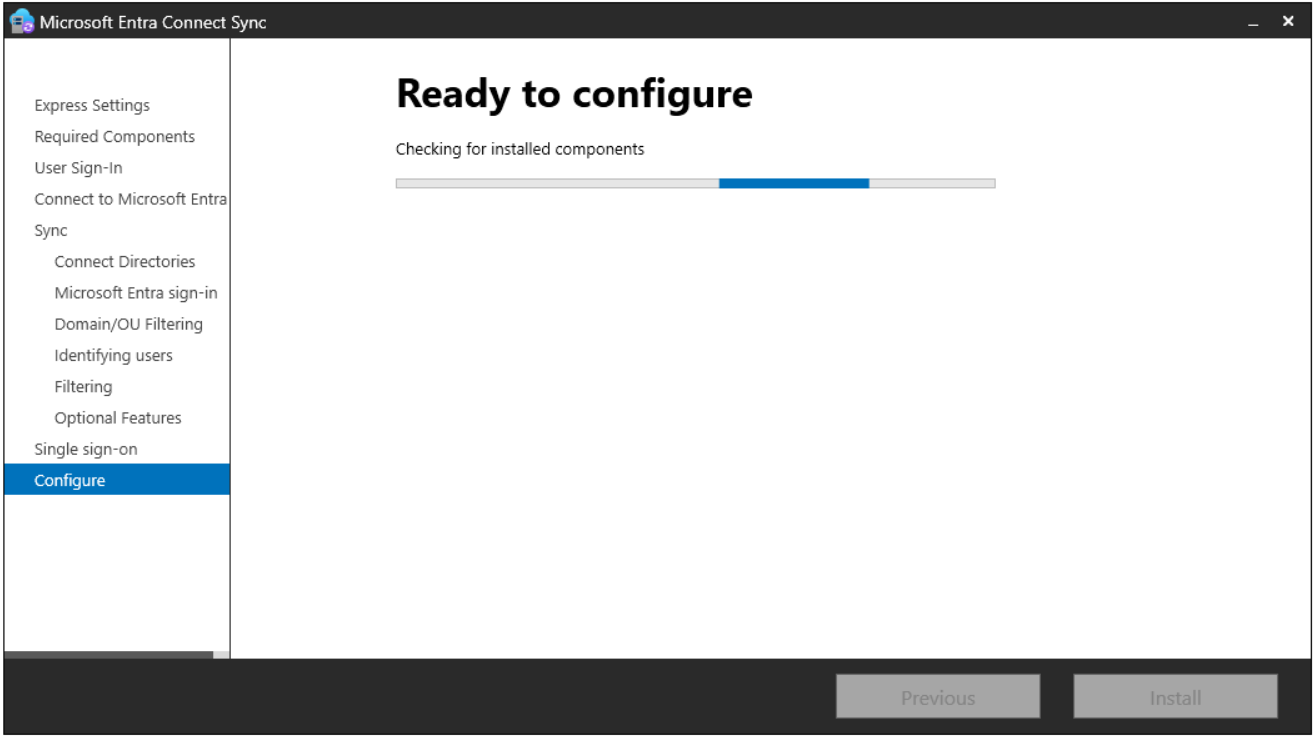
According to my choices, the list contains these operations:
✔ Installing and configuring Synchronization Services on this computer.
✔ Installing the Authentication Agent for Pass-through Authentication.
✔ Enabling Pass-through Authentication in the tenant.
✔ Enabling Seamless SSO.
✔ Configuring the source anchor as mS-DS-ConsistencyGuid.
✔ Configuring the Microsoft Entra ID connector.
✔ Configuring the firatboyan.local connector.
✔ Enabling Password Hash Synchronization.
✔ Enabling Password Writeback.
✔ Enabling the Microsoft Entra ID Export Deletion Threshold (500).
The Prevent accidental deletes feature in the last item is enabled by default in the installation and does not allow an export that contains more than 500 deletions. This is the mechanism that protects the tenant from bulk deletion in errors such as an OU being taken out of scope by mistake. I explain how to view and change the threshold in step 19.
Start the synchronization process and Enable staging mode
There are 2 boxes below the list.
Start the synchronization process when configuration completes. If it is left selected, the first full synchronisation starts as soon as the installation finishes. If it is cleared, the wizard configures synchronisation but disables the scheduler.
Enable staging mode. A server in staging mode runs the import and synchronisation operations normally but does not run any export. Password sync and Password Writeback do not work in this mode, even if they were selected in the installation. Staging mode is used to install a second server that waits ready next to the active server, or to review the configuration before it is written out. Only 1 server can write to the tenant as active at a time, and the structure must be active-passive.
Because the staging server continues to import and process data, it becomes active quickly when it takes over. For the switch, the Configure staging mode task is opened in the wizard, the staging mode box is cleared and the start of synchronisation is confirmed. When the mode is turned off, the server starts to export, and password sync and Password Writeback become active.
Enable staging mode must not be selected when the first and only server is installed. If it is selected, the server writes nothing to Entra ID and password synchronisation does not work.
I leave the first box selected and the second one empty, and I click the Install button.
16- Configuring
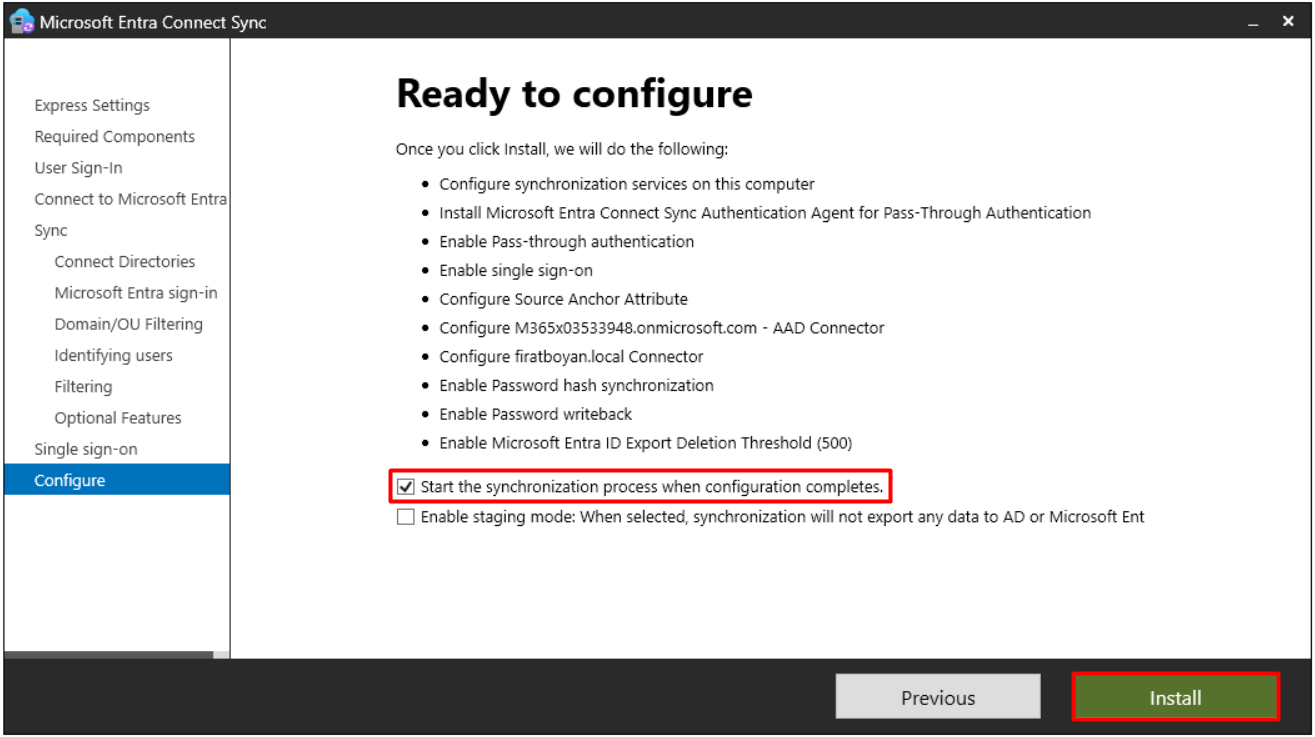
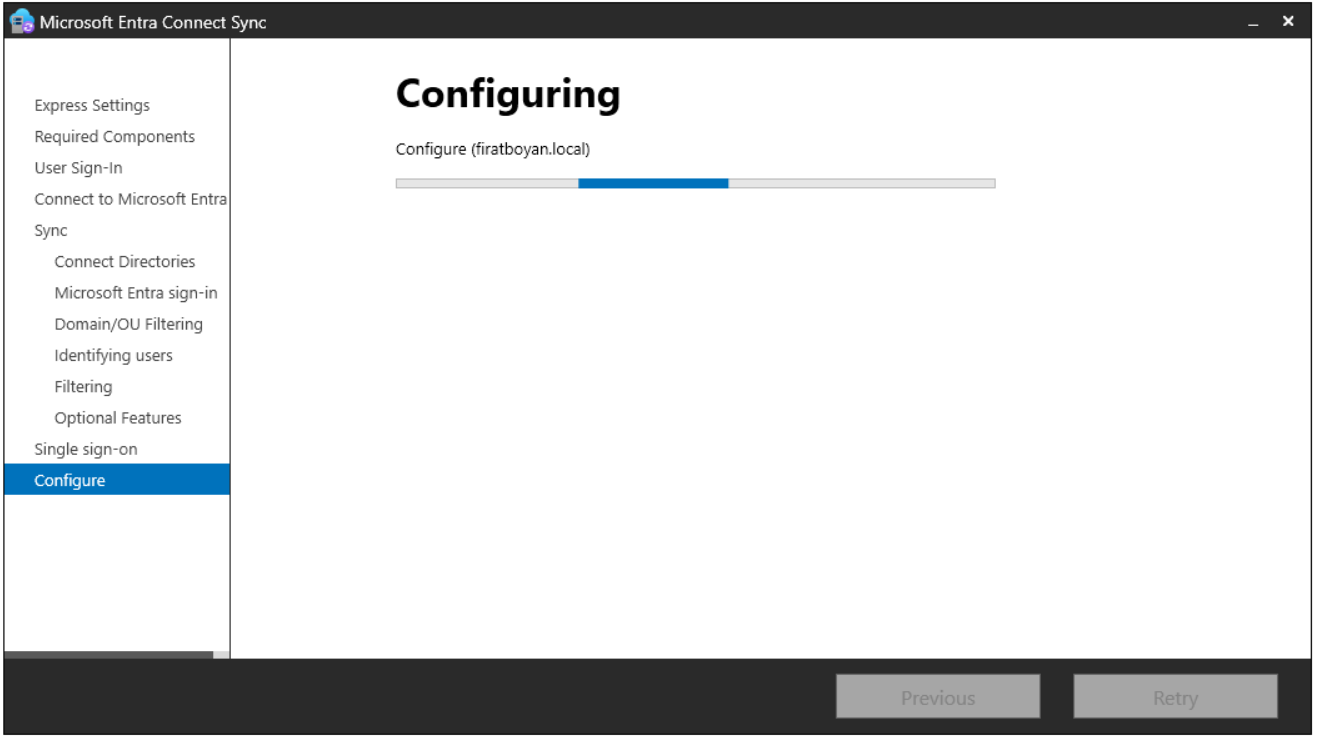
In the Configuring stage, the wizard applies the operations that it listed in order. The screens below show the order that I saw in my installation.
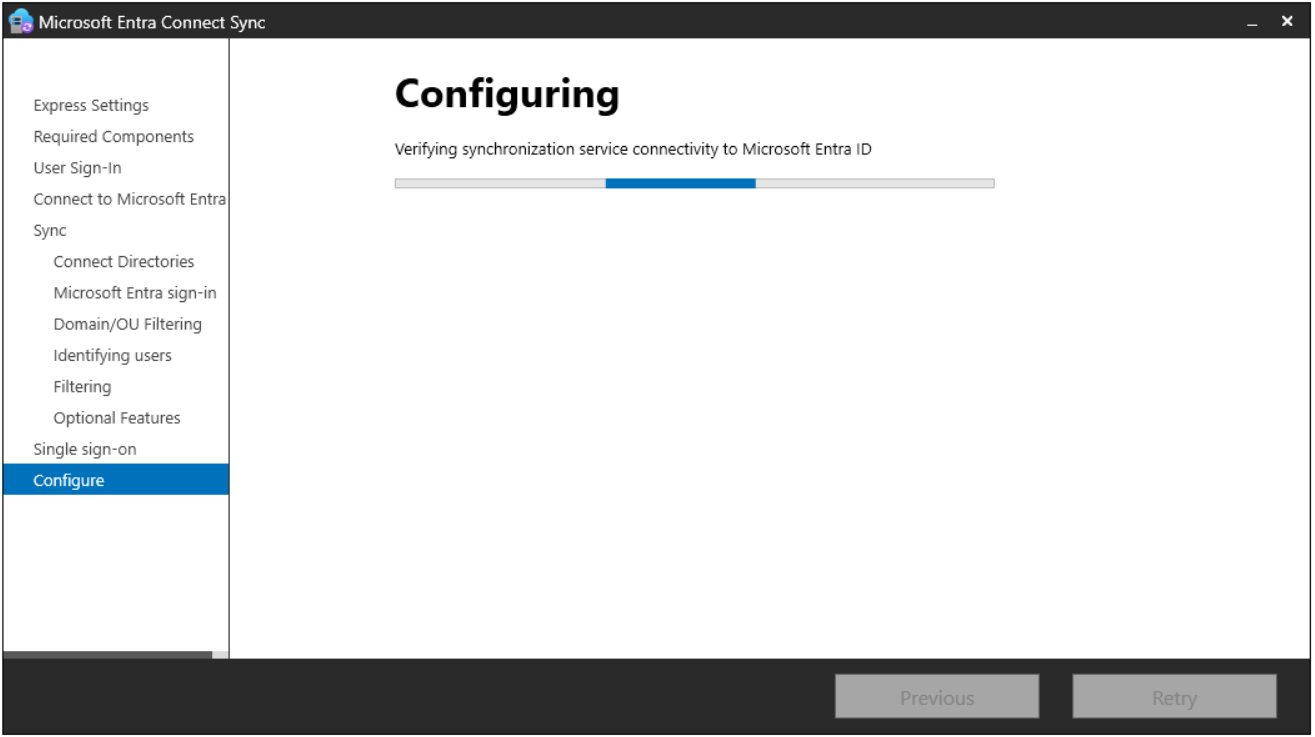
Verifying Synchronization Service Connectivity to Microsoft Entra ID
The access of the synchronisation service to Microsoft Entra ID is verified. If the connection cannot be established, it can be tried again with the Retry button.
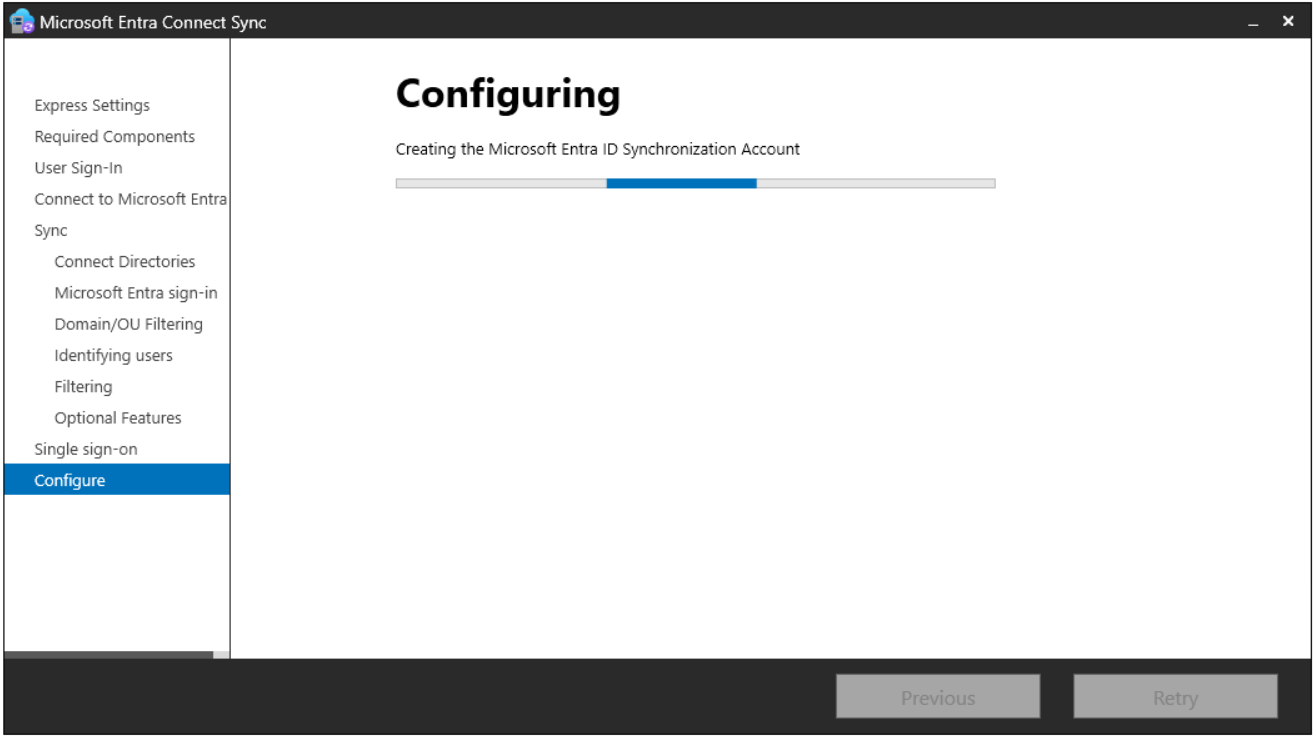
Creating the Microsoft Entra ID Synchronization Account
This step determines the identity with which the server connects to Entra ID. The biggest behaviour change in the article is here. The 2 images below show the moment when a user account starting with Sync_ was created in the tenant, in the old version with which I performed my installation.
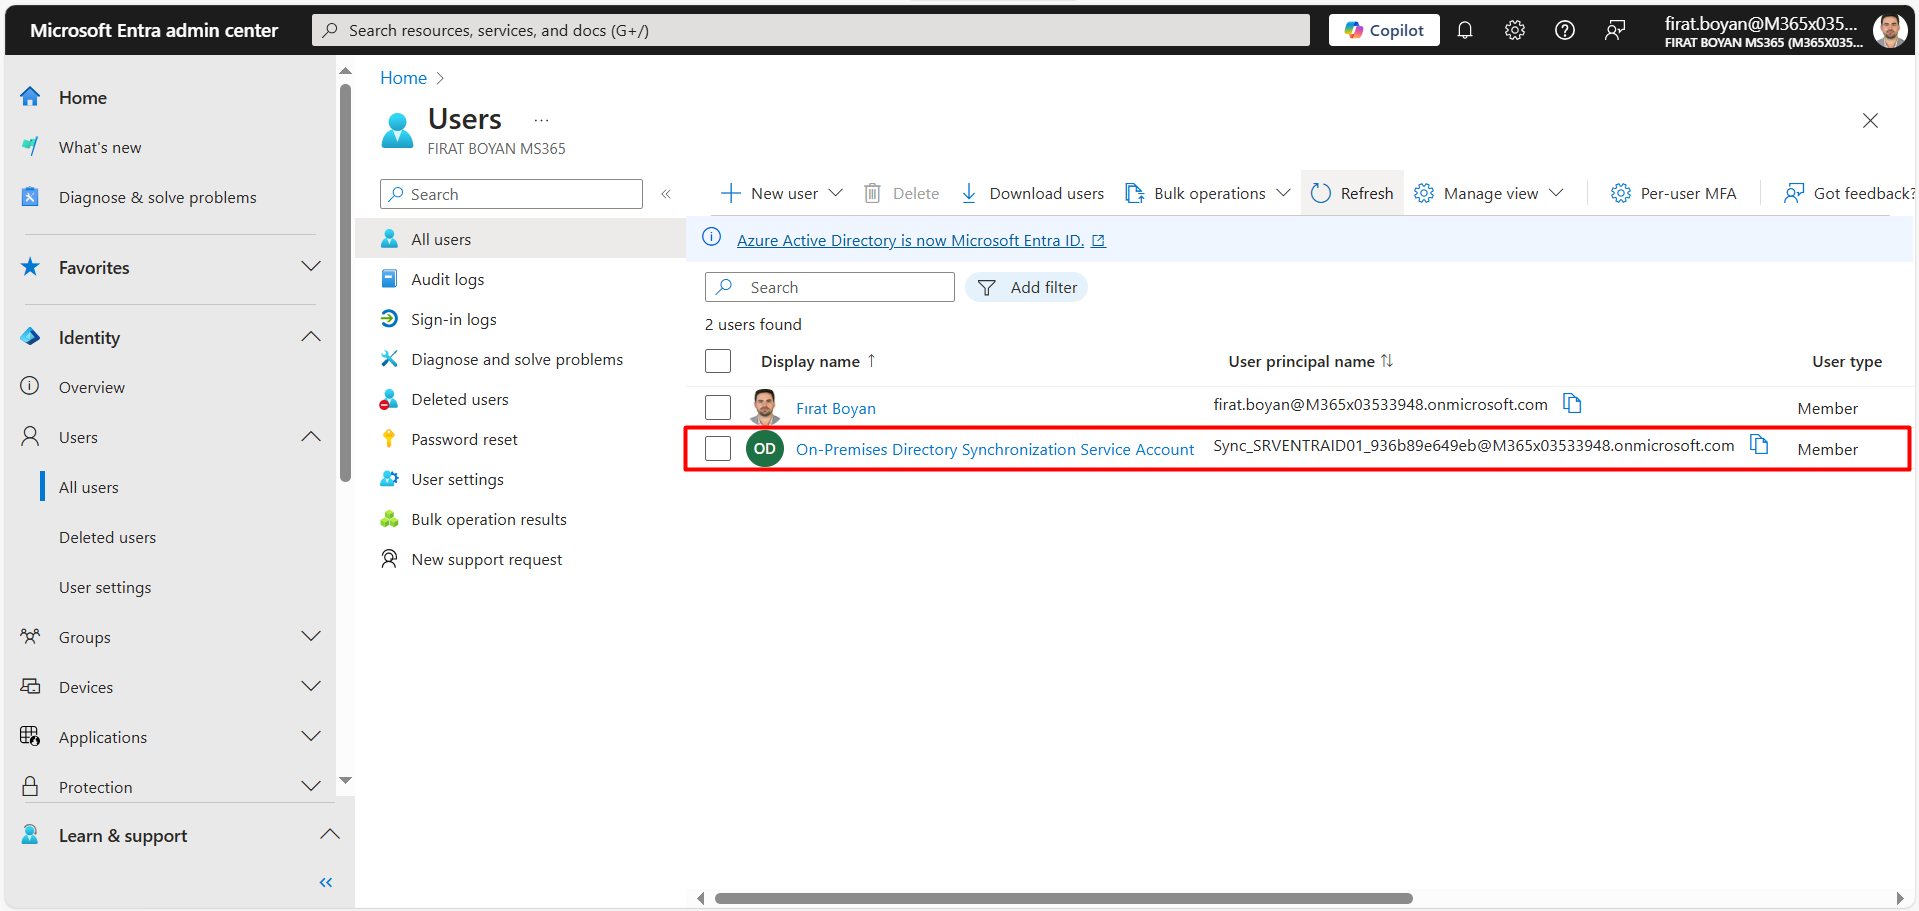
The 2 images above belong to old versions. In new installations done with version 2.5.76.0 and later, the Sync_ account is not created and does not appear in the Users list. An application is created in the tenant instead.
With version 2.5.76.0, Application-Based Authentication became generally available and became the default. The difference between the 2 methods is in the table below.
|
Topic |
Old Method (Sync_ Account) |
Current Method (Application-Based Authentication) |
|
Identity |
A user account in the format Sync_ServerName_ID@tenant.onmicrosoft.com is created in the tenant. |
The wizard does not create a user account. A single-tenant application is created in the tenant. |
|
Permissions |
The account is assigned the Directory Synchronization Accounts role, which gives only directory synchronisation rights. |
The application is given the permissions required for synchronisation. |
|
Connection method |
The server signs in at each synchronisation with a long and complex password that does not expire. |
The server connects with the OAuth 2.0 Client Credential Flow, using a certificate instead of a password. |
|
Certificate |
None. |
With the default option, Microsoft Entra Connect manages the certificate. Its lifetime is 90 days, and it is stored in the CURRENT_USER certificate store. |
|
TPM |
Not required. |
Microsoft recommends that the server has a TPM 2.0 that is ready for use. If there is no TPM, the private key is marked as non-exportable and kept in the software-based key store. |
|
Renewal |
The password is not renewed. |
The certificate is renewed automatically by the scheduler. If the scheduler is suspended, the automatic renewal does not take place either. |
The rules that apply to the old Sync_ account from version 2.6.84.0 onwards are in the table below.
|
Rule |
Description |
|
There is no fallback to the old account |
If the Application-Based Authentication setup fails, the wizard does not return to the old account silently. It returns an error and stops. |
|
There is no automatic migration |
Existing servers that run with the old account are not migrated to the new method automatically in the background. |
|
The migration is done manually |
To migrate a server that runs with the old account, the Configure application-based authentication to Microsoft Entra ID task under Additional tasks is run in the wizard. |
|
The old account is removed |
Microsoft recommends removing the old Sync_ account with the Remove-ADSyncAADServiceAccount cmdlet after the migration. |
After 7 April 2027, the old method that connects with the Sync_ account will stop working. Servers that run with this account must be migrated to the Application-Based Authentication method before this date. I verify the identity with which the server connects in step 19.
Enabling Single Sign-On
With the Domain Administrator credentials that I entered in step 14, the AZUREADSSOACC computer account is created in the firatboyan.local forest, and the Kerberos decryption key of the account is shared with Entra ID.
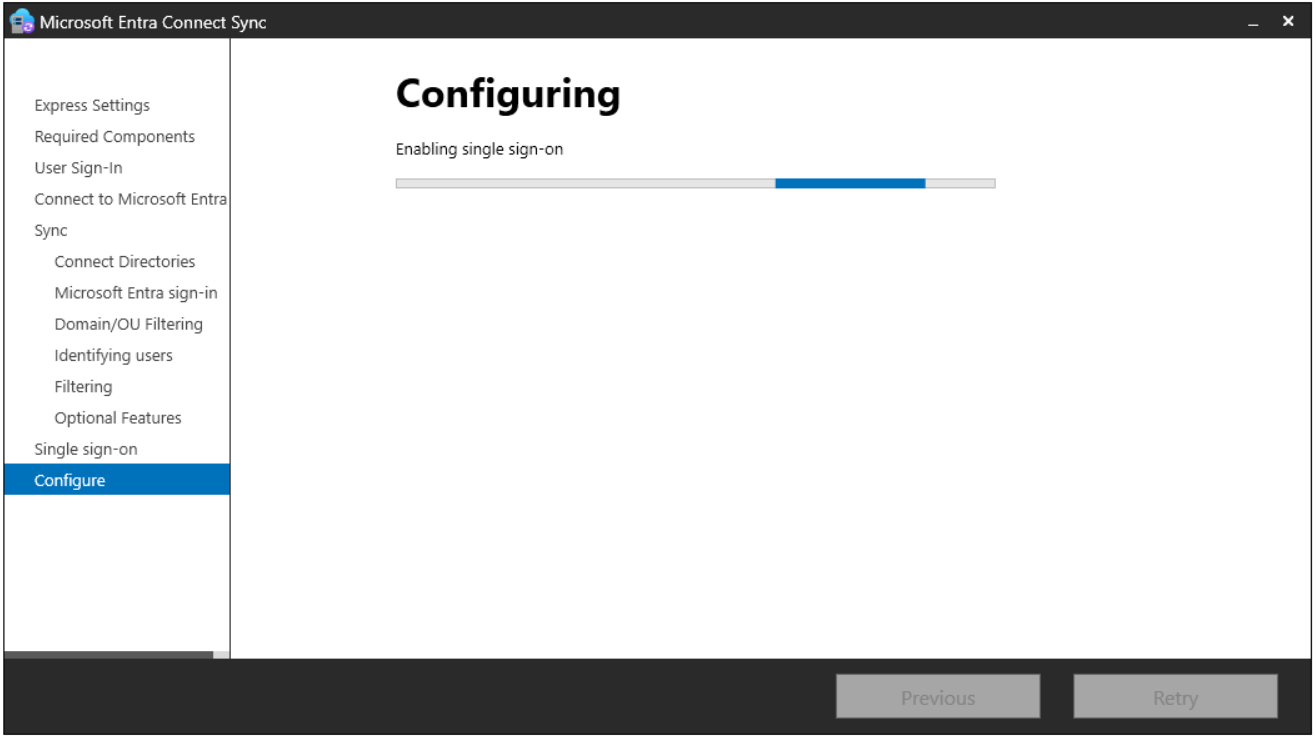
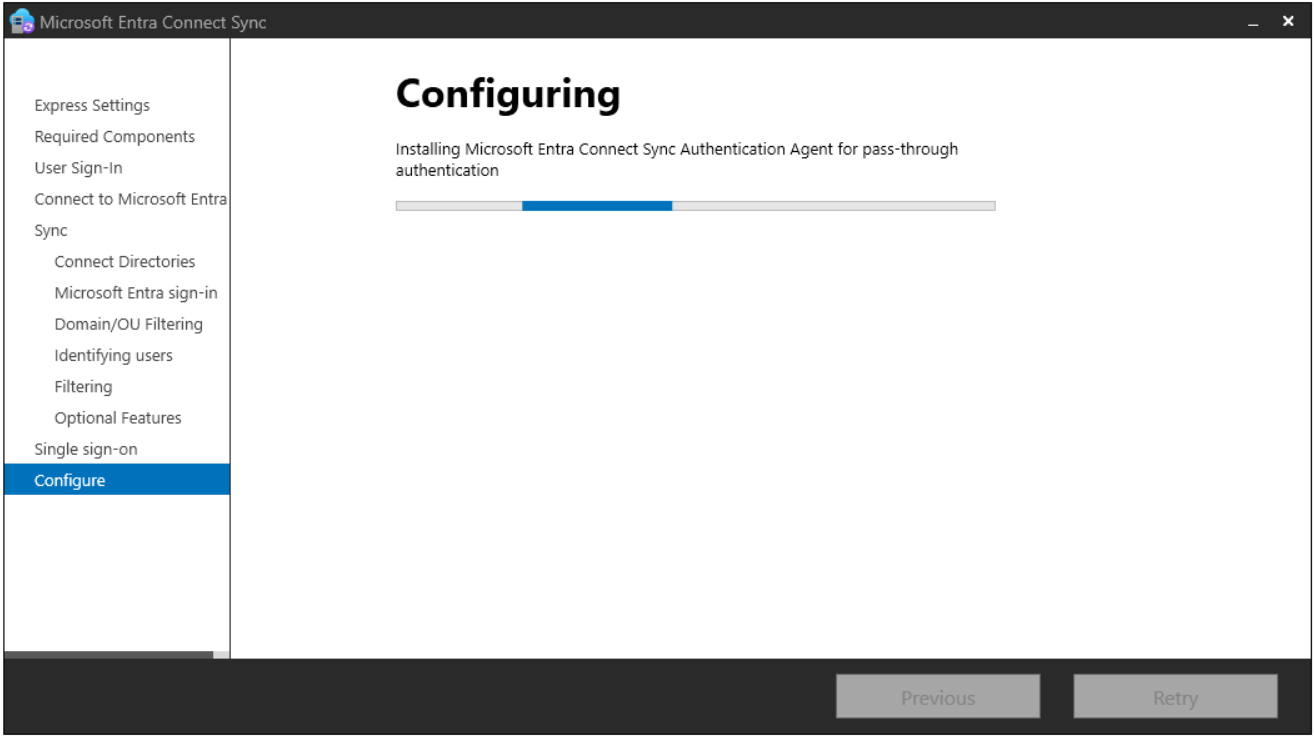
Installing and Configuring Authentication Agent for Pass-Through Authentication
The first Authentication Agent for PTA is installed on the Microsoft Entra Connect Sync server itself and registered in the tenant. This single agent is not enough for production. After the installation, it is necessary to install additional agents on different servers and bring the total number to at least 3.
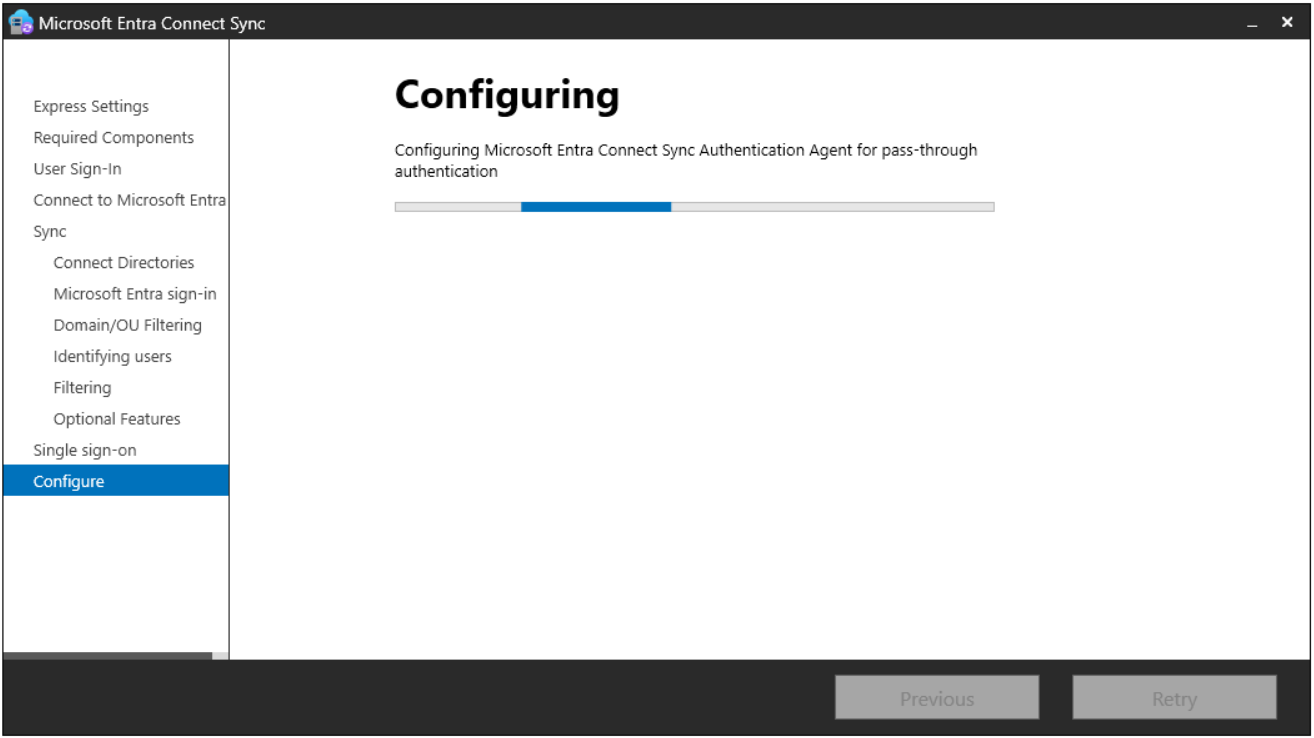
Checking for Installed Components
The wizard checks the installed components again.
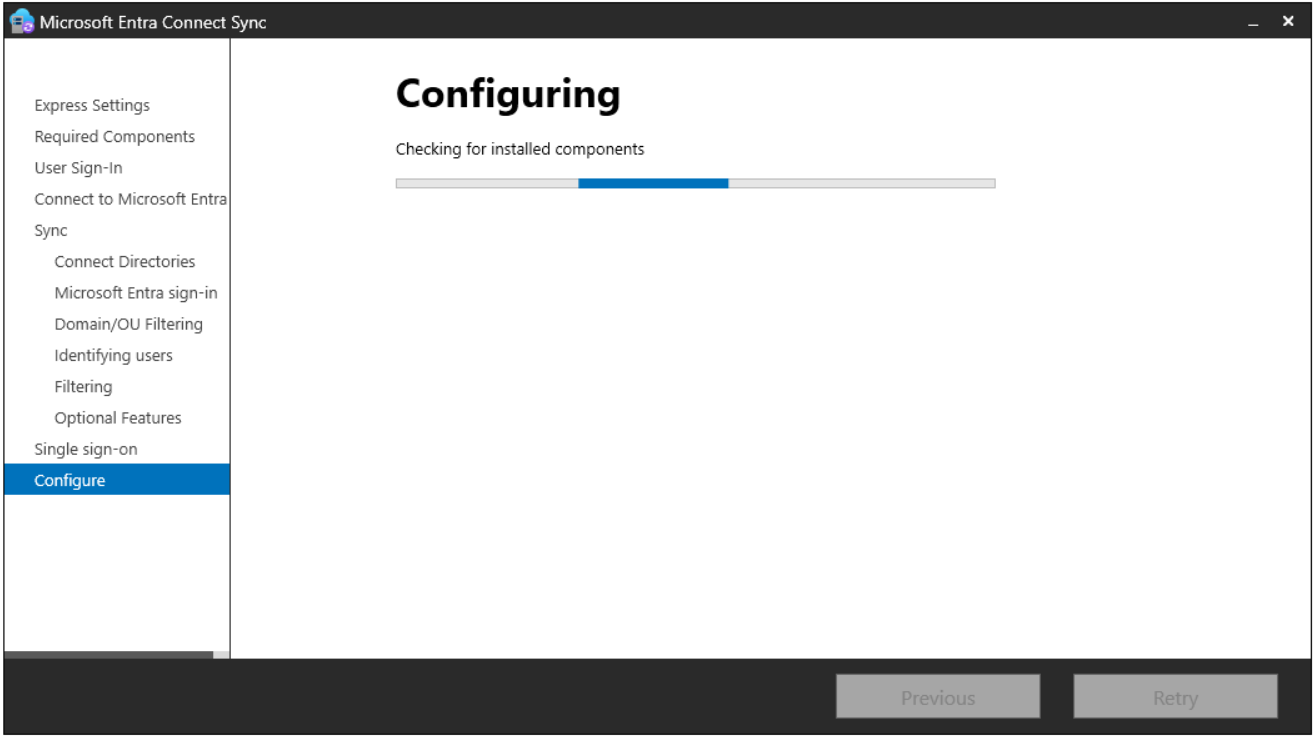
Configuring Microsoft Entra Connect Sync
The synchronisation service (ADSync) is configured with the settings that I selected. The wizard does the configuration, and the ADSync service performs the synchronisation. Synchronization Service Manager is the management interface that I use to monitor synchronisation after the installation.
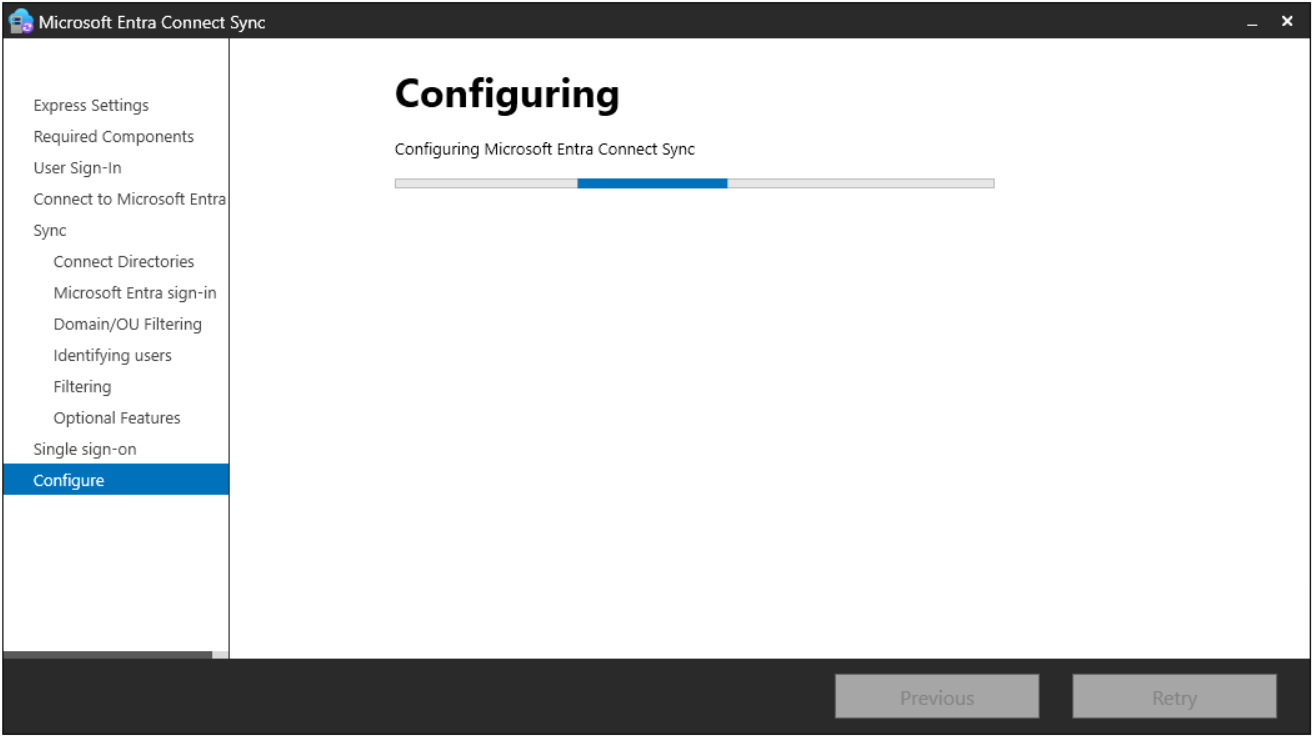
Configuring (M365x03533948.onmicrosoft.com - AAD)
The connector on the tenant side is configured. On the screen, the abbreviation AAD, which remains from the old naming, appears at the end of the connector name.
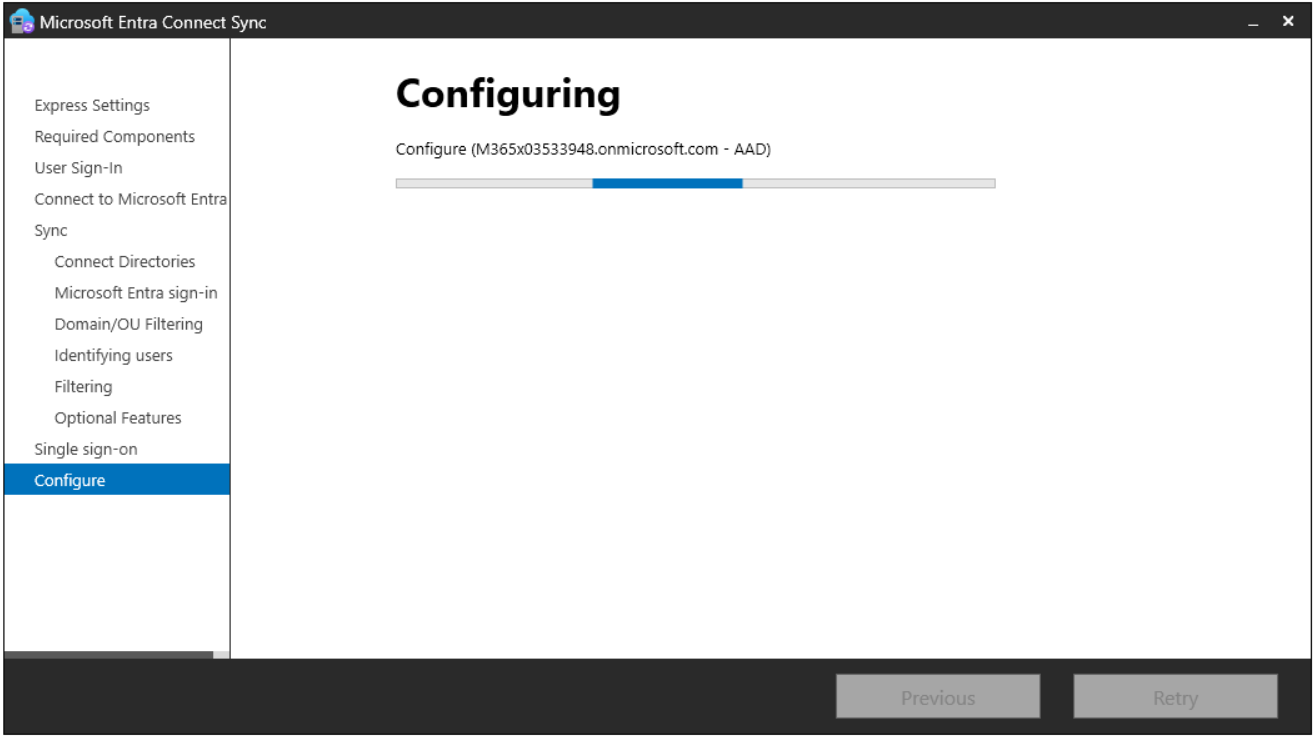
Updating Synchronization Rules (M365x03533948.onmicrosoft.com - AAD)
The default sync rules that correspond to the features I selected are created and updated. The wizard does this work. Synchronization Rules Editor is a separate tool that I use after the installation to review these rules and add custom rules.
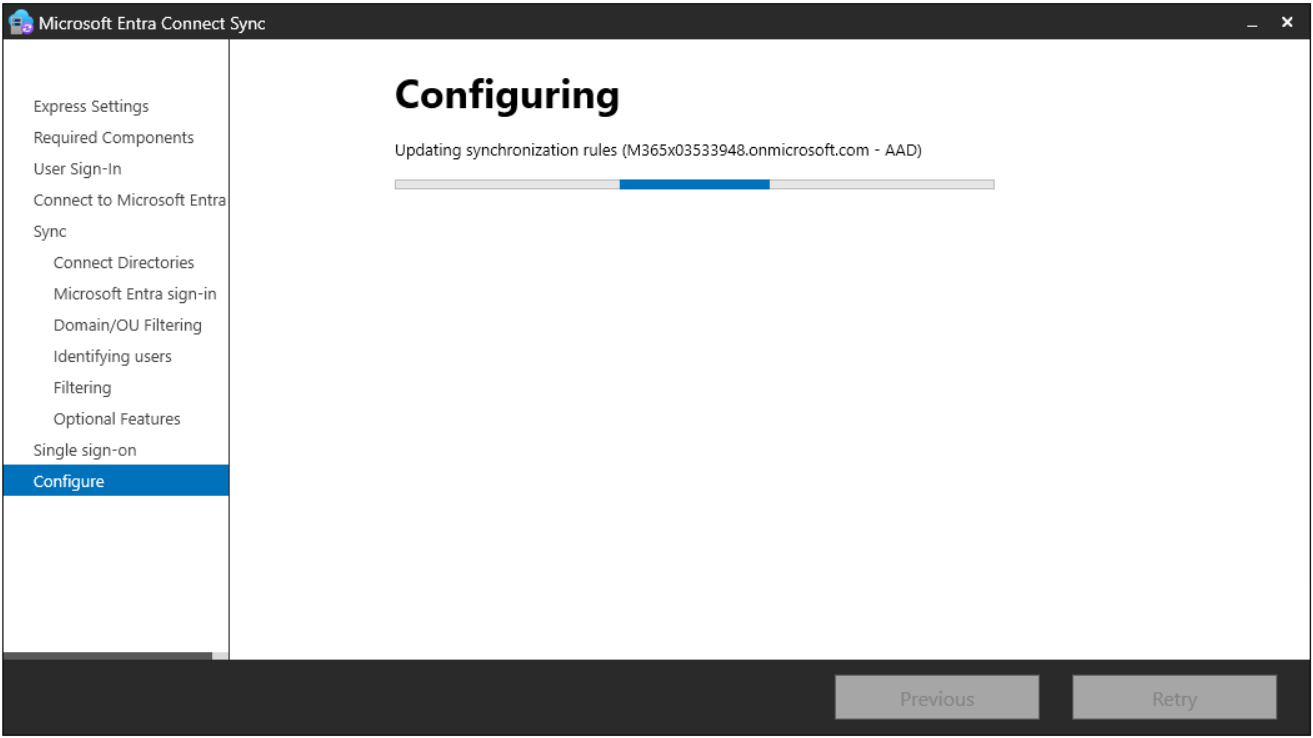
Configuring (firatboyan.local)
The connector on the on-premises side is configured: the Connector account that I specified in step 8, the domain and OU selection in step 10 and the source anchor setting in step 11 are applied to this connector.
17- Configuration complete
The installation is complete. The summary screen lists the result of the configuration and the points that need attention: mS-DS-ConsistencyGuid is used as the source anchor, PTA and Seamless SSO are enabled, PHS and Password Writeback are on and the initial synchronisation was started.
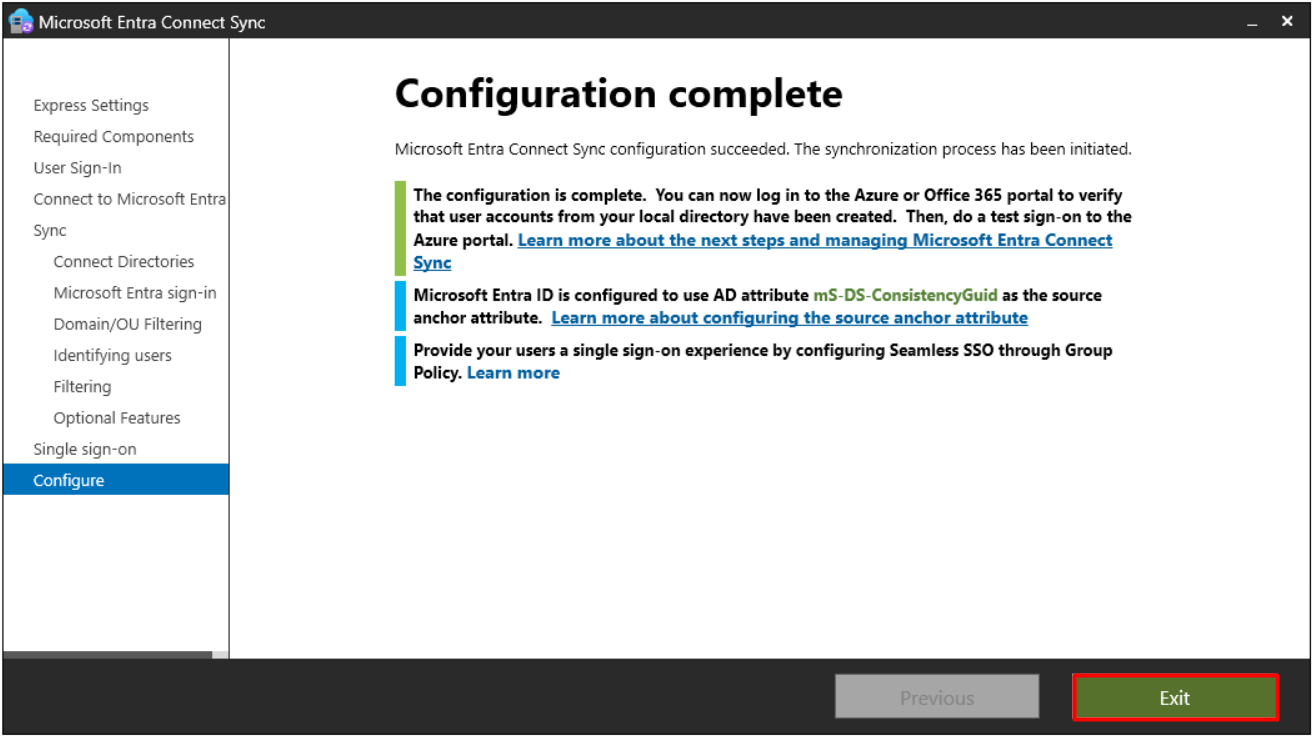
After I exit the wizard, I sign out of Windows and sign in again. Microsoft requires this before Synchronization Service Manager and Synchronization Rules Editor are used.
18- Initial Synchronisation and Verification
I first check the result of the initial synchronisation in Synchronization Service Manager. On the Operations tab, I see that the import, synchronisation and export steps completed successfully and that a total of 264 objects were transferred to Entra ID. Accounts such as Ayşe Yıldız, Mehmet Aksoy, Zeynep Kaya, Ali Demir and Fatma Şahin under the Users OU are in the list.
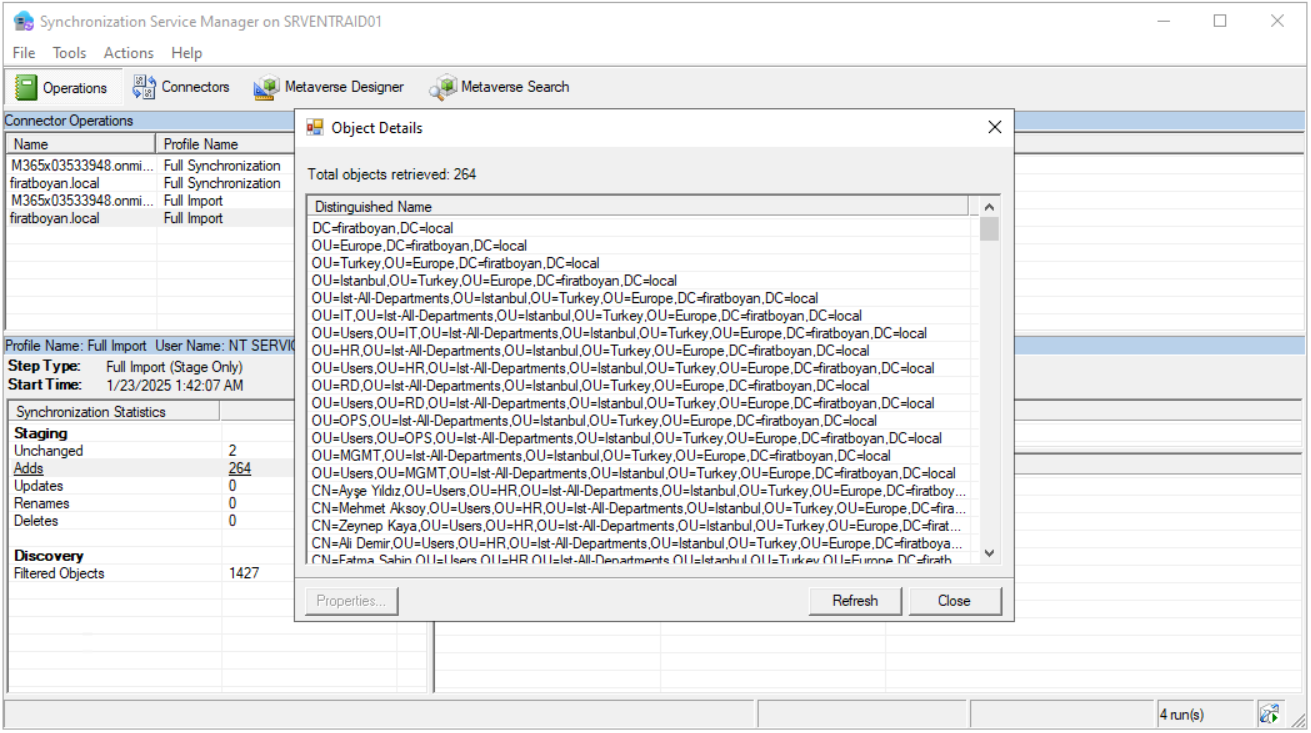
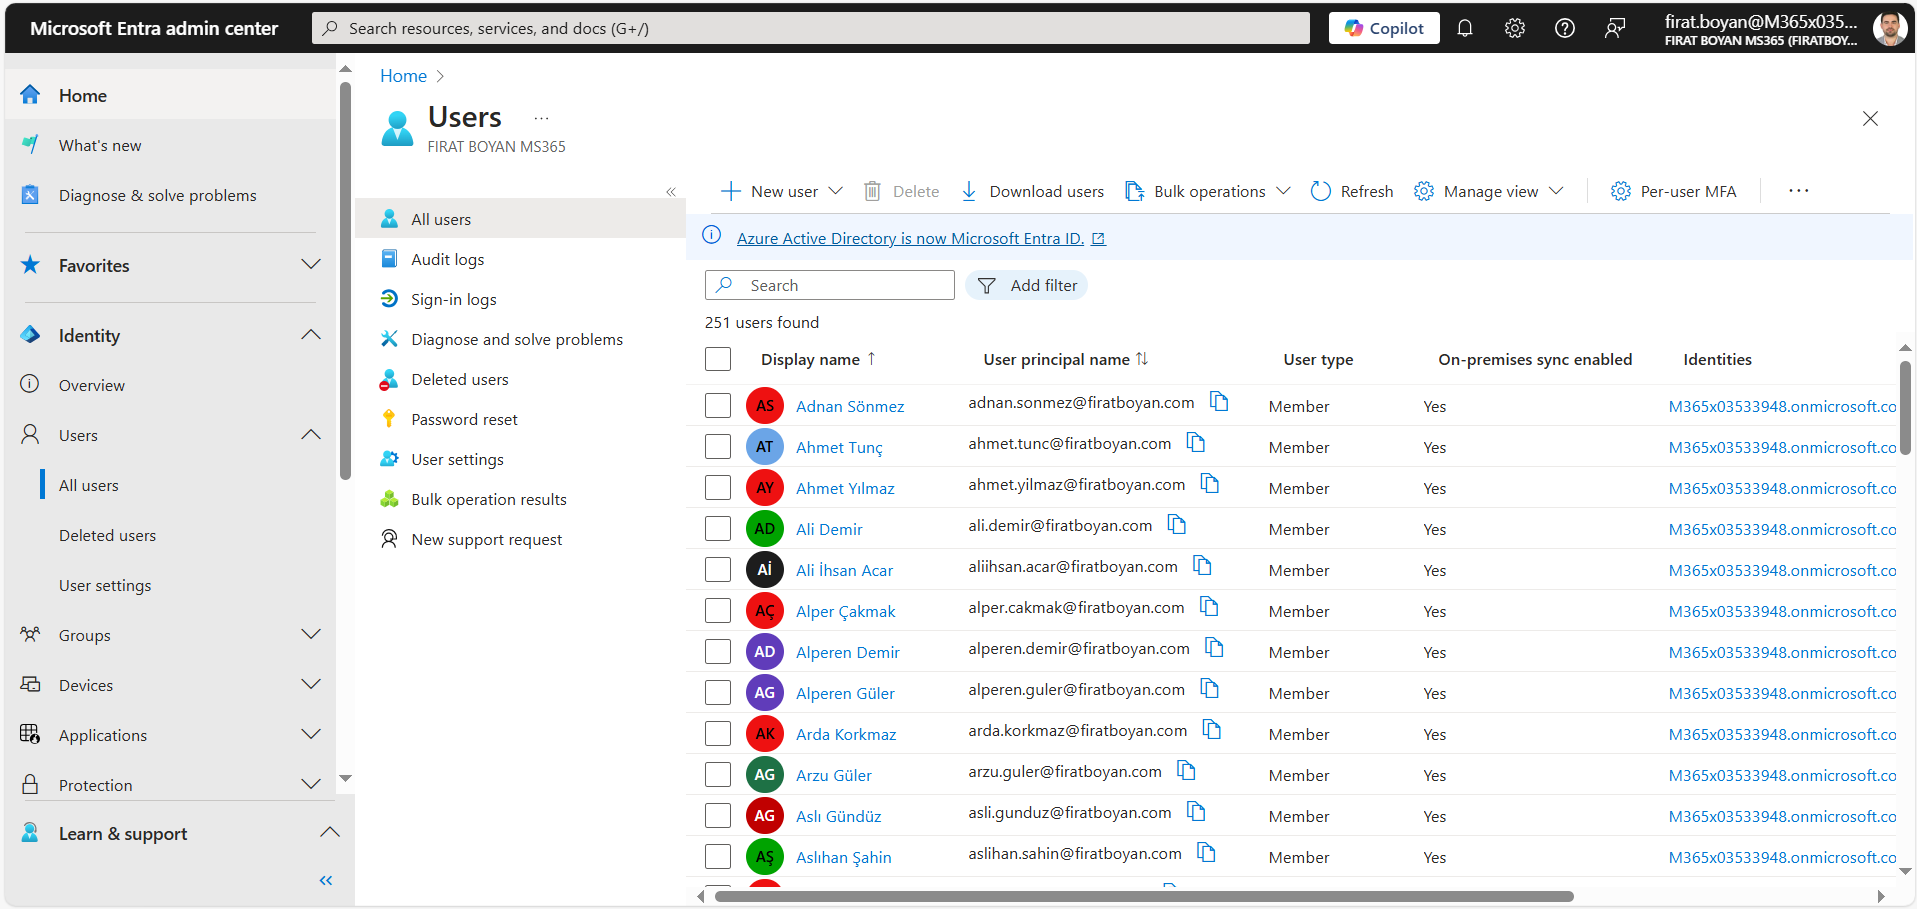
The source of the synchronised users is on-premises Active Directory: user details and passwords are changed in Active Directory, and the changes are reflected in Entra ID. Password resets made in the cloud are also written to Active Directory by Password Writeback.
On the cloud side, I verify from 2 places. In the Microsoft Entra admin center, the Connect Sync page under Entra Connect shows the time of the last synchronisation, and a value of Yes for On-premises sync enabled in the properties of a user confirms that the object is synchronised from on-premises. In the Active users list in the Microsoft 365 admin center, the Sync status column shows with an icon whether the user is cloud-only or synchronised from on-premises.
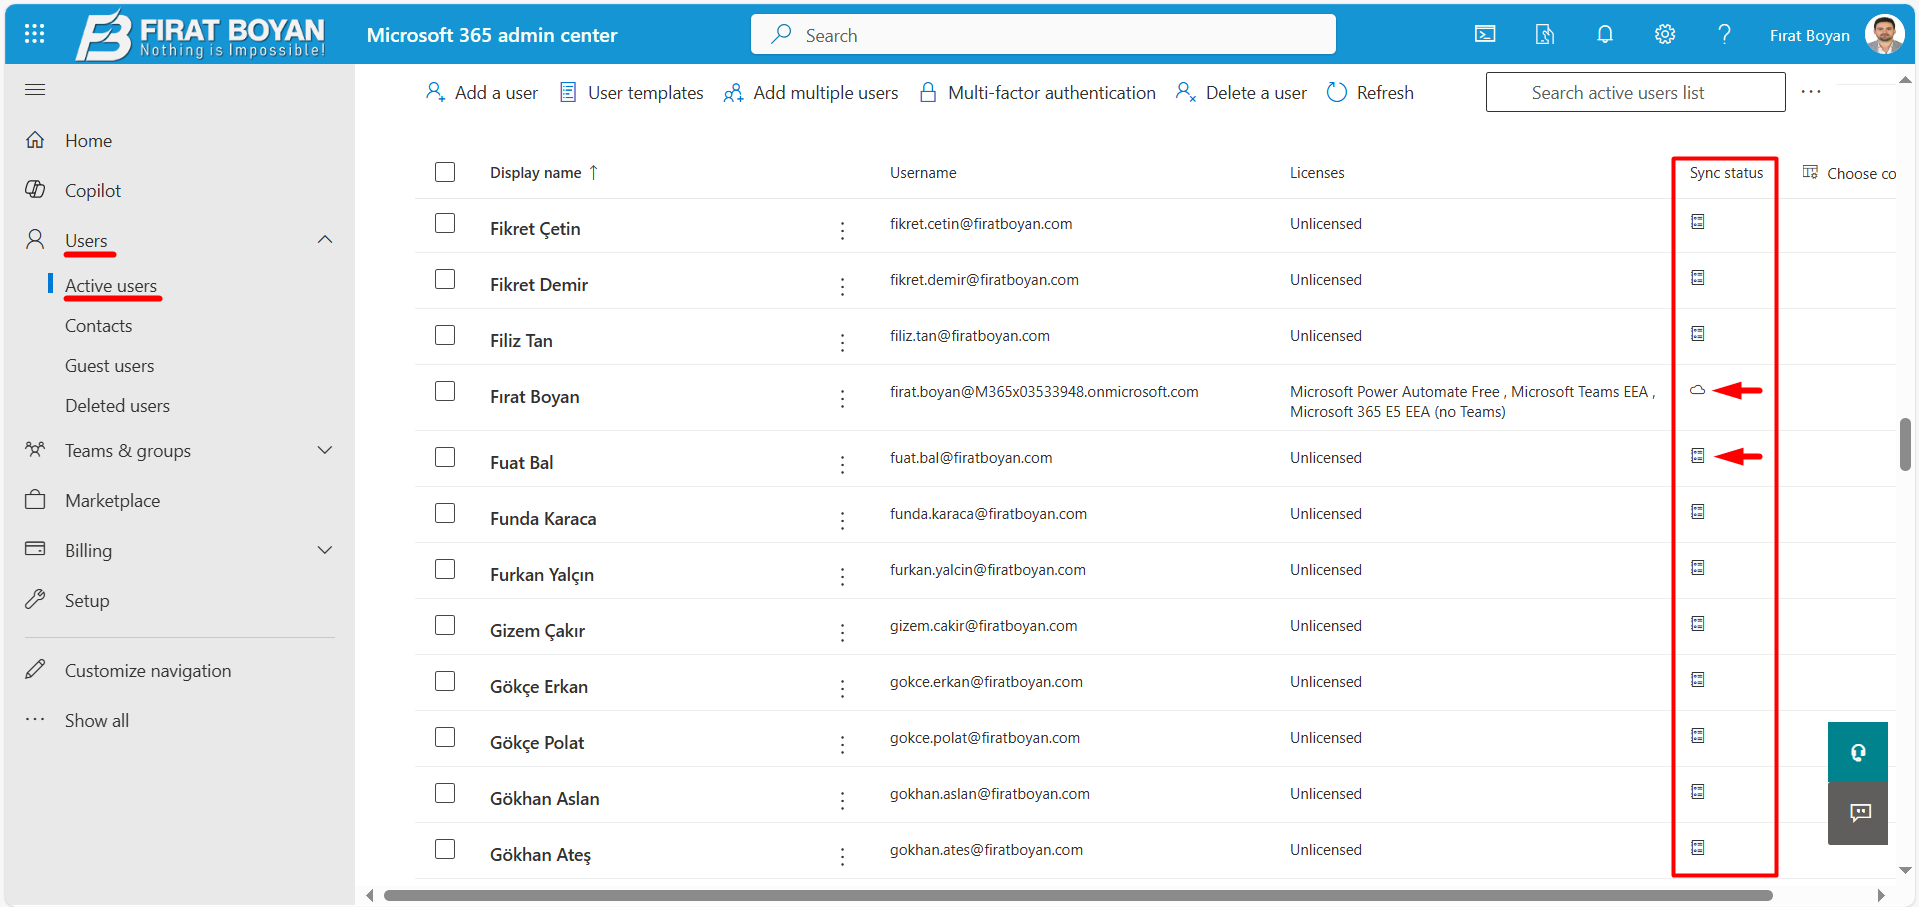
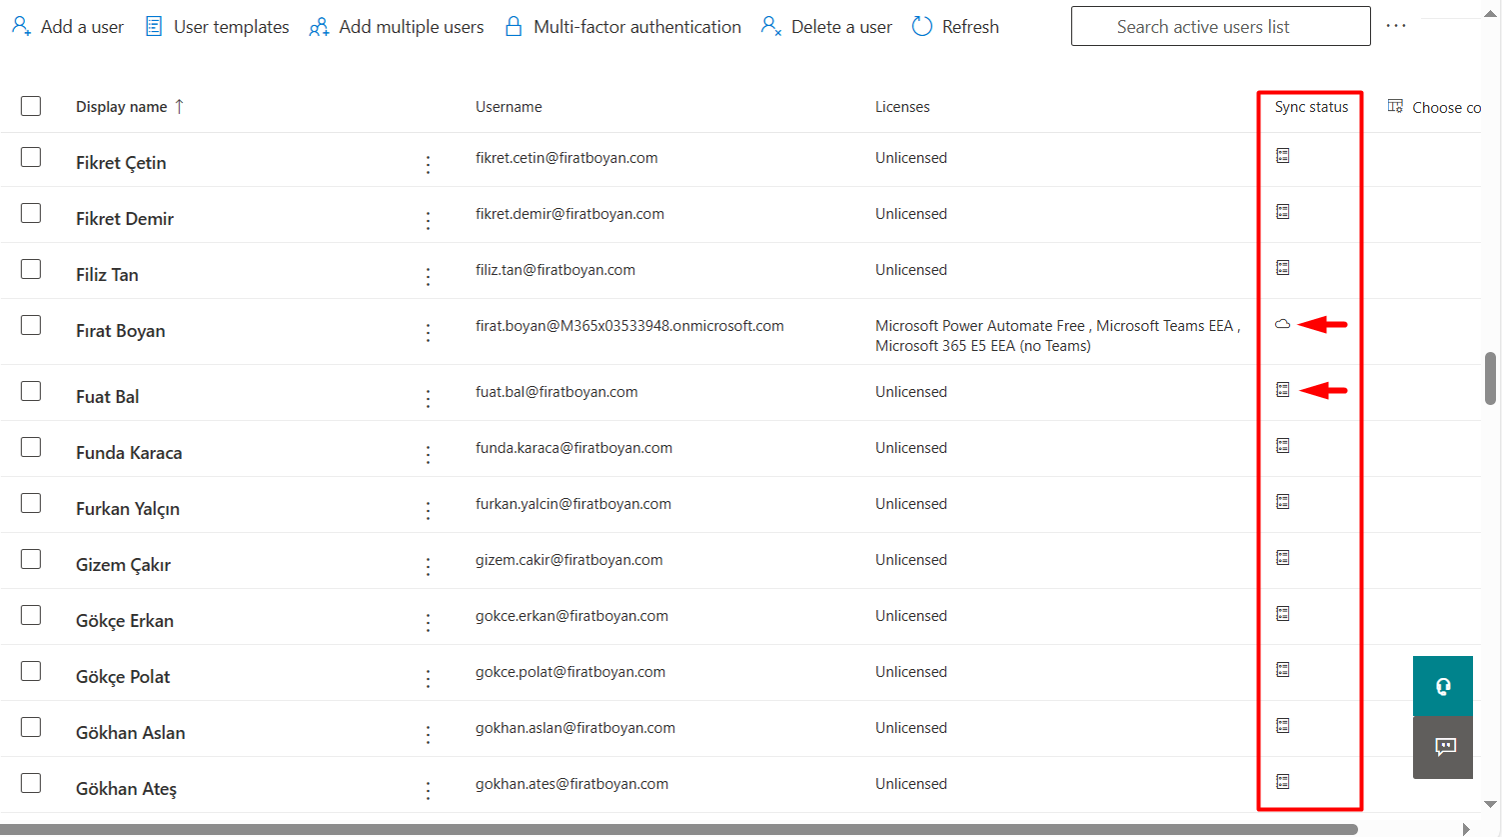
If a user that exists in on-premises Active Directory and is in an OU in scope appears as cloud-only in the cloud, the match did not take place. In this case, the UPN, proxyAddresses and the OU scope must be checked.
From this point, the work belongs to the scheduler. Object and attribute synchronisation runs every 30 minutes by default. Password synchronisation is a separate process and runs every 2 minutes. To see the state of the scheduler and to start a delta synchronisation without waiting, I use the commands below. Delta processes only the changes, and Initial runs a full import and a full synchronisation on all connectors.
Get-ADSyncScheduler

Start-ADSyncSyncCycle -PolicyType Delta
19- Post-Installation Checklist
The wizard is finished, but there are tasks to do so that Seamless SSO and PTA work securely and without interruption in production. The table below shows together these tasks, their reasons and how they are verified. The details of each row are in the sections below the table.
|
Task |
Reason |
How It Is Verified |
|
Group Policy for Seamless SSO |
The browser sends the Kerberos ticket only to addresses in the intranet zone. |
It is tested with a private browser session on a domain-joined client. |
|
Protecting the AZUREADSSOACC account |
If the key of the account is compromised, a Kerberos ticket can be generated for every synchronised user. |
Delegation is disabled on the account, and only Domain Admins can manage it. |
|
Kerberos Decryption Key Rollover |
Microsoft recommends renewing the key at least every 30 days. The operation is not automatic. |
The forest is listed in the Get-AzureADSSOStatus output, and a 30-day reminder is added to the calendar. |
|
Migration from RC4 to AES |
With the July 2026 update, the default encryption type in AD DS became AES-256. |
The msDS-SupportedEncryptionTypes value of the account shows the AES types. |
|
Additional Authentication Agents |
A single agent is a single point of failure for PTA. Microsoft recommends at least 3 agents. |
The agents appear as Active on the Pass-through authentication page in the admin center. |
|
Password Writeback checks |
The licence, Minimum password age and the writeback setting in the admin center are conditions separate from the feature. |
Writeback is enabled on the On-premises integration page, and SSPR is tested with a test user. |
|
Application-Based Authentication verification |
After 7 April 2027, servers that connect with the Sync_ account will not be able to synchronise. |
ConnectorIdentityType is checked in the Get-ADSyncEntraConnectorCredential output. |
|
Export Deletion Threshold |
The default threshold of 500 provides protection against bulk deletion errors. |
The threshold is viewed with Get-ADSyncExportDeletionThreshold. |
Group Policy Configuration for Seamless SSO
The work that the wizard does is limited to the server side: it creates the AZUREADSSOACC account and shares the key with Entra ID. It does not change the client side. However, the browser sends the Kerberos ticket automatically only to addresses in the intranet zone, and the Seamless SSO addresses of Entra ID remain in the Internet zone by default. Unless these addresses are moved to the intranet zone, the user is still asked for a password even though the feature appears as on in the wizard.
Because the setting is under User Configuration, I link the Group Policy object to the OU that contains the user accounts. There are 2 settings to make.
Site to Zone Assignment List. It is under User Configuration > Policies > Administrative Templates > Windows Components > Internet Explorer > Internet Control Panel > Security Page. According to the Microsoft custom installation documentation, 2 addresses are entered as the value name and both are given the value 1: https://autologon.microsoftazuread-sso.com and https://aadg.windows.net.nsatc.net.
Allow updates to status bar via script. It is in the Intranet Zone node under the same path and must be enabled.
A Registry Item Group Policy Preference can also be used instead of the Site to Zone Assignment List. However, the registry path that Microsoft gives for this alternative covers only the autologon address. The difference between the 2 methods is whether users can change their own intranet zone settings: Group Policy locks the setting, and the Preference leaves it changeable. These steps apply to Internet Explorer, Microsoft Edge and Google Chrome, which shares the trusted sites list with Internet Explorer.
The Microsoft Seamless SSO quickstart documentation lists only the autologon address, and the custom installation documentation also adds the second address. Entering the 2 addresses together is compatible with both documents.
I explained each of the methods step by step, together with the Group Policy screens, in the Mandatory GPO Configuration for Domain-Joined Devices section of my article Microsoft Entra ID Seamless SSO, the Difference Between PHS and PTA, and Kerberos. You can follow the configuration there.
Protecting the AZUREADSSOACC Account
The AZUREADSSOACC computer account must be strongly protected. Only Domain Administrator accounts must be able to manage the account, Kerberos delegation must be disabled on the account and no other account must have delegation permission on this account. It is also recommended to keep the account in an OU that is protected against accidental deletion. If the environment has Pass-the-Hash and Credential Theft mitigations, it must also be checked that the account was not moved to the quarantine container.
Kerberos Decryption Key Rollover
If the Kerberos decryption key is leaked, a Kerberos ticket can be generated for any synchronised user. For this reason, Microsoft recommends renewing the key at least every 30 days. The operation is not automatic. It is done on the Microsoft Entra Connect Sync server, in a PowerShell session opened as administrator, with Domain Administrator and Hybrid Identity Administrator credentials, using the steps below. The Update-AzureADSSOForest command in the last step renews the key of the AZUREADSSOACC account in Active Directory and reports the new key to Entra ID. From version 2.6.91.0 onwards, the ADSync.psd1 module must be loaded before the AzureADSSO.psd1 module.
cd "$env:ProgramFiles\Microsoft Azure Active Directory Connect"

Import-Module "$env:ProgramFiles\Microsoft Azure AD Sync\Bin\ADSync\ADSync.psd1"

Import-Module .\AzureADSSO.psd1

New-AzureADSSOAuthenticationContext

Get-AzureADSSOStatus | ConvertFrom-Json

$creds = Get-Credential

Update-AzureADSSOForest -OnPremCredentials $creds
These commands are run on the server where Microsoft Entra Connect Sync is installed, not on a domain controller. The points that I pay attention to when running them are in the table below.
|
Topic |
Description |
|
New-AzureADSSOAuthenticationContext |
It asks for the account that has the Hybrid Identity Administrator role in the tenant. |
|
Get-Credential |
It asks for the Domain Administrator account of the forest. The user name is entered in the format FIRATBOYAN\Administrator, and the account must not be a member of the Protected Users group. |
|
Delegated account |
If the operation is done with an account to which a Domain Admin delegated rights instead of a Domain Admin, the command is run with the -PreserveCustomPermissionsOnDesktopSsoAccount parameter. |
|
Multiple forests |
The Get-Credential and Update-AzureADSSOForest commands are run separately for each forest. If a forest other than the one that contains the Connect server is updated, Global Catalog access (TCP 3268 and TCP 3269) is required. |
|
Staging mode |
There is no need to do this operation on a server in staging mode. |
The Update-AzureADSSOForest command must not be run more than once for a forest. Otherwise, Seamless SSO does not work until the Kerberos tickets of the users are renewed.
Kerberos Encryption Type: AES Instead of RC4
In Seamless SSO, the domain controller gives the user a Kerberos ticket for the AZUREADSSOACC account and encrypts this ticket with the key of that account. The msDS-SupportedEncryptionTypes attribute of the account in Active Directory determines which algorithm is used for the encryption. Seamless SSO supports 3 types: AES256_HMAC_SHA1, AES128_HMAC_SHA1 and RC4_HMAC_MD5.
This topic became important with the July 2026 Windows Server update. Previously, the default Kerberos encryption type in AD DS was RC4. With this update, the default became AES-256, and Microsoft states that Seamless SSO problems can occur in environments that continue to use RC4. Its recommendation is to configure the AZUREADSSOACC account to work with AES256_HMAC_SHA1 or another AES-based type.
The order matters in the migration: First, the Kerberos decryption key is renewed with the commands above, and then the encryption type of the account is changed to AES. If the encryption type is changed before the key is renewed, Seamless SSO may not work. I change the encryption type on the domain controller with the command below.
Get-ADComputer AZUREADSSOACC -Properties msDS-SupportedEncryptionTypes | Select-Object Name, msDS-SupportedEncryptionTypes

Set-ADComputer AZUREADSSOACC -KerberosEncryptionType AES256
Additional Authentication Agents
Only 1 Authentication Agent was installed during the installation, and this agent is on the Microsoft Entra Connect Sync server. When this server is taken into maintenance or becomes unreachable, PTA validation stops. Microsoft recommends at least 3 agents for production. The installation file of the additional agents is downloaded from the Pass-through authentication page under Entra Connect in the admin center and installed on different servers. The state of the agents is visible on the same page.
Password Writeback Checks
Turning on the option in the wizard is not enough by itself. I verify that the users are licensed, that the Minimum password age value in the domain is 0 and that the writeback setting is enabled on the On-premises integration page under Password reset in the Microsoft Entra admin center. As the last check, I perform a Self-Service Password Reset with a test user and test that the new password works in Active Directory.
Application-Based Authentication Verification
I can see the identity with which the server connects to Entra ID in 2 ways. In the View or export current configuration task in the wizard, the Client ID of the application appears if the application identity is used, and the account name appears if the old method is used. The PowerShell command below gives the same information. If the ConnectorIdentityType field in the output shows the value ServiceAccount, the server still runs with the old account, and the Configure application-based authentication to Microsoft Entra ID task under Additional tasks is run in the wizard.
Get-ADSyncEntraConnectorCredential
Export Deletion Threshold
When the threshold is exceeded, the export stops without deleting any object, an email is sent to the administrator and the state of the export step appears as stopped-deletion-threshold-exceeded in Synchronization Service Manager. The threshold is viewed and changed with the cmdlets below, using a Global Administrator or Hybrid Identity Administrator account. The admin@tenant.onmicrosoft.com expression in the commands is replaced with the UPN value of the administrator account.
Get-ADSyncExportDeletionThreshold -AADUserName "admin@tenant.onmicrosoft.com"

Enable-ADSyncExportDeletionThreshold -DeletionThreshold 500 -AADUserName "admin@tenant.onmicrosoft.com"
Seamless SSO Test
After Group Policy is deployed, I verify the feature from 2 places. The first is the tenant side: in the Microsoft Entra admin center, I check that the Seamless single sign-on value appears as Enabled on the Entra Connect and Connect sync page under Entra ID.
[SCREENSHOT: Microsoft Entra admin center, the section of the Connect sync page where the Seamless single sign-on row appears as Enabled]
The second is the client side. For the test, the user must be signed in to Windows on a domain-joined device, the device must be able to reach a domain controller directly over a wired, wireless or VPN connection and Group Policy must be applied to this user. I open a new private session in the browser and go to https://myapps.microsoft.com/M365x03533948.onmicrosoft.com. If Seamless SSO works, the user is signed in without being asked for a user name and password. Finally, I sign in to the Microsoft 365 services with test accounts and test that validation through PTA works.
I hope you find it useful...
Feel free to share your thoughts and questions about this article in the comments below. Every contribution helps the content reach more people and makes for a more useful discussion.