When a Microsoft 365 environment is created, the tenant starts with a domain that Microsoft assigns automatically, with the tenant.onmicrosoft.com suffix. This domain is a technical starting point that the services require in order to work, and it represents the identity of the tenant in the background. User accounts, groups and the initial configuration can be created under this domain without any problem. However, it does not give the organisation an identity that is associated with its own name. For user names and email addresses in particular, the tenant.onmicrosoft.com domain does not meet the expectation of corporate addressing.
When a domain that belongs to the organisation is added to Microsoft 365, user identities start to be defined in the organisation's own address space. User Principal Name (UPN) values, email addresses in Exchange Online and service access become directly tied to this domain. As a result, users use a defined and consistent address structure that belongs to the organisation, in both internal and external communication. After this stage, the tenant.onmicrosoft.com domain stays in the background and continues to exist as the technical domain of the tenant.
The attribute structure of the user objects held in Entra ID, the authentication flows and the relationships between services are all shaped directly by the defined domain. User sign-in behaviour, service access and identity references work in line with this domain, and the domain acts as a common binding element across the infrastructure.
In hybrid architectures, an exact match between the UPN suffixes used in on-premises Active Directory and the domains defined in Microsoft 365 directly affects whether synchronisation runs correctly. With this match, user identities stay consistent both on-premises and in the cloud, and addressing and identity matching continue without problems.
For this reason, the domain is not only a visual addressing element. It is a central structure that the entire identity infrastructure refers to. The relationship between Entra ID, Exchange Online and the other Microsoft 365 services takes its meaning from this common domain definition.
A domain that is added and verified correctly in Microsoft 365 gives users a consistent experience across all services. Users access Exchange Online, Teams, SharePoint and OneDrive through the same domain. Although different services run in the background, from the outside the whole structure appears under a single corporate domain, and the digital identity of the organisation is represented clearly.
From this point, let us go through the process of adding a domain to your Microsoft 365 tenant step by step. We will look at how the verification records are created, how the domain is associated with the services, and how the required configuration is made in the related components, Exchange Online first of all. In this way, we can make sure that the domain is not only added to your tenant, but is also compatible with the services and positioned correctly.
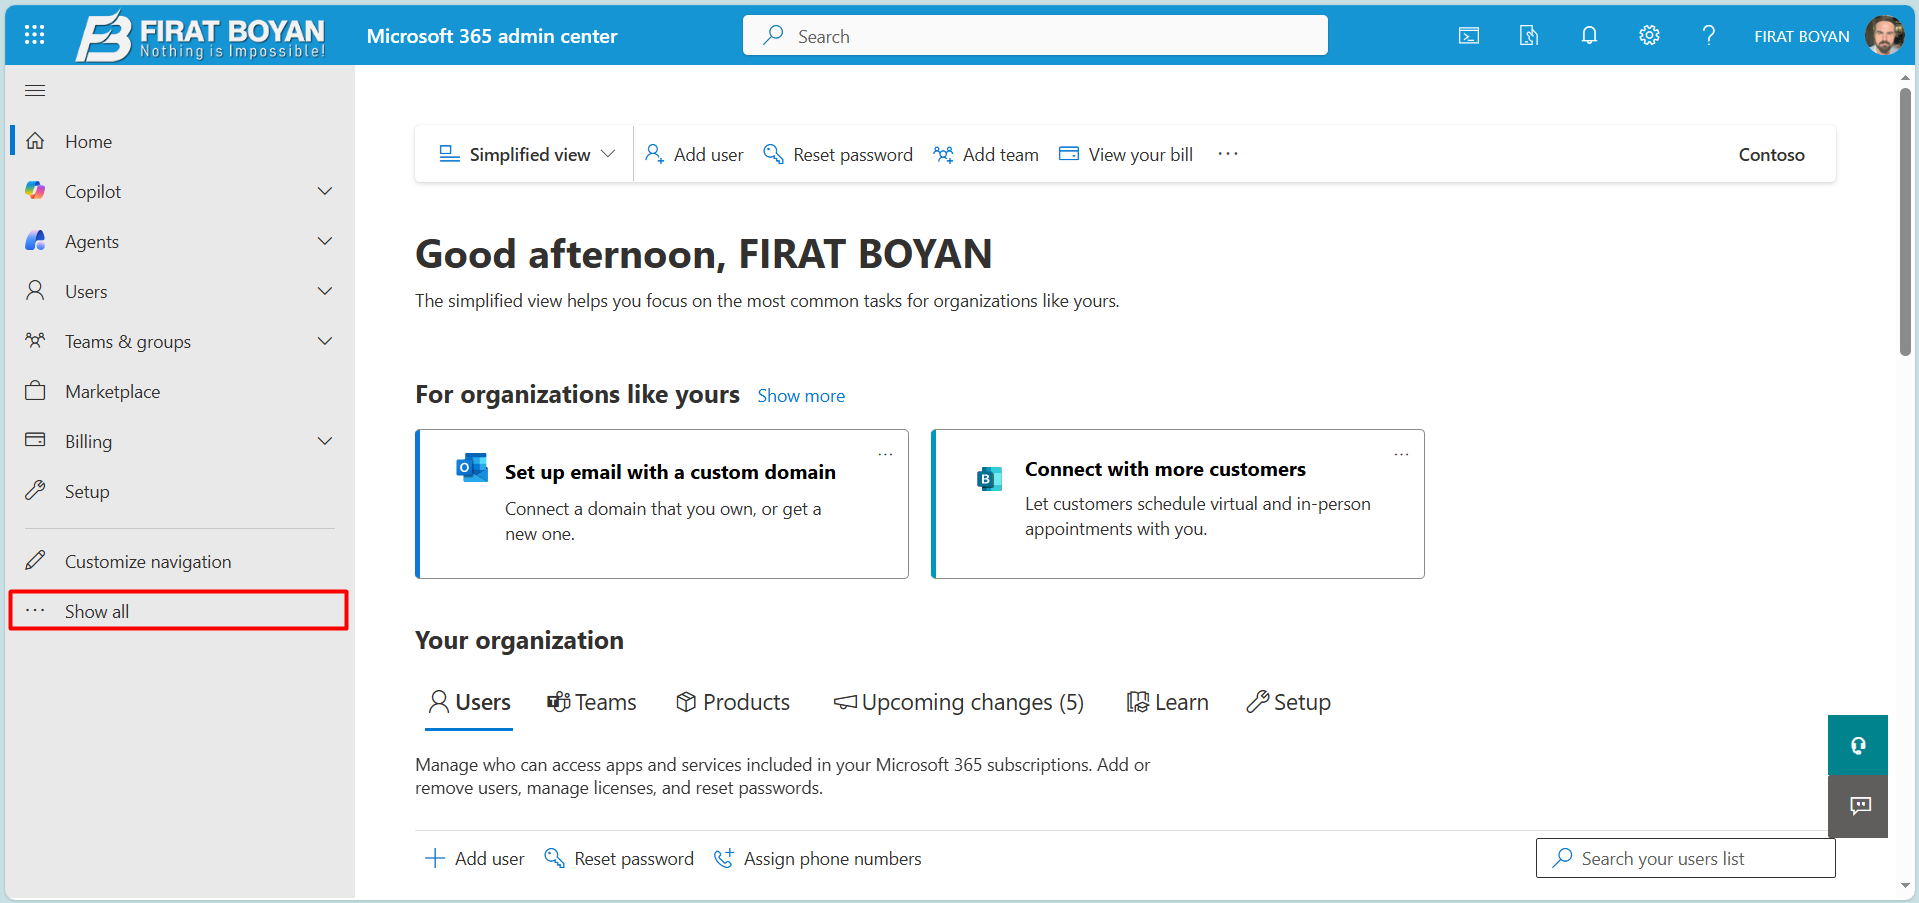
1- Before you start adding a domain to Microsoft 365, open the Microsoft 365 admin center, where the administrative tasks are carried out. After you sign in to the admin center in a browser, the main dashboard appears. This screen is the central point where the general state of the tenant is monitored and basic administrative tasks are started.
The navigation menu on the left lists the frequently used areas by default. To reach the detailed settings for domain, user and service configuration, click Show all at the bottom of this menu. This step makes all the advanced administration menus that are hidden in the admin center visible.
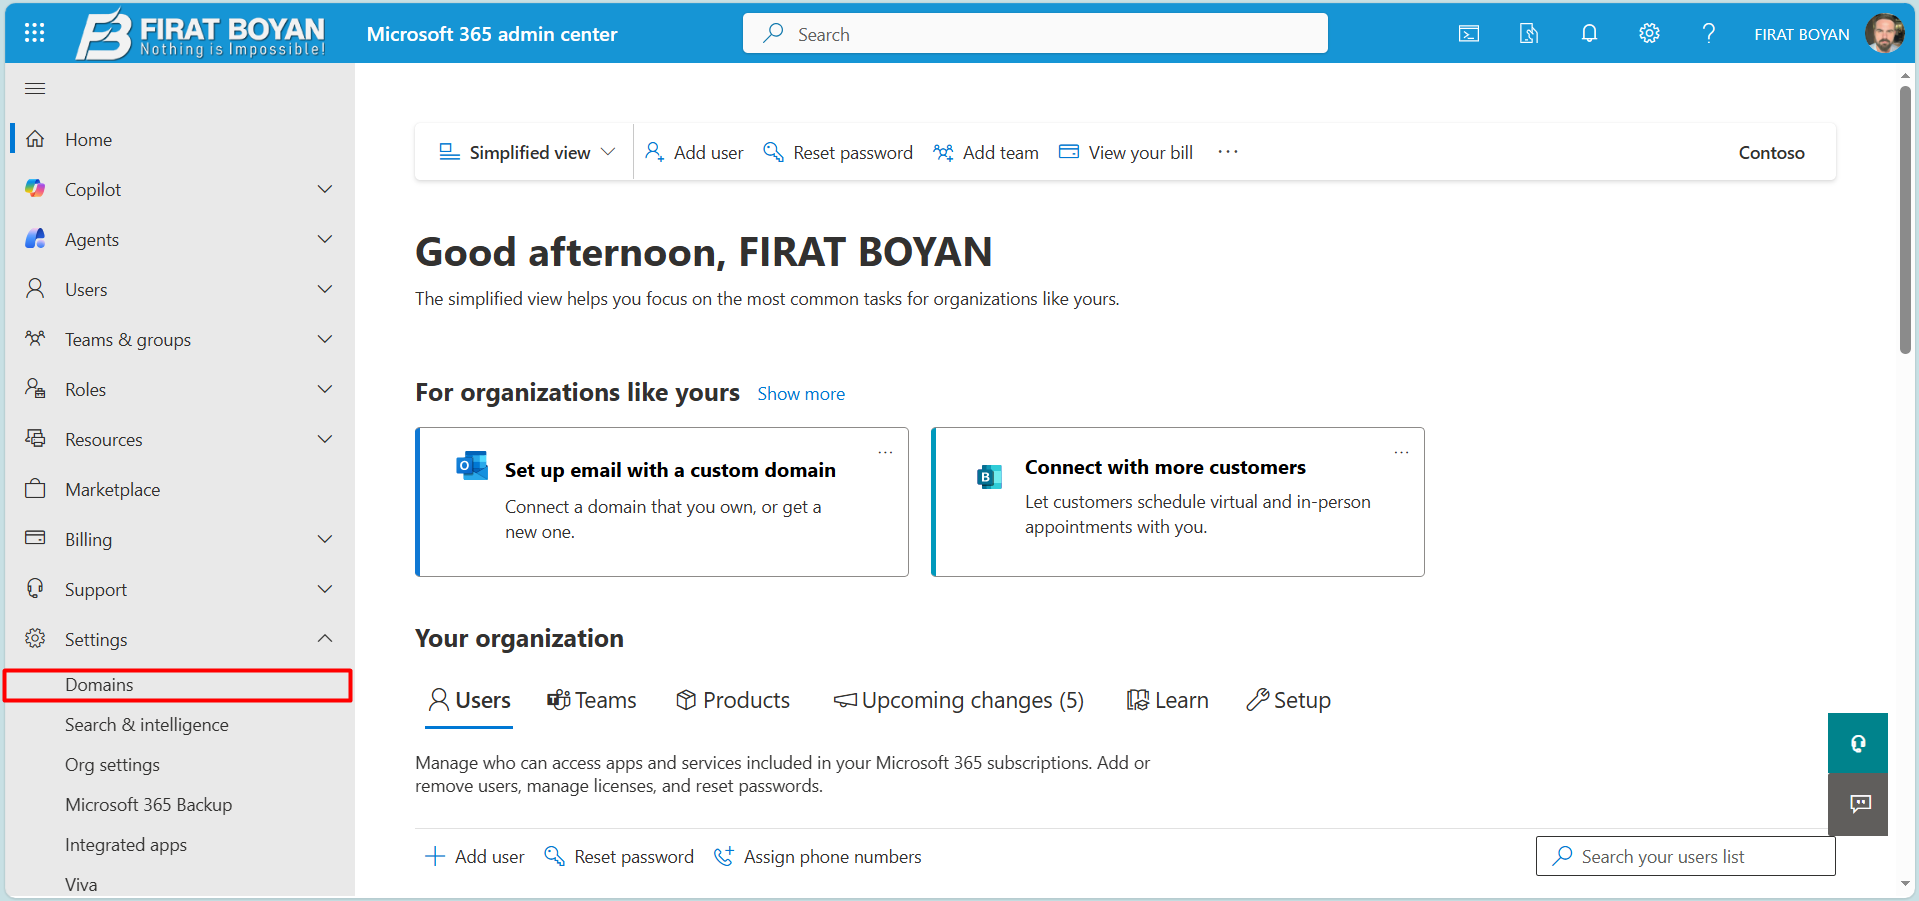
2- After the expanded menu is displayed with Show all, expand the Settings heading on the left. This area is the central menu for the settings that apply across the Microsoft 365 tenant. Click Domains under Settings to open the screen that lists the domains defined in the tenant.
From here, let us continue on the Domains screen to start adding the domain.
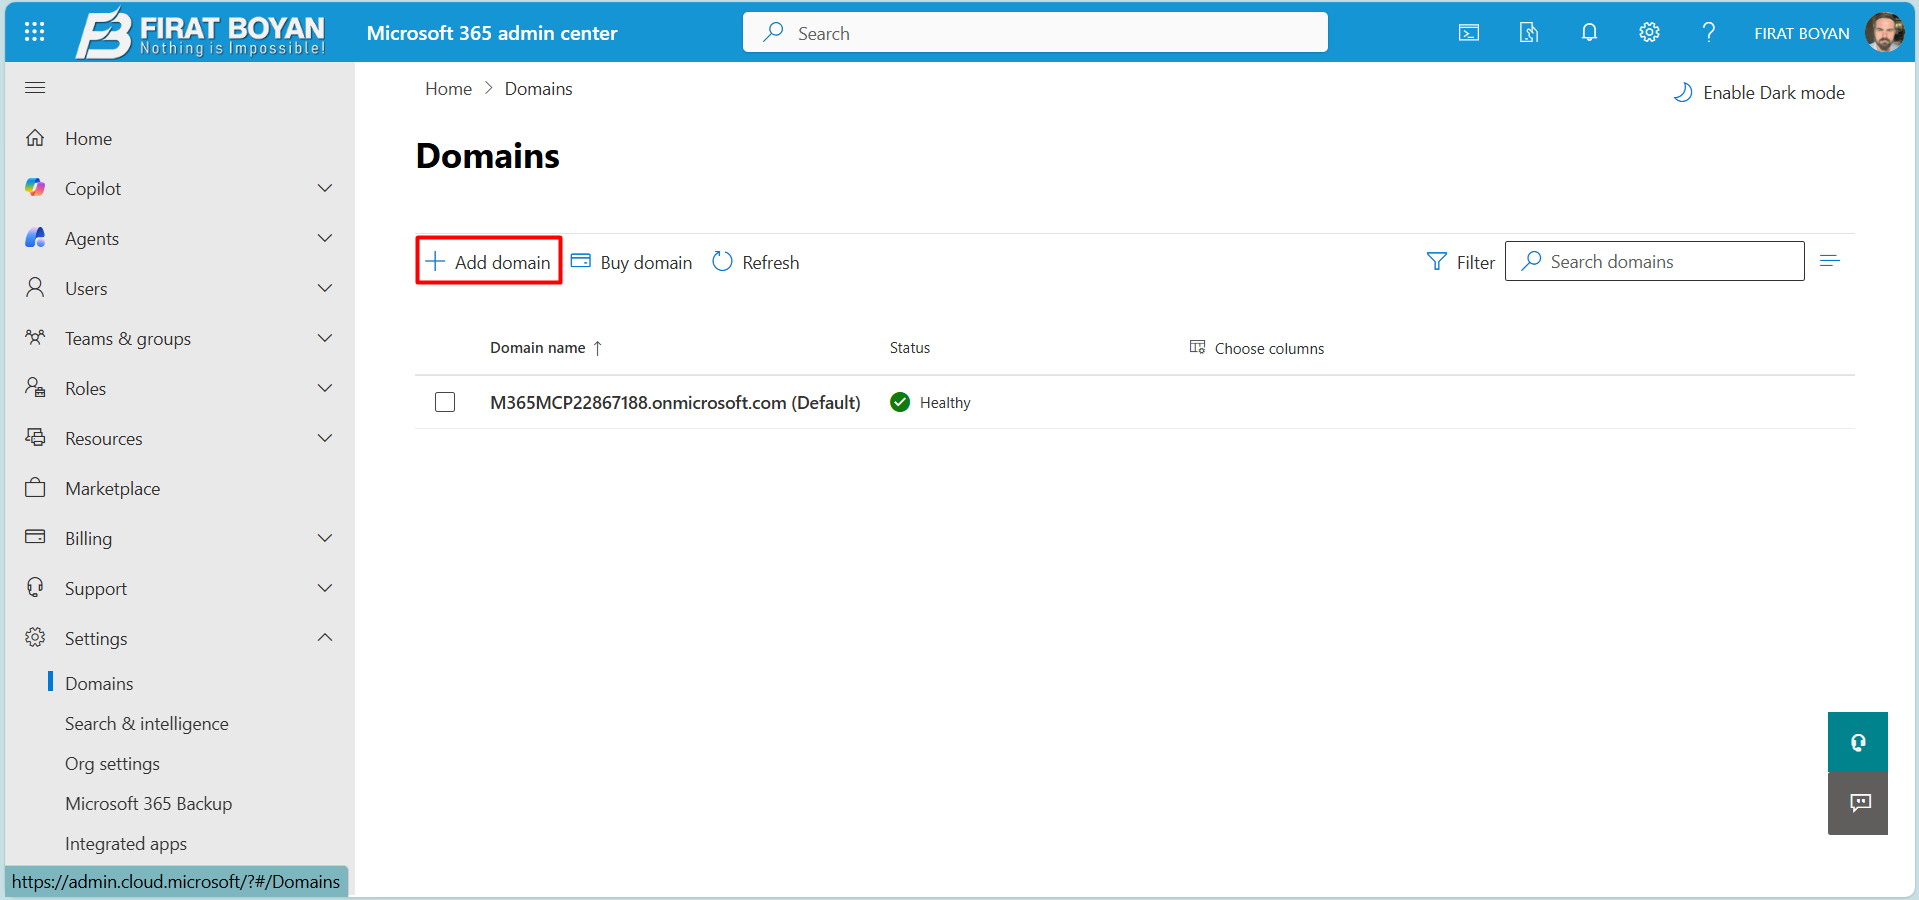
3- The Domains section shows the existing domain records together with the default tenant.onmicrosoft.com domain, and a new domain can be added from here. To start adding a new domain, click Add domain at the top. This starts the wizard that is used to introduce an externally owned domain to the Microsoft 365 tenant.
With the Add domain step, the verification process starts for the domain name that will be entered, and the configuration steps directed by Microsoft follow. In the next stage, the domain name is entered and the verification method is selected.
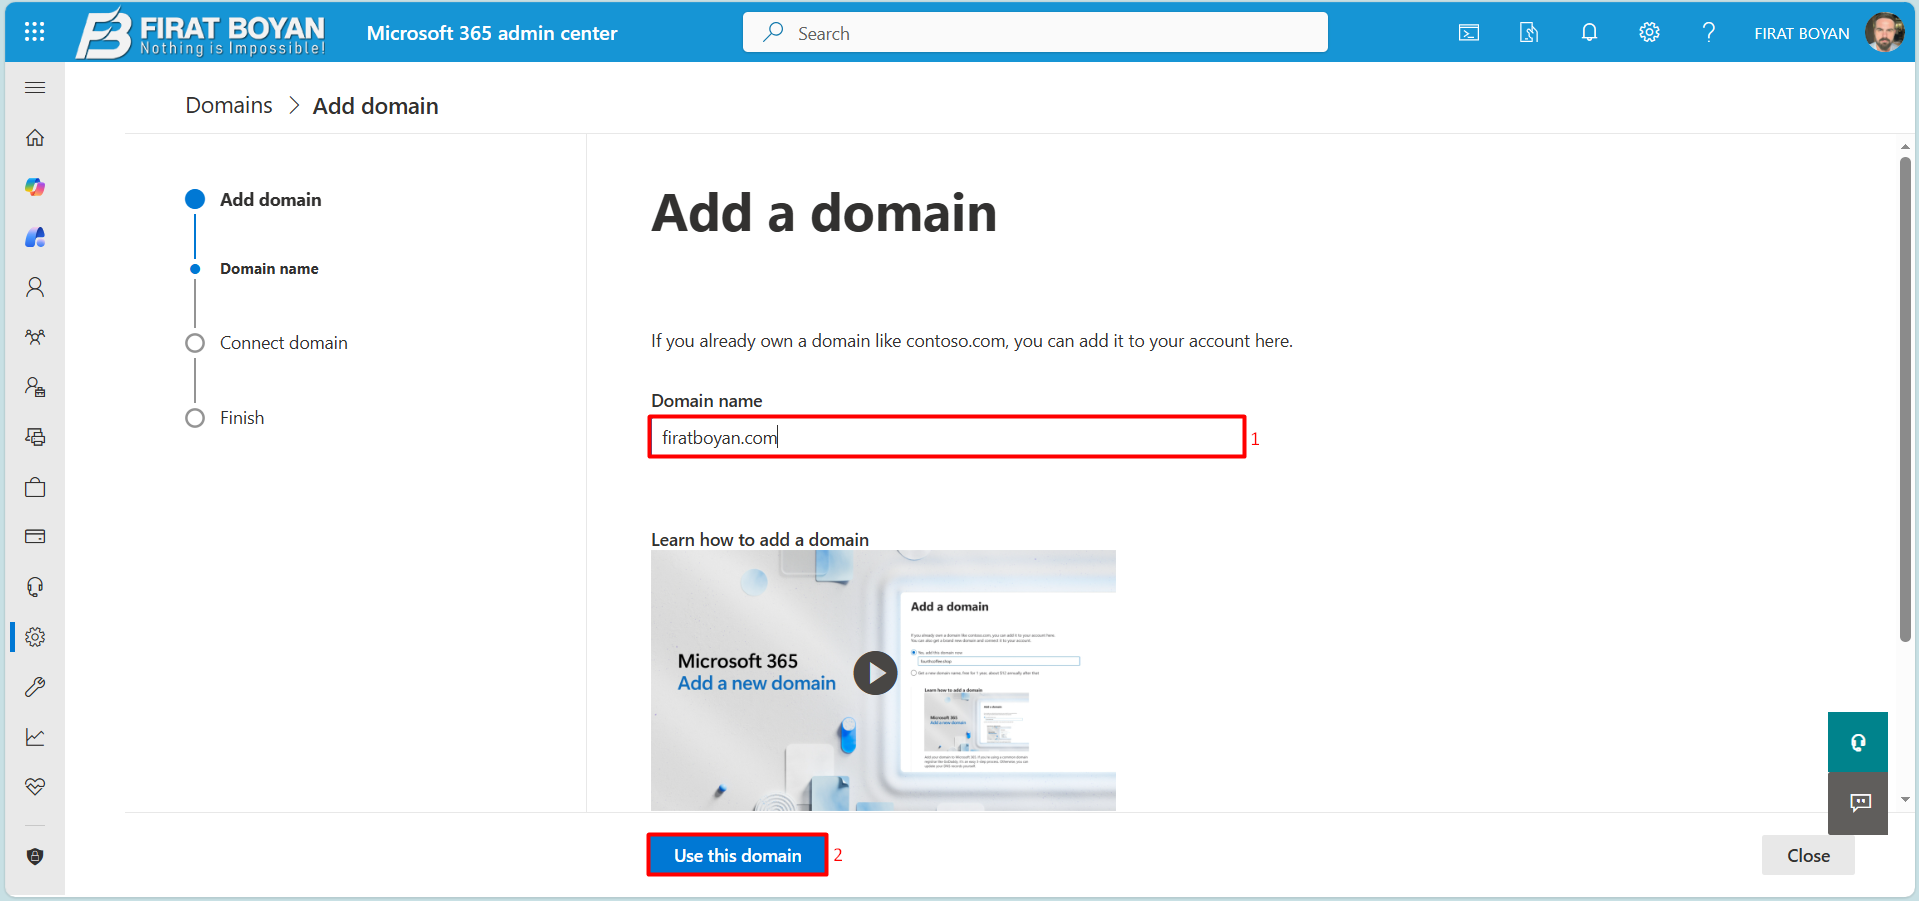
4- When the domain addition section opens under Add a domain, the first step is to enter the name of the domain to add. Type the domain that will be used in the Microsoft 365 tenant in the Domain name field. The domain entered at this stage must already belong to the organisation, and its DNS management must be accessible.
After the domain name is entered, click Use this domain at the bottom to continue. This step puts the domain into the verification process and opens the next screen, which shows the DNS verification methods.
If your organisation uses on-premises Exchange or hosted Exchange, and the plan is to add only the email domain to the Microsoft 365 tenant without moving the mailboxes to Exchange Online, Outlook clients may query the Microsoft 365 endpoints first during the Autodiscover process. On the user side, this behaviour appears as a sign-in window that opens repeatedly and a failure to connect to the on-premises mailbox.
To prevent this, the following registry value is defined on classic Outlook clients.
Registry Path : HKEY_CURRENT_USER\Software\Microsoft\Office\16.0\Outlook\AutoDiscover
Value Name    : ExcludeExplicitO365Endpoint
Value Type    : REG_DWORD (32-bit)
Value Data    : 1
This key makes Outlook skip the Office 365 endpoint checks in the Autodiscover process. By default, Outlook tries to retrieve the Office 365 configuration through Step 4, which queries Office 365 first, and through Step 11, which tries the Office 365 endpoints again as a last resort when the other steps return no result. When ExcludeExplicitO365Endpoint is set to 1, these 2 steps are disabled, and Outlook reaches the on-premises Exchange configuration through the standard Autodiscover steps such as the SCP, the Autodiscover host record and the SRV record. The user then connects directly to the on-premises mailbox without seeing the Microsoft 365 sign-in window.
The 16.0 in the path applies to all of the Office 2016, 2019, 2021 and 2024 versions. In large environments, the same value can be deployed through GPO or an Intune configuration profile. With central deployment through GPO or Intune, the value is defined under the policy-based AutoDiscover path instead of the non-policy path, and Microsoft states that policy-based keys take precedence over non-policy keys. The policy path is as follows.
HKEY_CURRENT_USER\Software\Policies\Microsoft\Office\16.0\Outlook\AutoDiscover |
This control does not apply to the new Outlook for Windows. The new Outlook does not support on-premises Exchange accounts and uses a different account provisioning model that is aimed only at cloud-based accounts such as Exchange Online and Outlook.com.
When mailbox migration to Exchange Online starts, the ExcludeExplicitO365Endpoint registry key must be removed. Otherwise, Outlook cannot connect to the mailbox in Exchange Online and the setup fails.
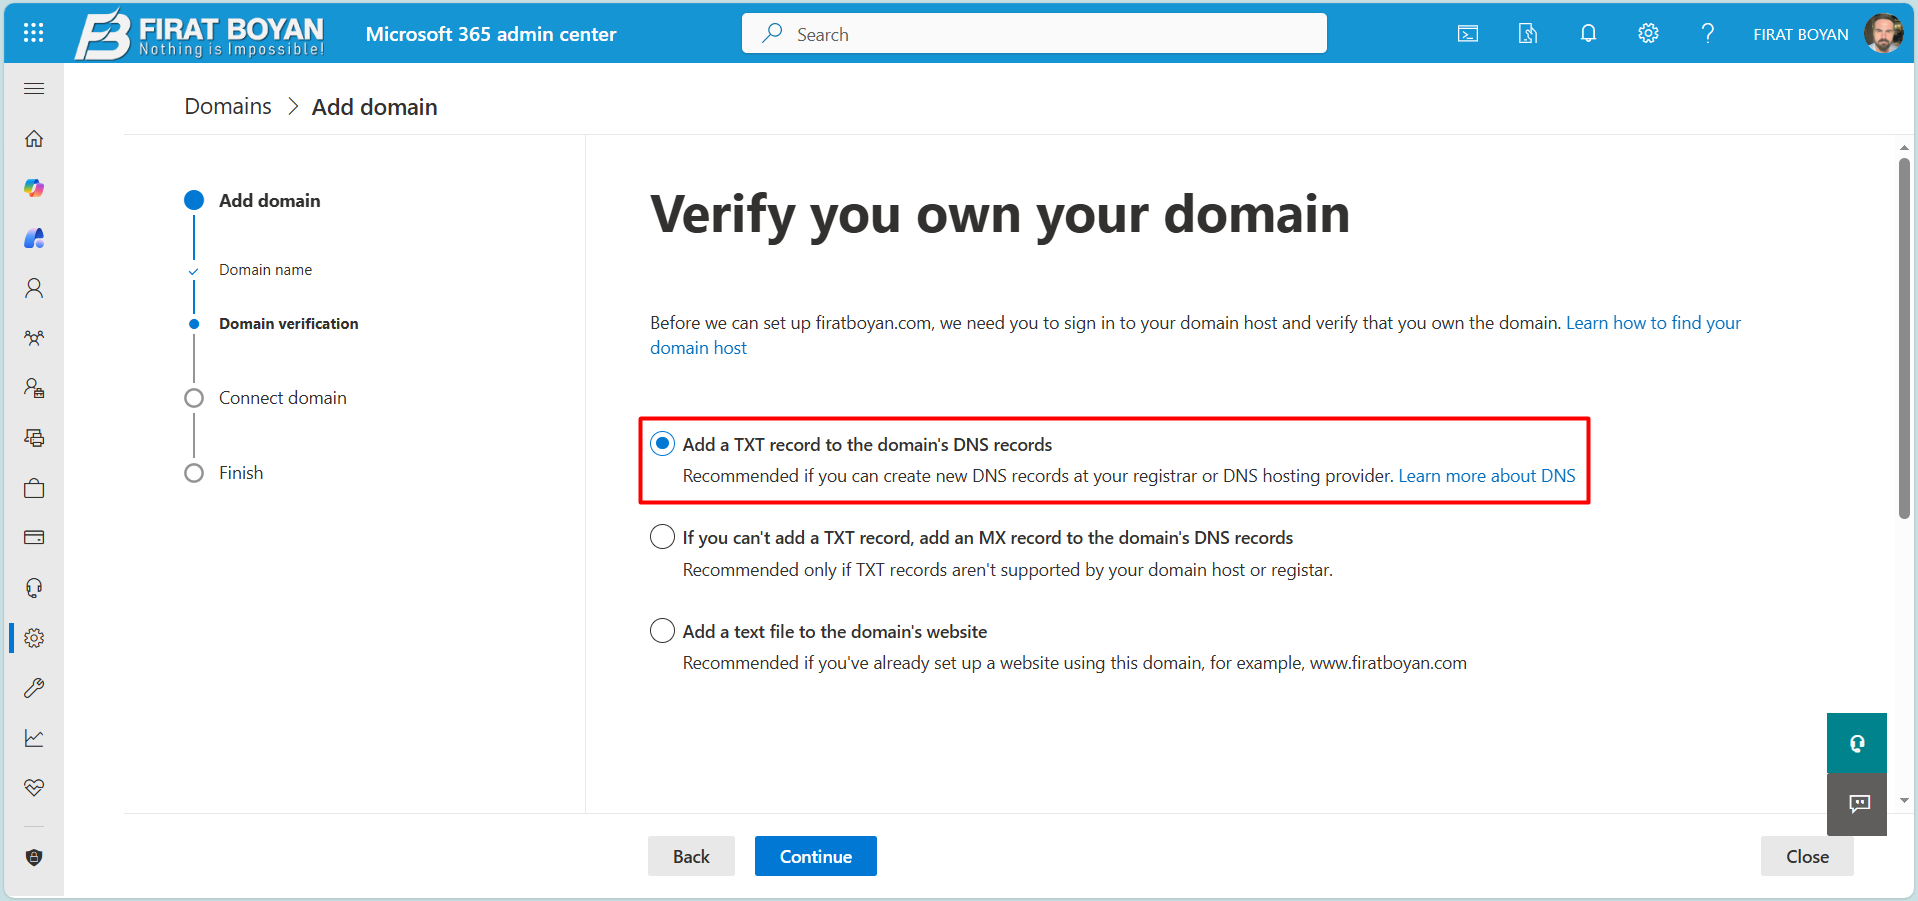
5- After the Domain name step is complete, the domain verification stage starts. This step proves, through the DNS or web infrastructure, that the domain being added to the Microsoft 365 tenant really belongs to you. To stop a user who has no authority over the domain from configuring it, Microsoft 365 applies a verification mechanism that requires a direct change in the management of the domain.
This screen offers more than 1 option for domain verification. Each option proves domain ownership with a different technical method, and the method to use depends on how the DNS and web infrastructure of the domain are managed.
✅ Add a TXT record to the domain’s DNS records
With this option, a special TXT record generated by Microsoft 365 is added in the DNS management panel of the domain. Because only people with full authority over the domain can create a TXT record, it is regarded as the most common and most trouble-free method of verifying domain ownership. It is the default choice in environments where DNS management is accessible, and it is the verification approach that Microsoft recommends.
✅ If you can’t add a TXT record, add an MX record to the domain’s DNS records
This is the alternative verification method for cases where a TXT record cannot be added. In this method, a temporary MX record is defined for verification, and Microsoft 365 confirms domain ownership through this record. It is generally used on systems with old or restricted DNS management interfaces that cannot define a TXT record.
✅ Add a text file to the domain’s website
This option applies when no record can be added on the DNS side. If a website is published for the domain, the text file supplied by Microsoft 365 is placed in the specified directory on the web server. Microsoft 365 accesses this file over HTTP and completes the domain verification. This method is for scenarios with no DNS access but with access to the web server.
The scenario in this article continues with the TXT record option, which is both simple to manage and technically the cleanest verification method.
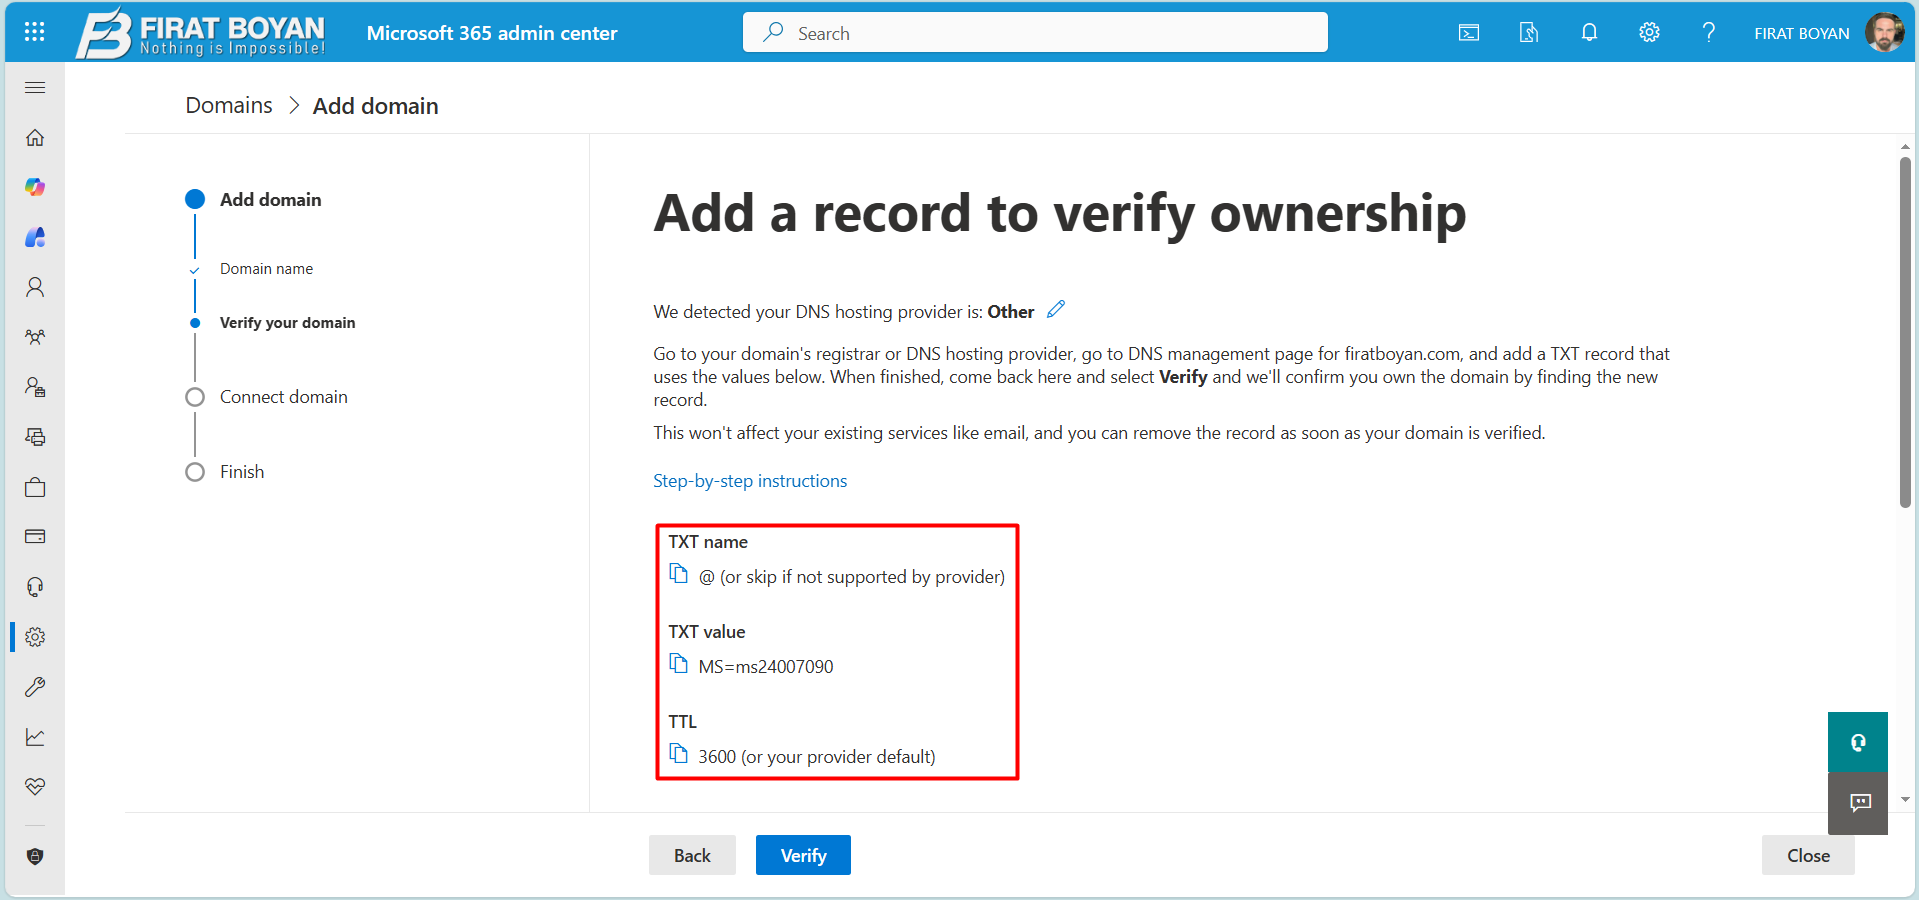
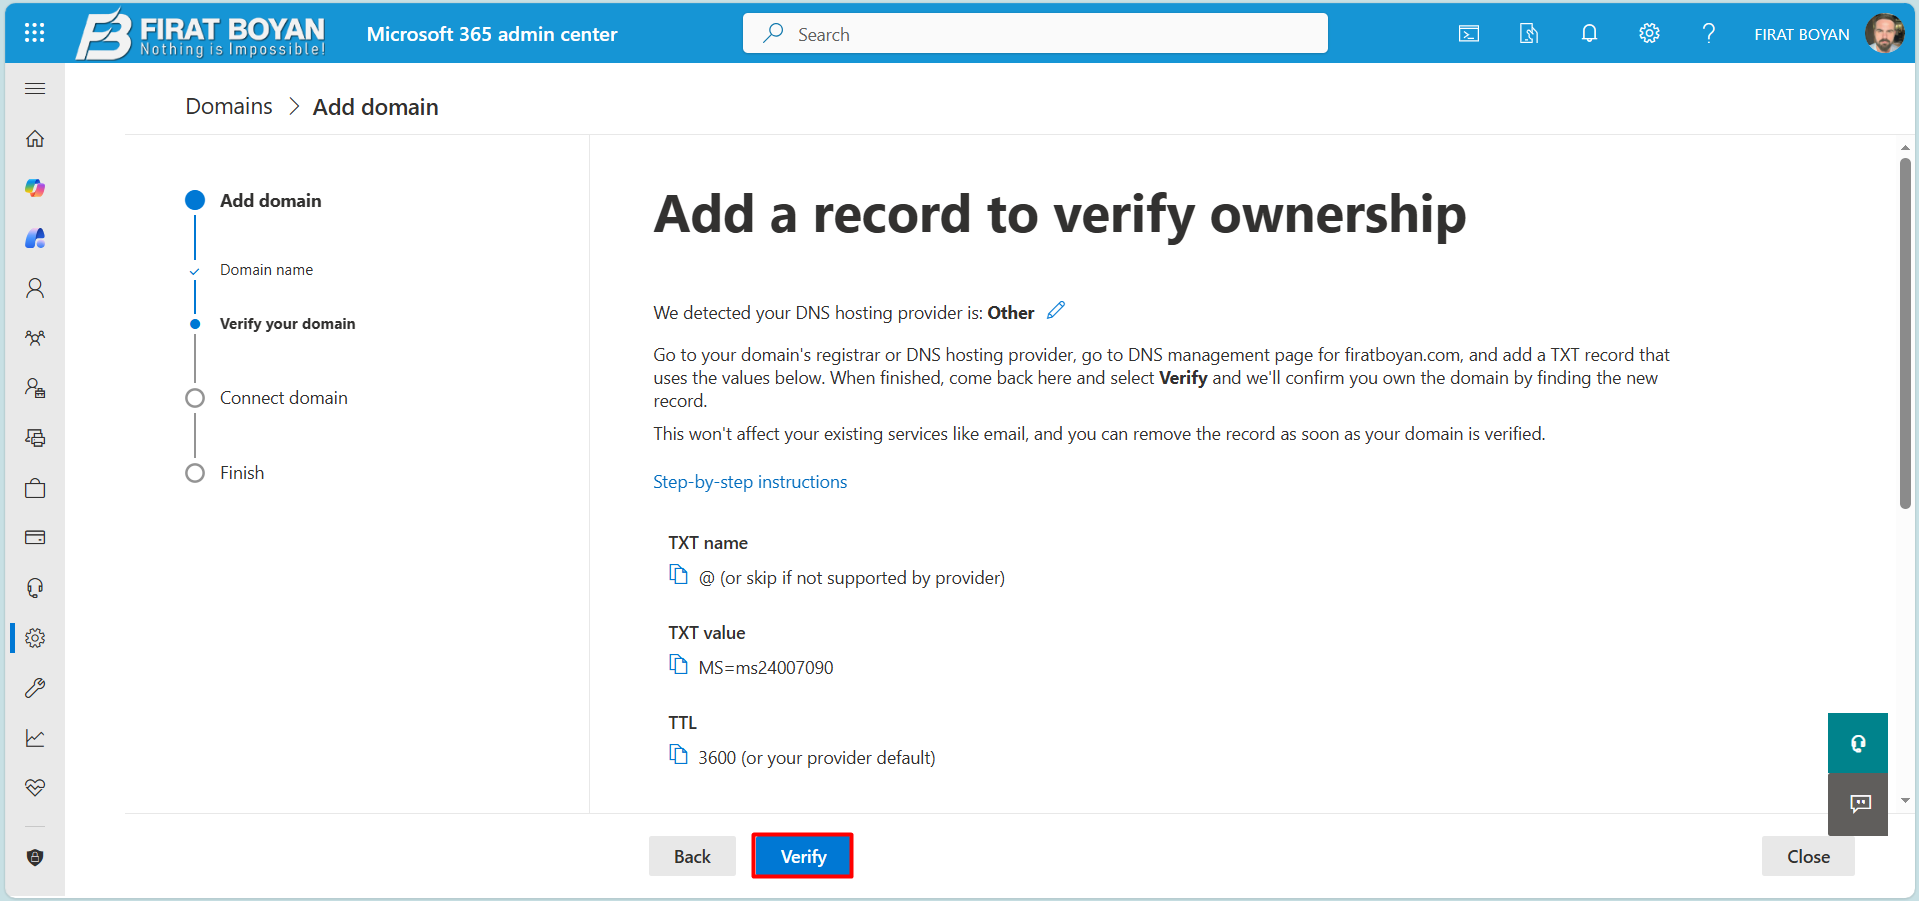
6- After the TXT verification method is selected, the screen shows the record details that must be added in DNS to prove domain ownership. In this step, Microsoft 365 detects which DNS infrastructure manages the domain and generates the verification record. The details shown are the technical values to enter in the DNS management panel of the domain exactly as they appear.
✔ TXT name
The TXT name field is the name of the record to create in DNS. The @ value shown here indicates that the record belongs directly to the domain itself. With many DNS providers, @ represents the root domain and is used automatically by the system. In those cases, leaving the field empty is enough. Microsoft 365 takes this behaviour of the DNS provider into account and shows this information as a note.
✔ TXT value
The value in the TXT value field, similar to MS=ms24007090, is a unique verification value that Microsoft 365 generates for the tenant. Microsoft 365 queries DNS for this value to confirm domain ownership. For this reason, the TXT value must be entered exactly as shown. A missing character, an extra character or a different string causes the verification to fail.
✔ TTL
The TTL value sets how long the DNS record is kept in cache. By default, 3600 seconds, which is 1 hour, is shown. If the default TTL of the DNS provider is used, this field does not need to be changed. Lower TTL values can make the DNS record propagate faster, but this is not a requirement for domain verification.
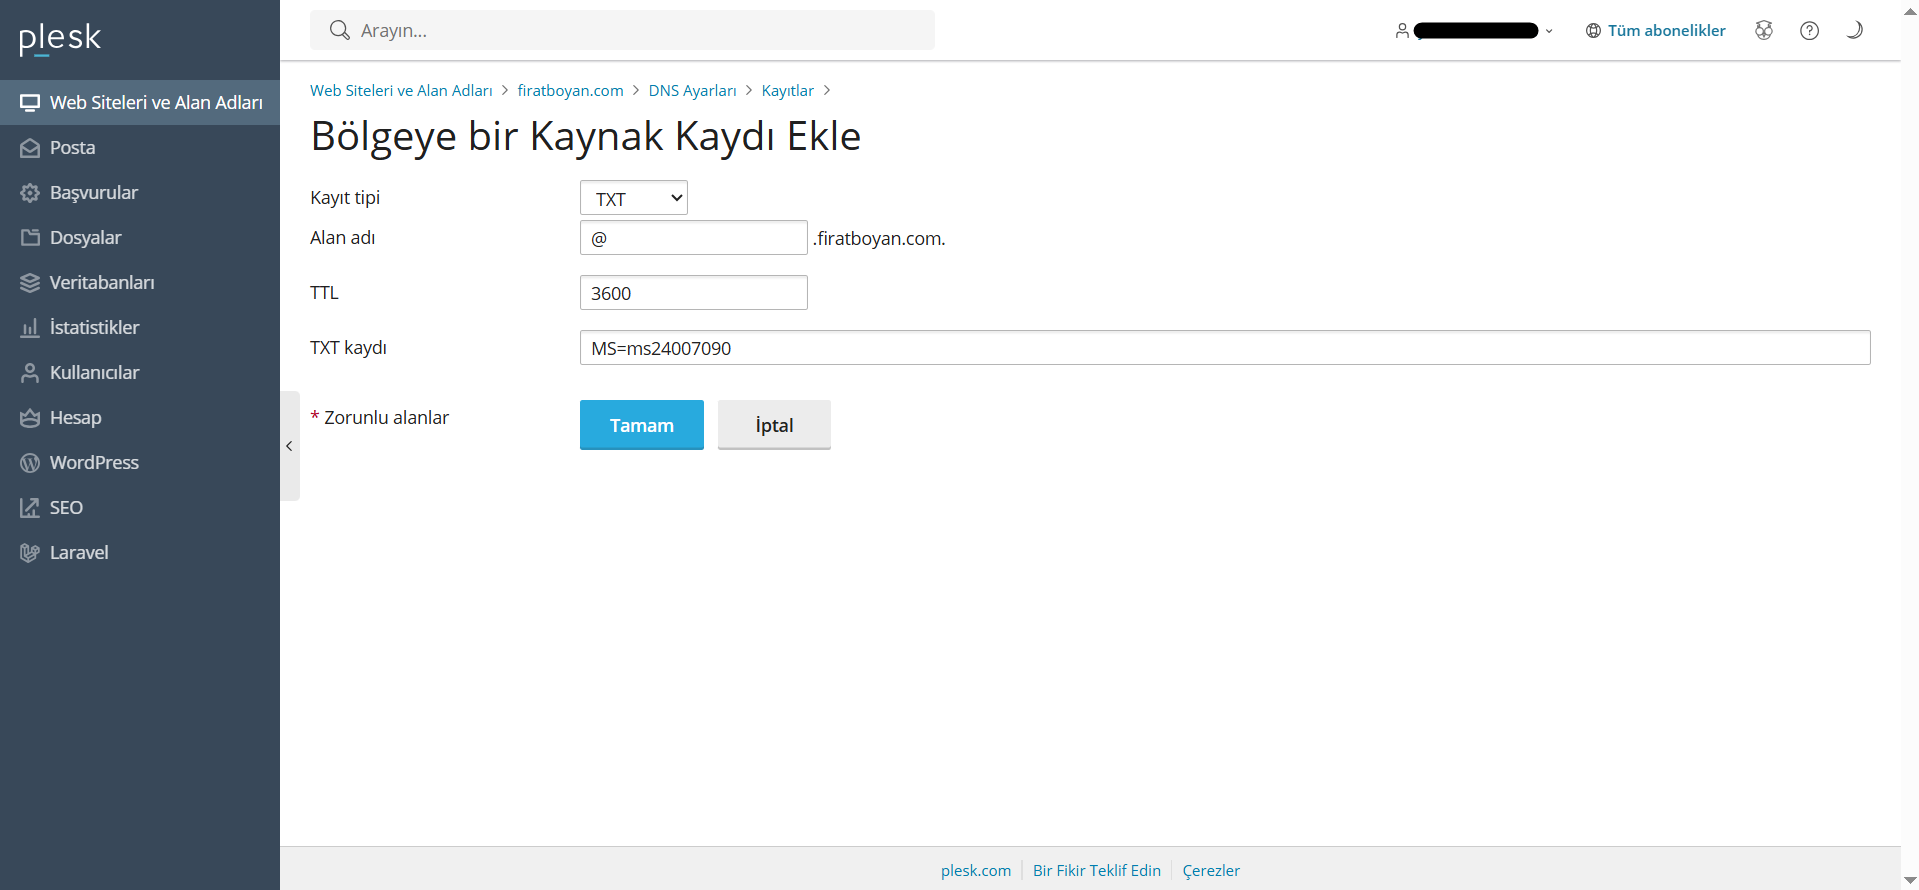
In this step, the TXT record generated by Microsoft 365 must be created on the authoritative DNS platform of the domain. The main purpose is to prove to Microsoft 365 that the infrastructure responsible for resolving the domain name in DNS is really under your control. For this reason, the TXT record must be defined on the DNS platform that manages the name server records of the domain. Microsoft 365 does not see records added to a different DNS infrastructure or only to a local DNS, and the verification fails.
✅ Adding the TXT record to the DNS platform
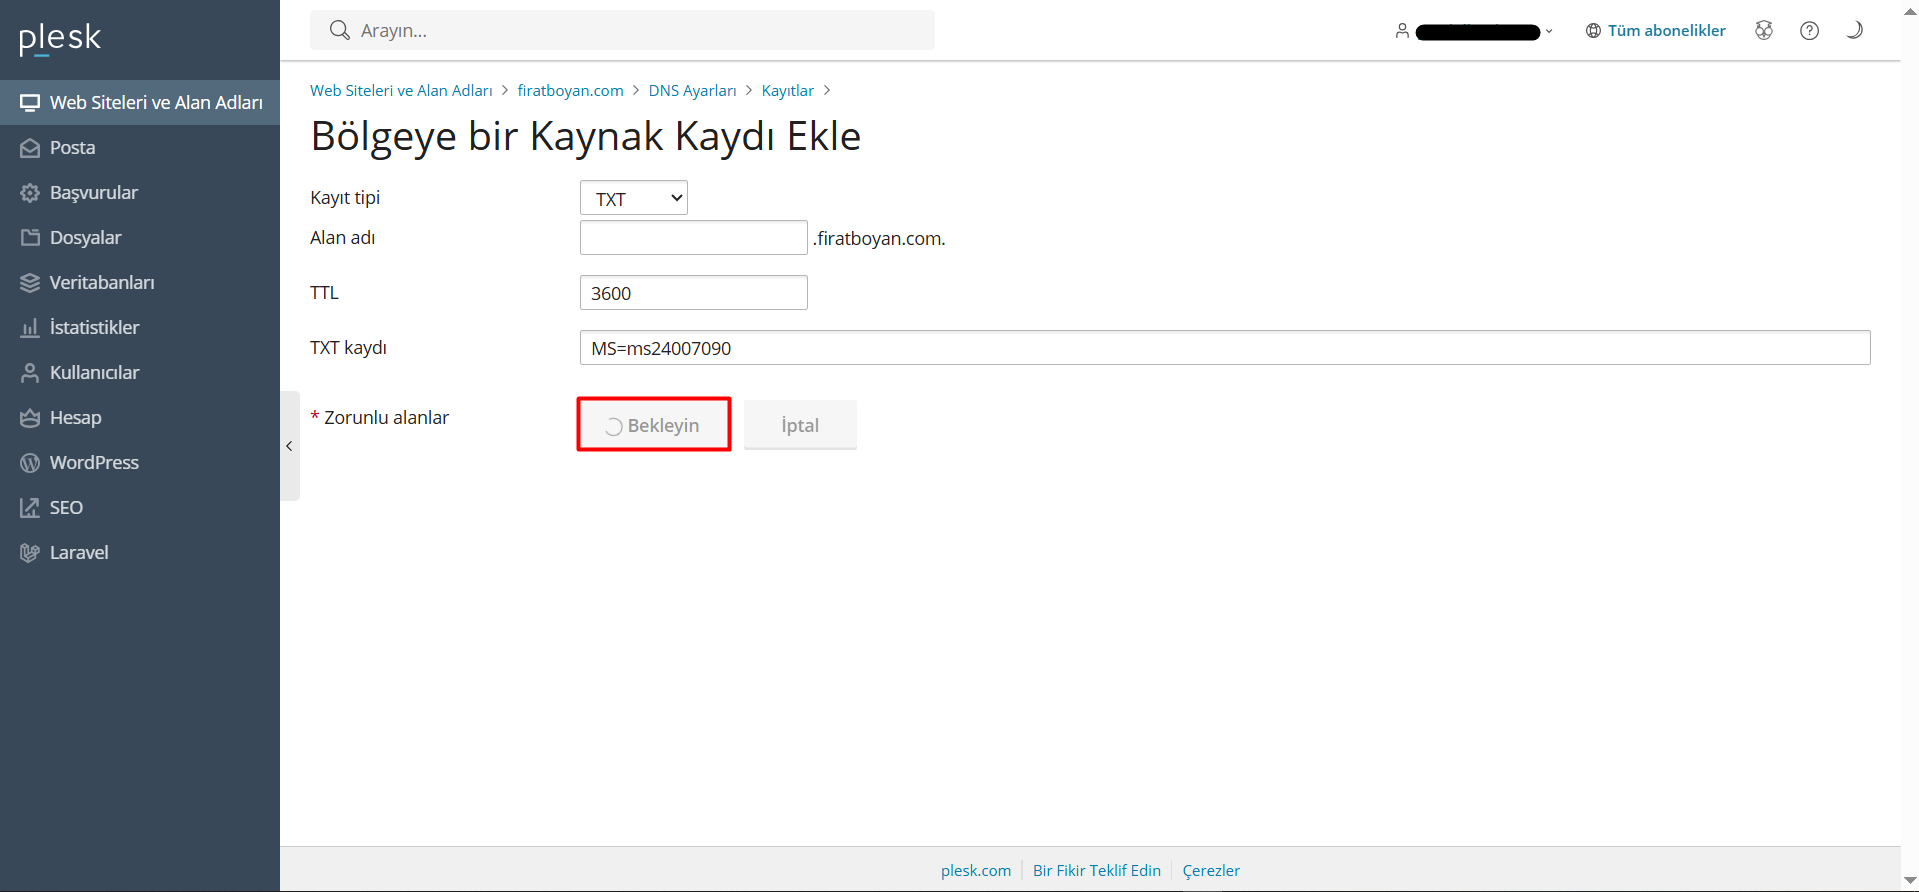
In the DNS management panel, select TXT as the record type and enter the TXT value supplied by Microsoft 365 exactly as shown. This value is specific to the tenant, and Microsoft 365 queries DNS for it during domain verification. After the record is created, there may be a short wait on the DNS side. The length of the wait depends on the TTL and the cache mechanism of the DNS infrastructure.
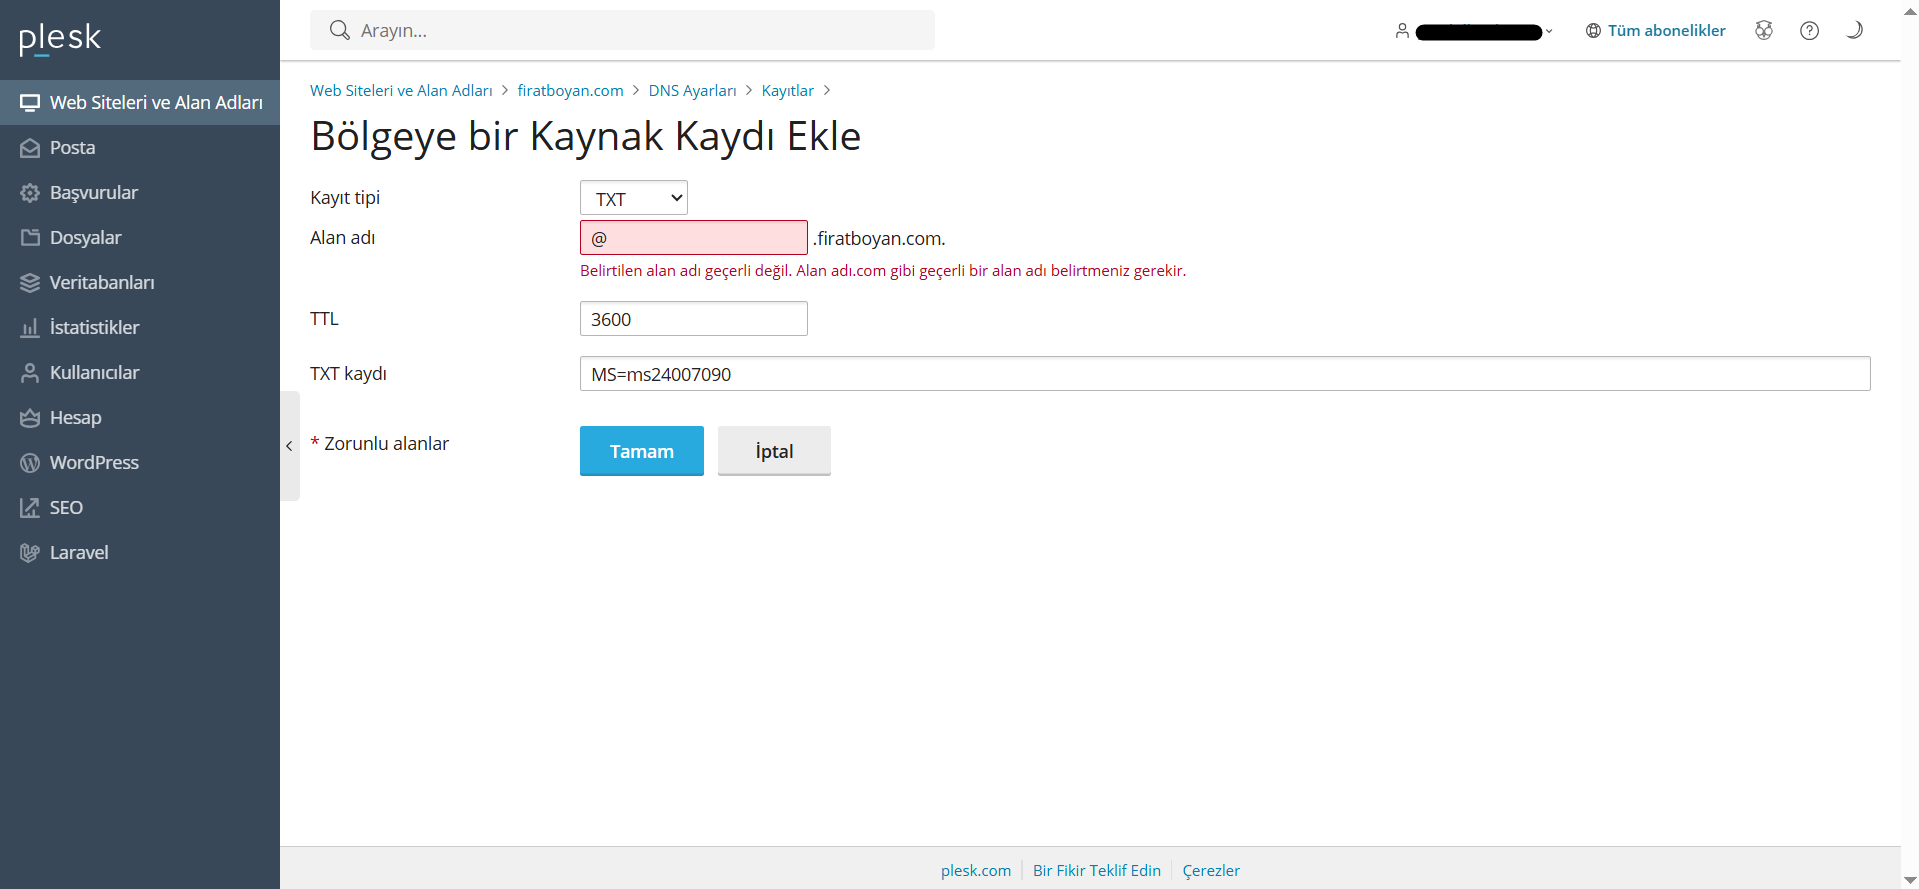
✅ Using the TXT name field
On many DNS platforms, @ in the TXT name field represents the root domain and adds the record directly to the domain name. In that case, using @ is enough. However, some DNS platforms do not accept the @ character as a valid name and return an error. In that case, leave the TXT name field empty. When the field is empty, the DNS platform attaches the record to the root domain automatically, and the Microsoft 365 verification works without problems.
✅ Waiting period after adding the record
After the TXT record is added, the DNS platform may enter a short processing state while the record propagates. It is normal for the interface to show a message such as Please wait at this stage. Once the DNS record is active, return to the Microsoft 365 admin center screen and complete the verification step.
The important point in this step is that the TXT record is defined on the correct DNS platform, at the correct domain level and with complete values. When these conditions are met, the domain verification completes without problems.
7- After the TXT record is created in DNS, return to the Microsoft 365 admin center and click Verify. Microsoft 365 queries DNS for the TXT record. If the record is detected correctly, domain ownership is confirmed and the domain addition process continues with the next step.
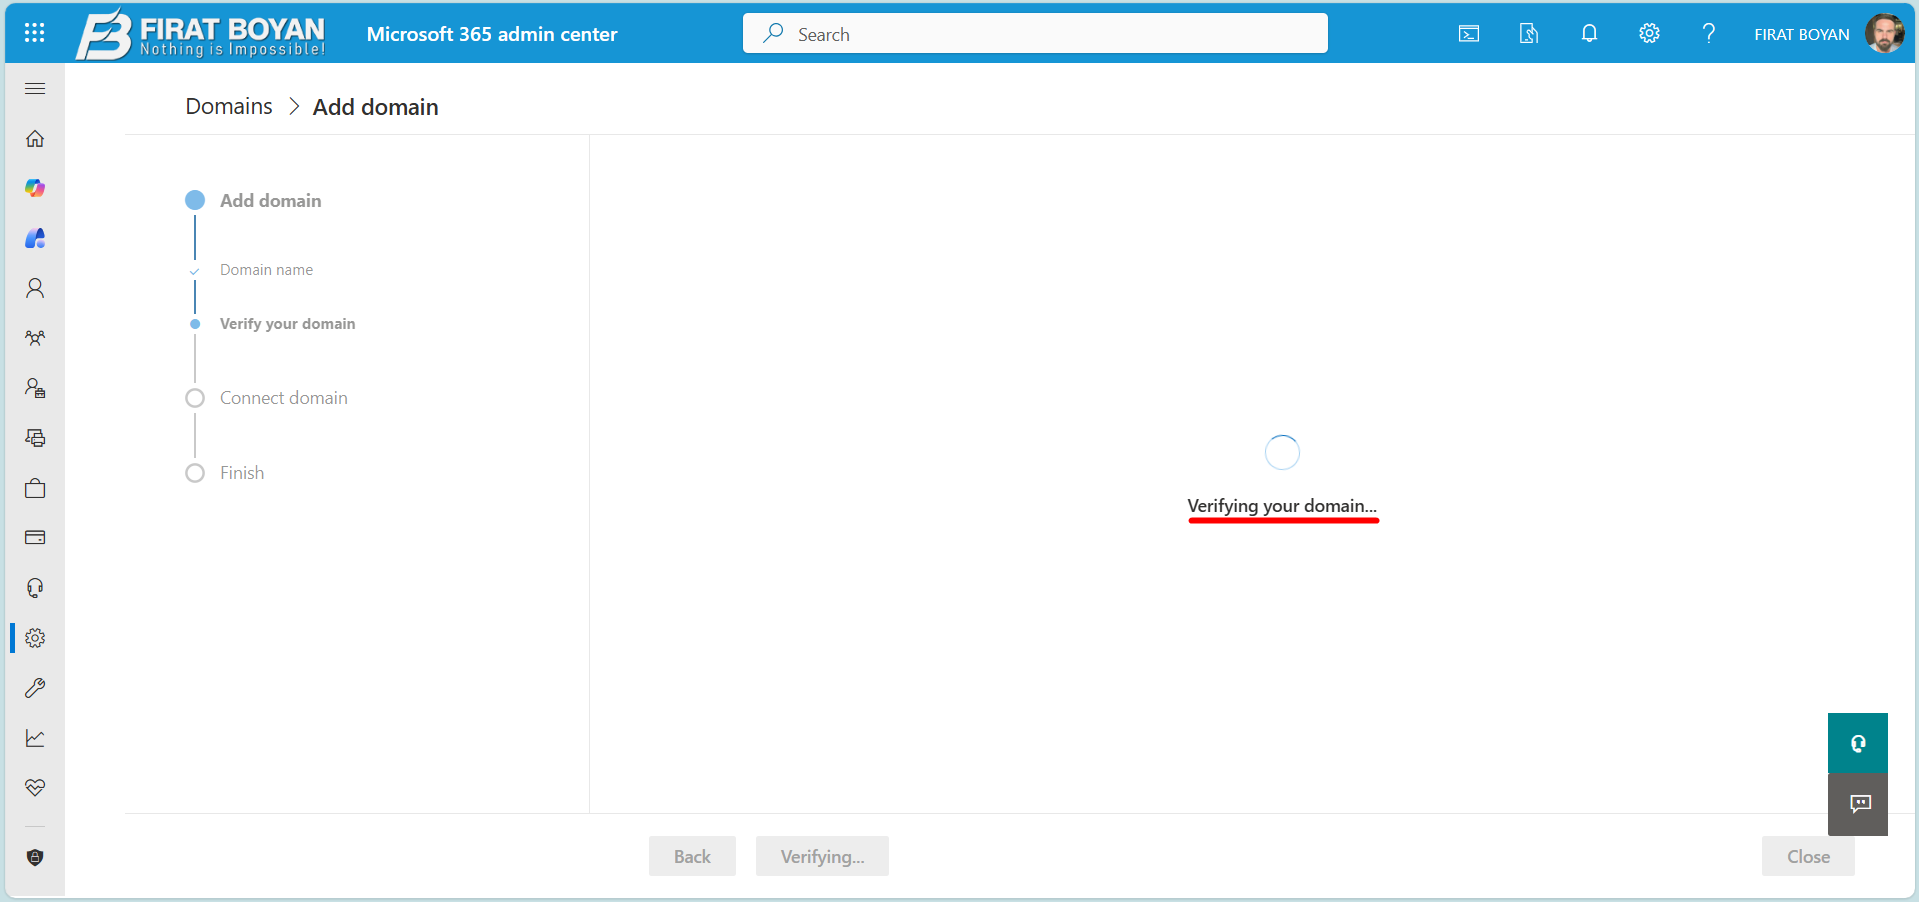
8- After Verify is clicked, the TXT record entered in DNS starts to be queried. At this stage, the screen shows Verifying your domain…, and Microsoft 365 checks through the name servers of the domain whether the TXT record really exists. No configuration change is made during this check.
The system only waits for the DNS response and verifies that the record is correct, complete and reachable. Depending on DNS propagation time, this can take a few seconds, and in some cases it can take longer. When the TXT record is detected correctly, the verification completes and the wizard moves to the next step automatically, so the domain addition process continues.
9- After domain verification is complete, the Connect domain stage follows, which determines the Microsoft 365 services that the domain will be associated with. This screen is there to define which services will actively use the domain, beyond the fact that it has been verified.
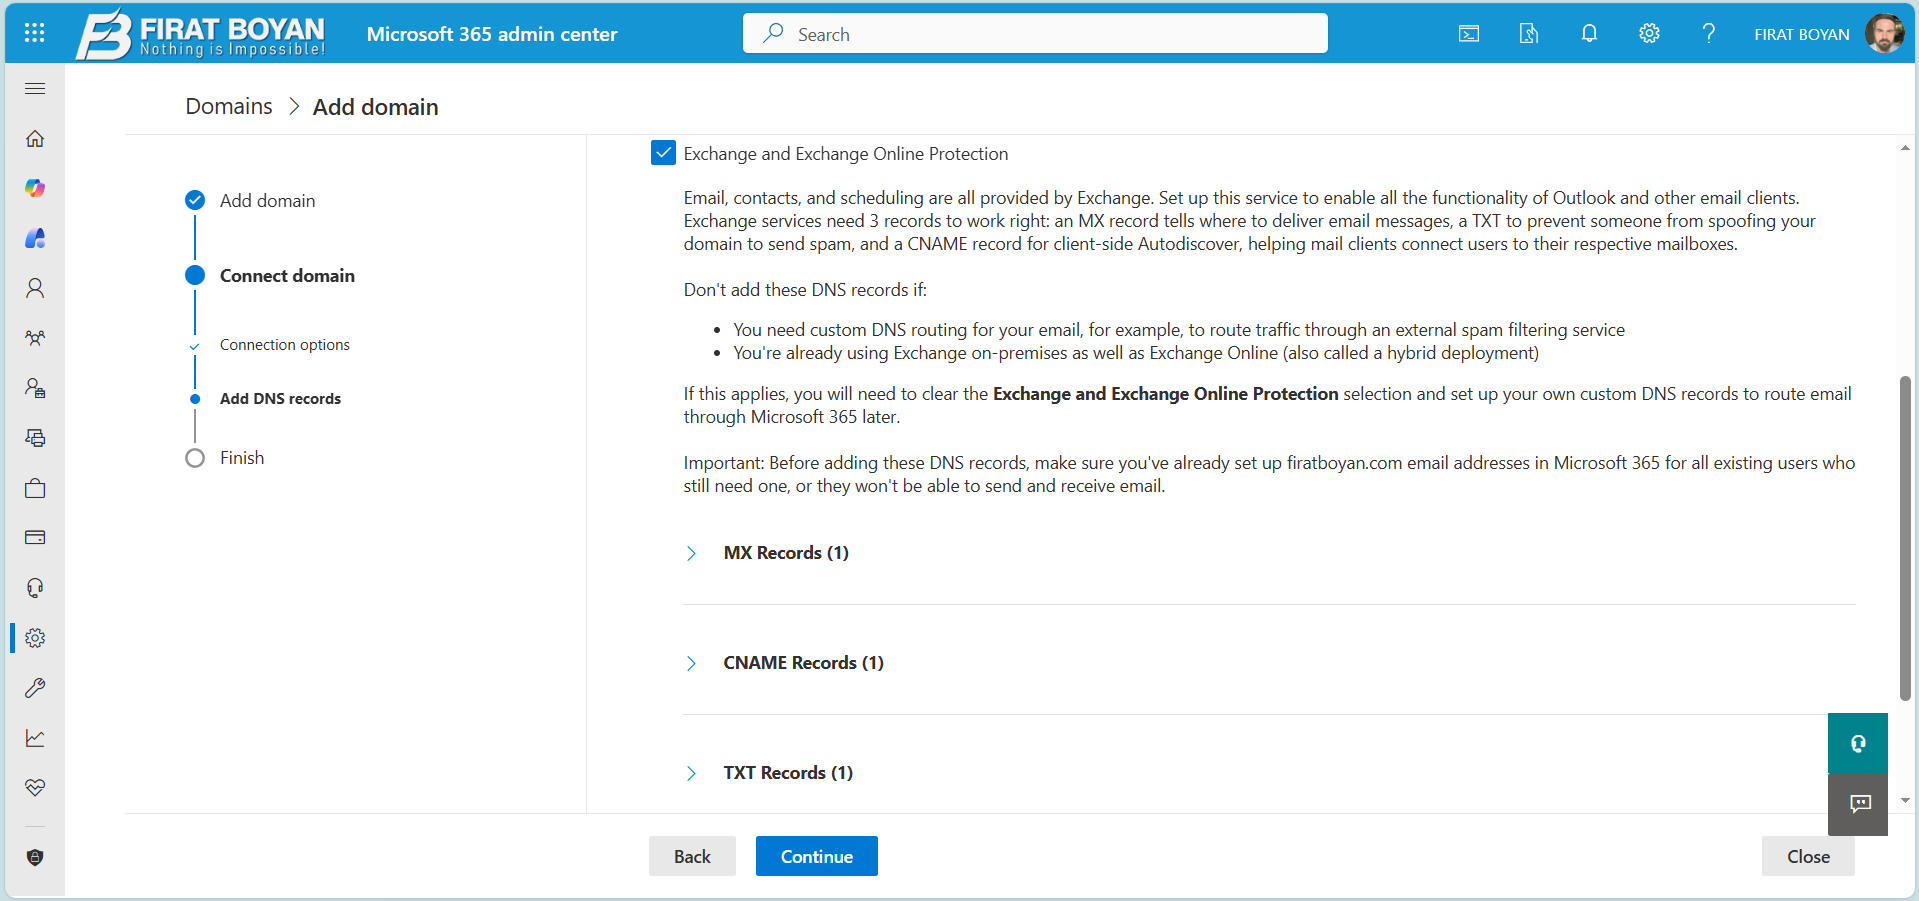
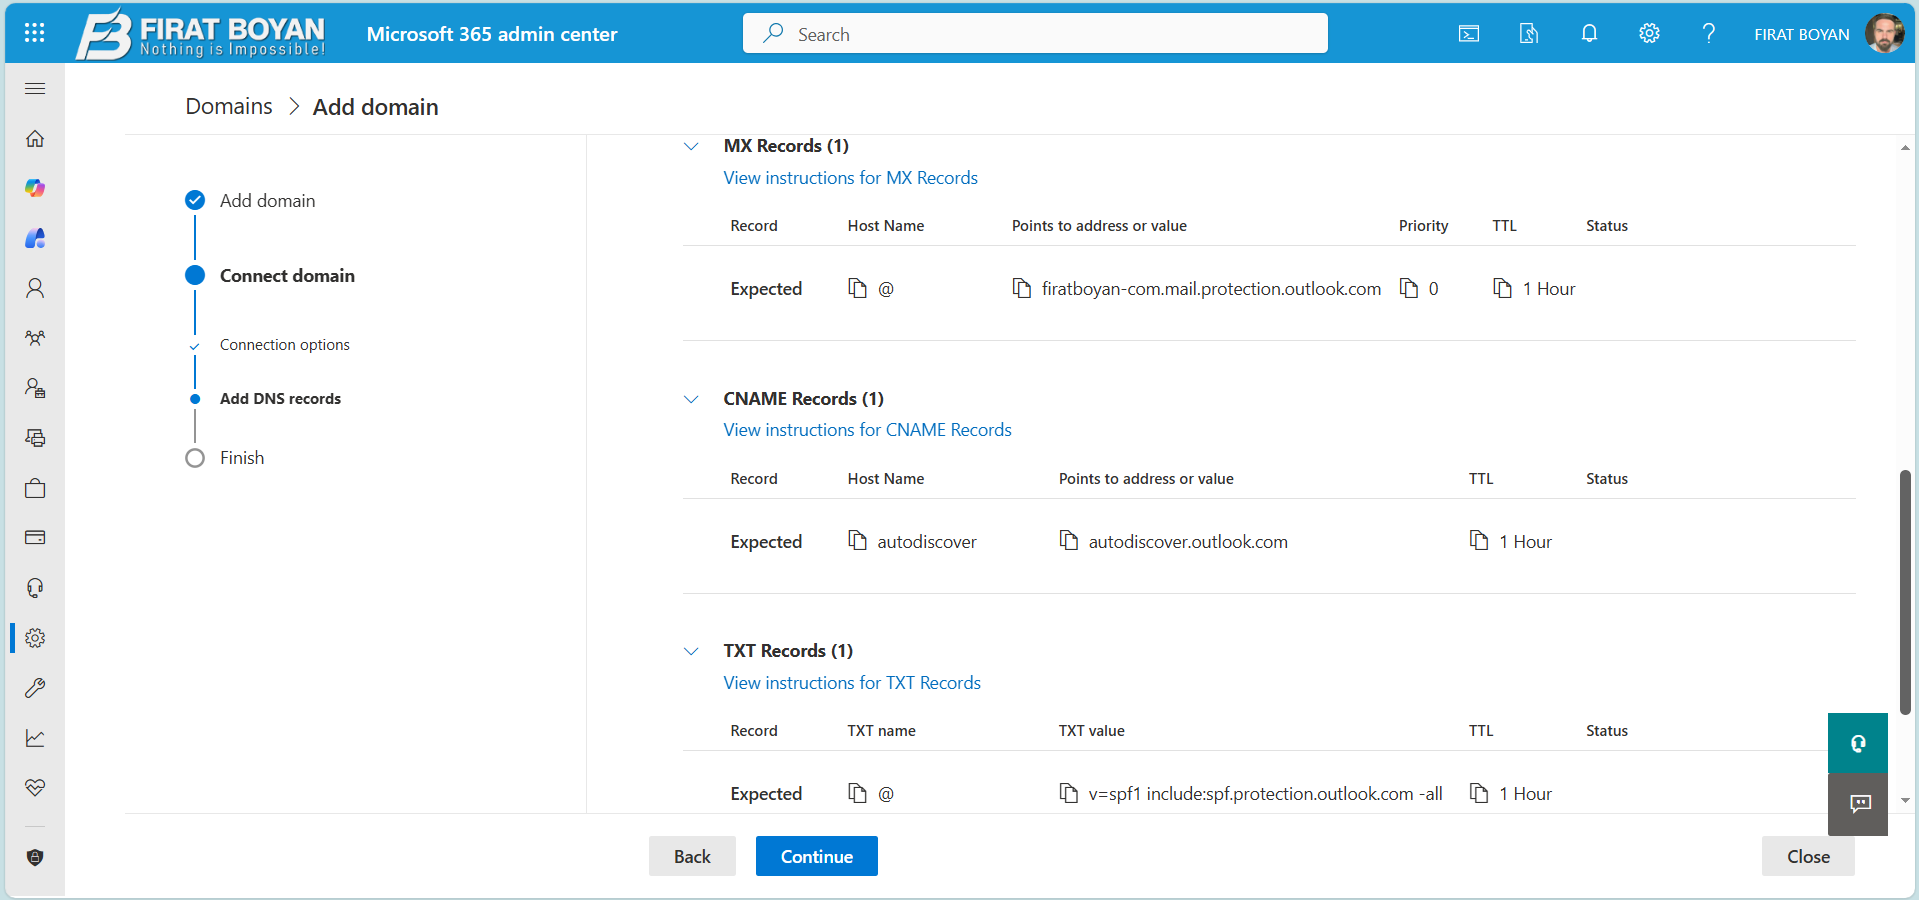
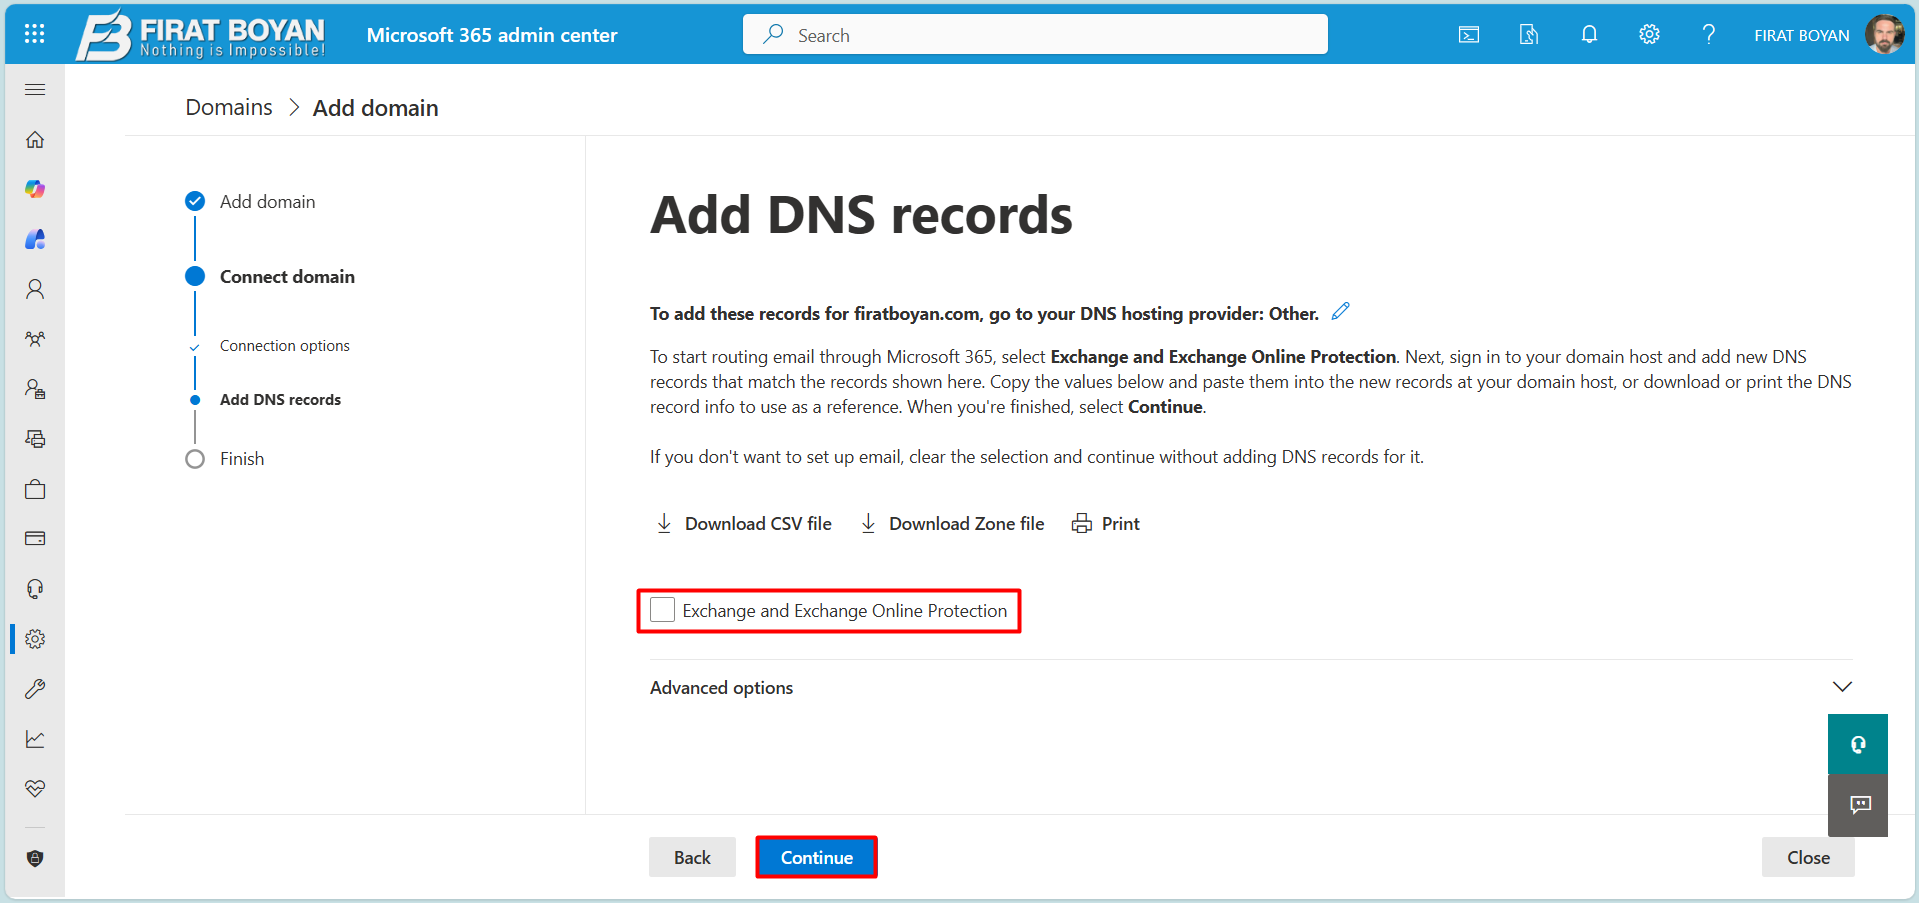
The important point to underline here is that the aim of this work is only to verify the domain. In a hybrid architecture in particular, email traffic may currently flow through on-premises Exchange. In such a setup, you may not want records such as MX, SPF or Autodiscover to point to Microsoft 365 at this stage. Otherwise, the existing mail flow may be affected.
Although the Exchange and Exchange Online Protection option is selected by default, leaving it clear for now is the more controlled approach in scenarios that use hybrid or custom mail routing. In this way, the domain is only verified in the Microsoft 365 tenant, and email traffic is not touched.
After the domain is verified, the DNS records for the relevant services can be configured deliberately in a separate stage, when they are needed and when the mail flow has been planned. Because this scenario focuses only on domain verification, we continue without selecting any services and skip the step of adding DNS records.
This approach keeps the domain addition process safe and predictable, especially in hybrid environments.
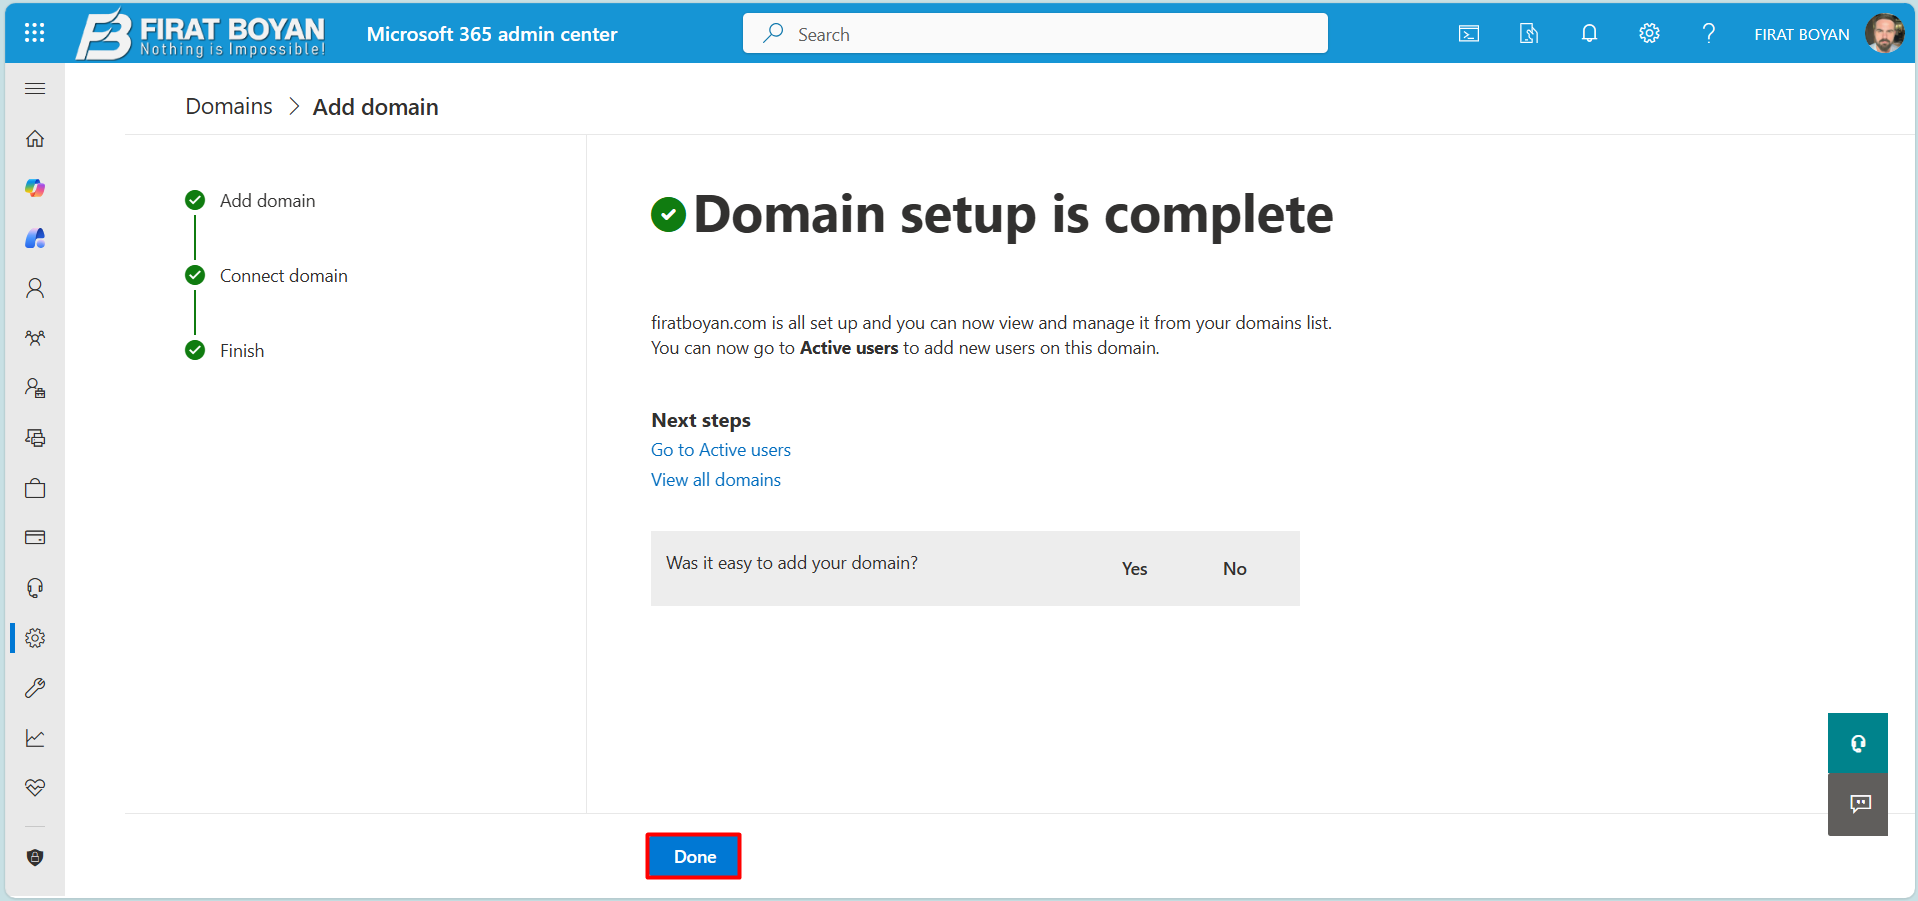
10- After the verification through the TXT record is complete, the domain addition process finishes successfully and the screen shows the Domain setup is complete message. At this stage, the domain has been verified by the Microsoft 365 tenant and is recognised by the system.
The main point of this screen is that the domain has only been verified. At this stage, the domain does not start to carry email traffic actively in Microsoft 365. In hybrid architectures in particular, if mail flow continues through on-premises Exchange, no MX or mail routing change has been made here. The process is limited to confirming domain ownership.
Click Done to finish the domain addition process. After this step, the domain appears in the Domains list in the Microsoft 365 admin center and can be used in a controlled way for user UPNs, email addresses or service-specific configuration when needed.
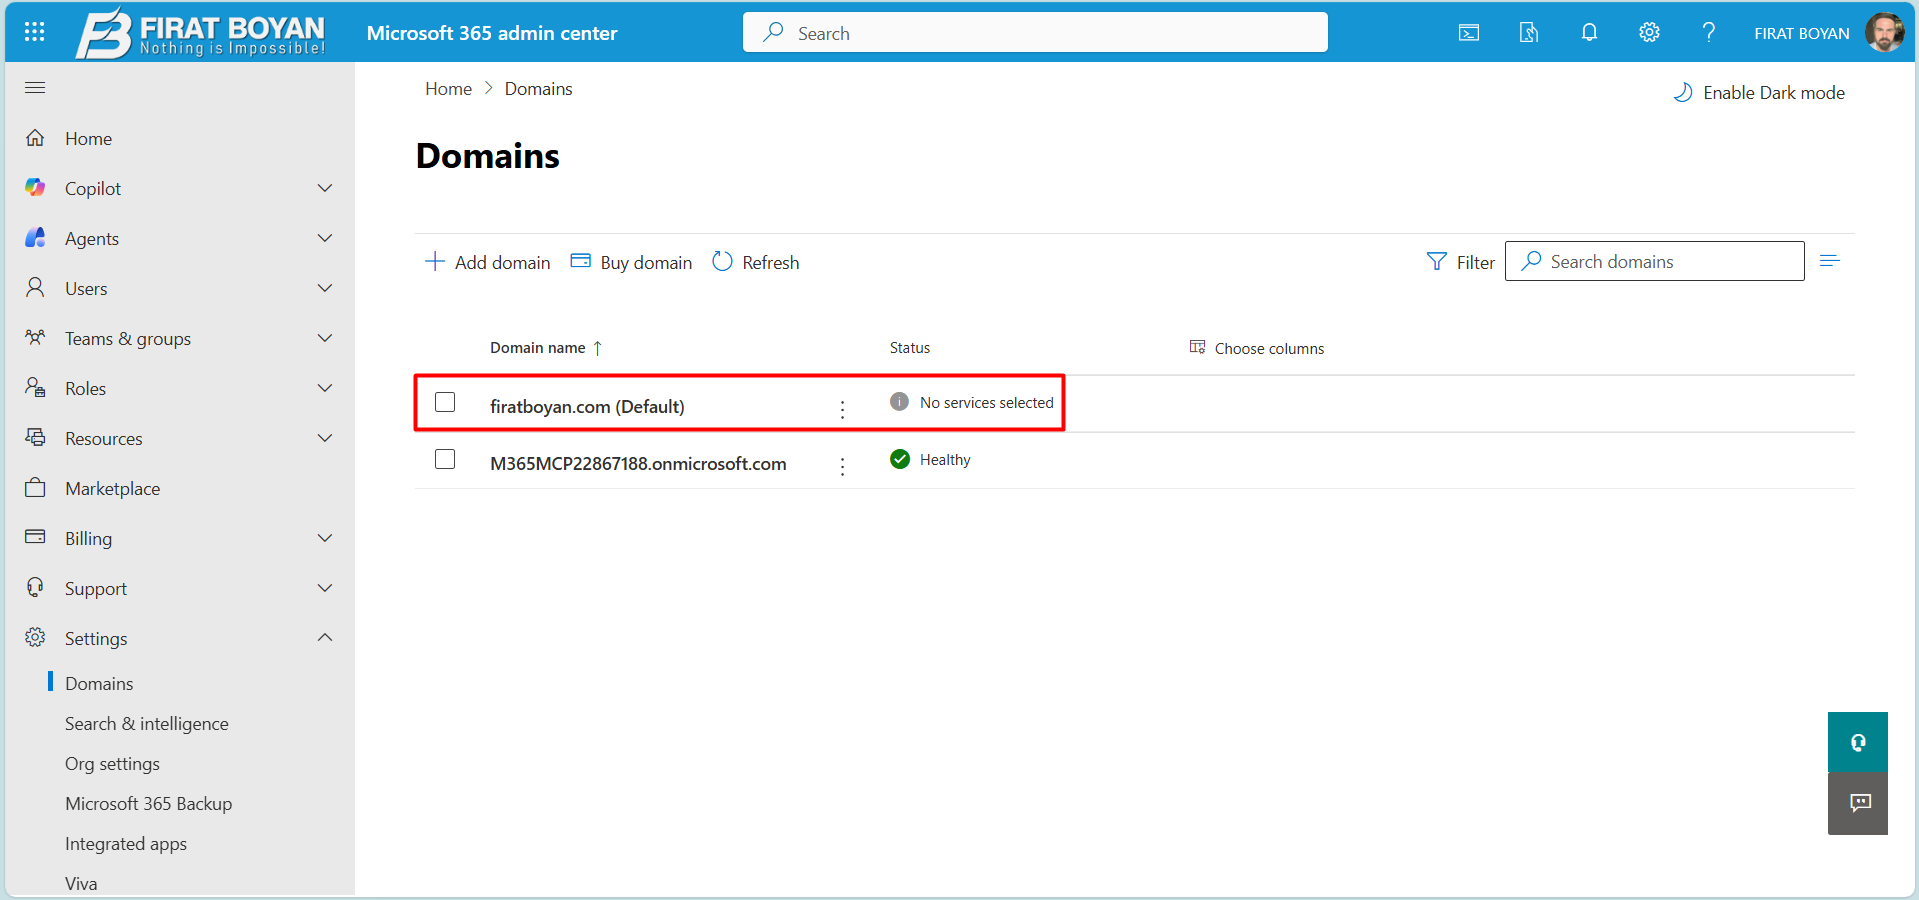
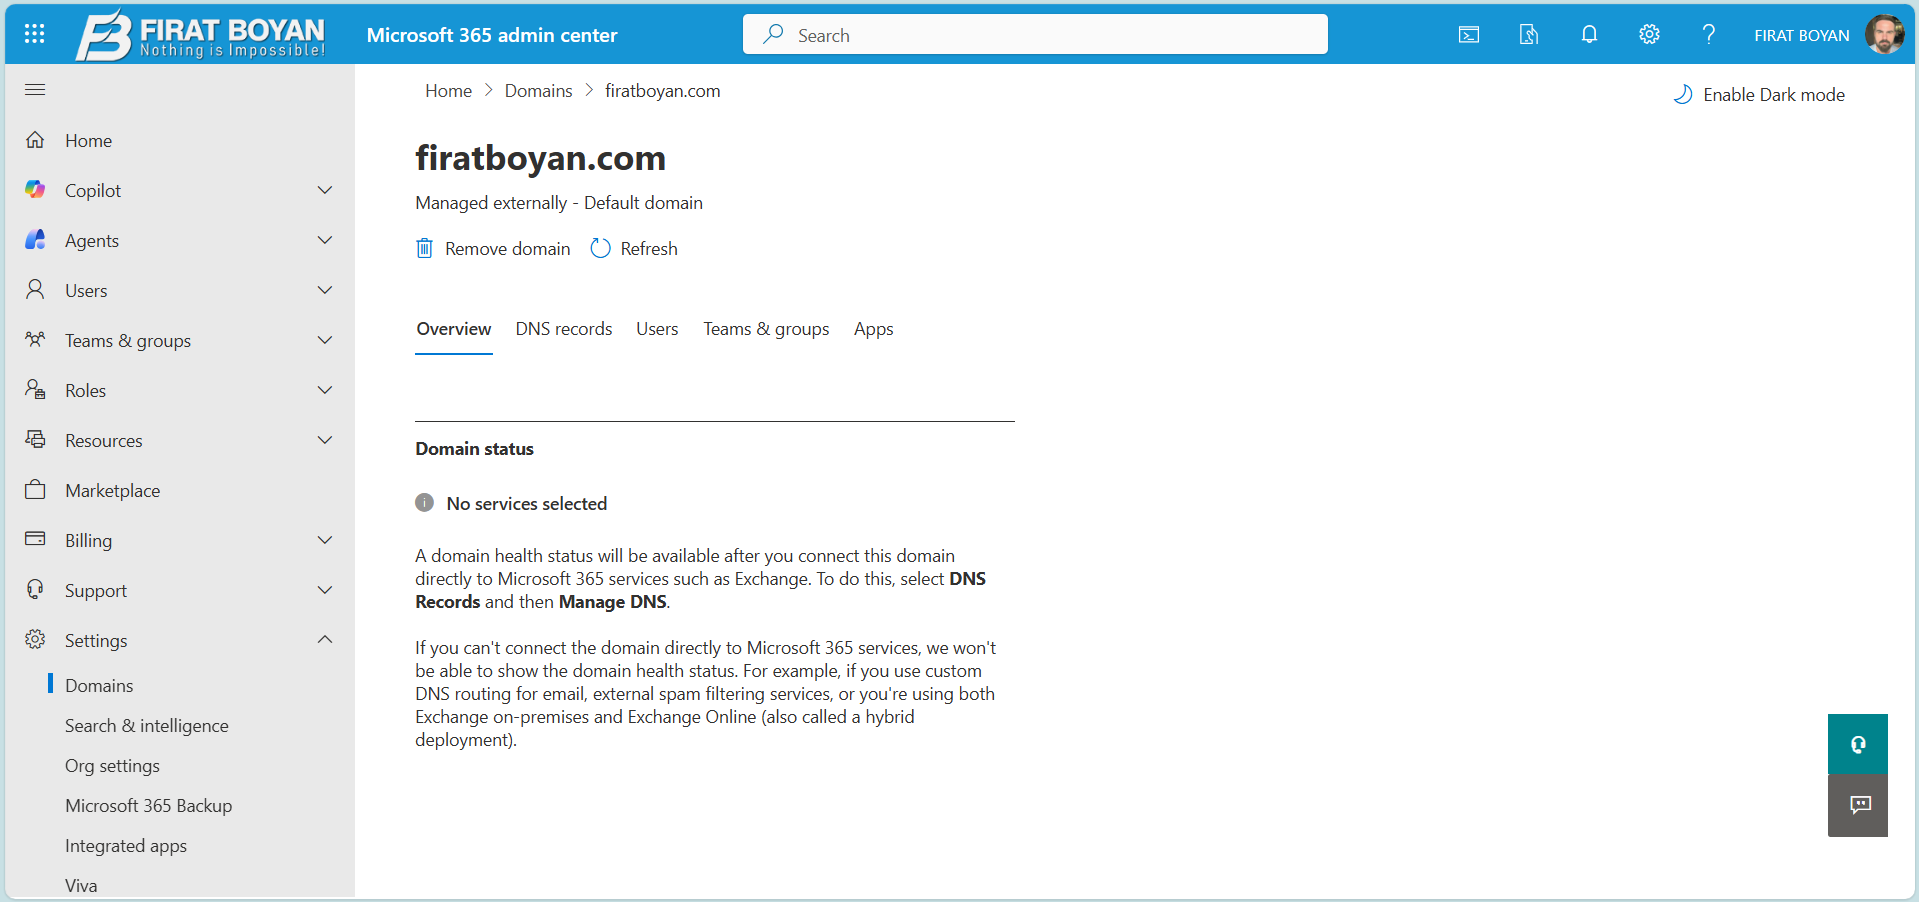
11- After Done is clicked and the domain addition process is complete, the Domains screen shows the added domain in the list. It is expected and correct for No services selected to appear next to the domain name on this screen.
This status shows clearly that the Microsoft 365 tenant has verified the domain but the domain is not yet associated with any Microsoft 365 service. This means the domain is not currently in active use for Exchange Online, Teams or any other Microsoft 365 service. It has only been introduced to the tenant at the ownership and authentication level.
In hybrid architectures in particular, this state is chosen deliberately. If email traffic flows through on-premises Exchange, or mail routing is planned for a later stage, the fact that the domain is not associated with services automatically protects the existing setup. At this stage, DNS records such as MX, SPF or Autodiscover are not put into use on the Microsoft 365 side.
Later, when needed, this domain can be associated manually and in a controlled way with Exchange Online or other Microsoft 365 services. For this reason, the No services selected status is not an error. It is a planned configuration step.
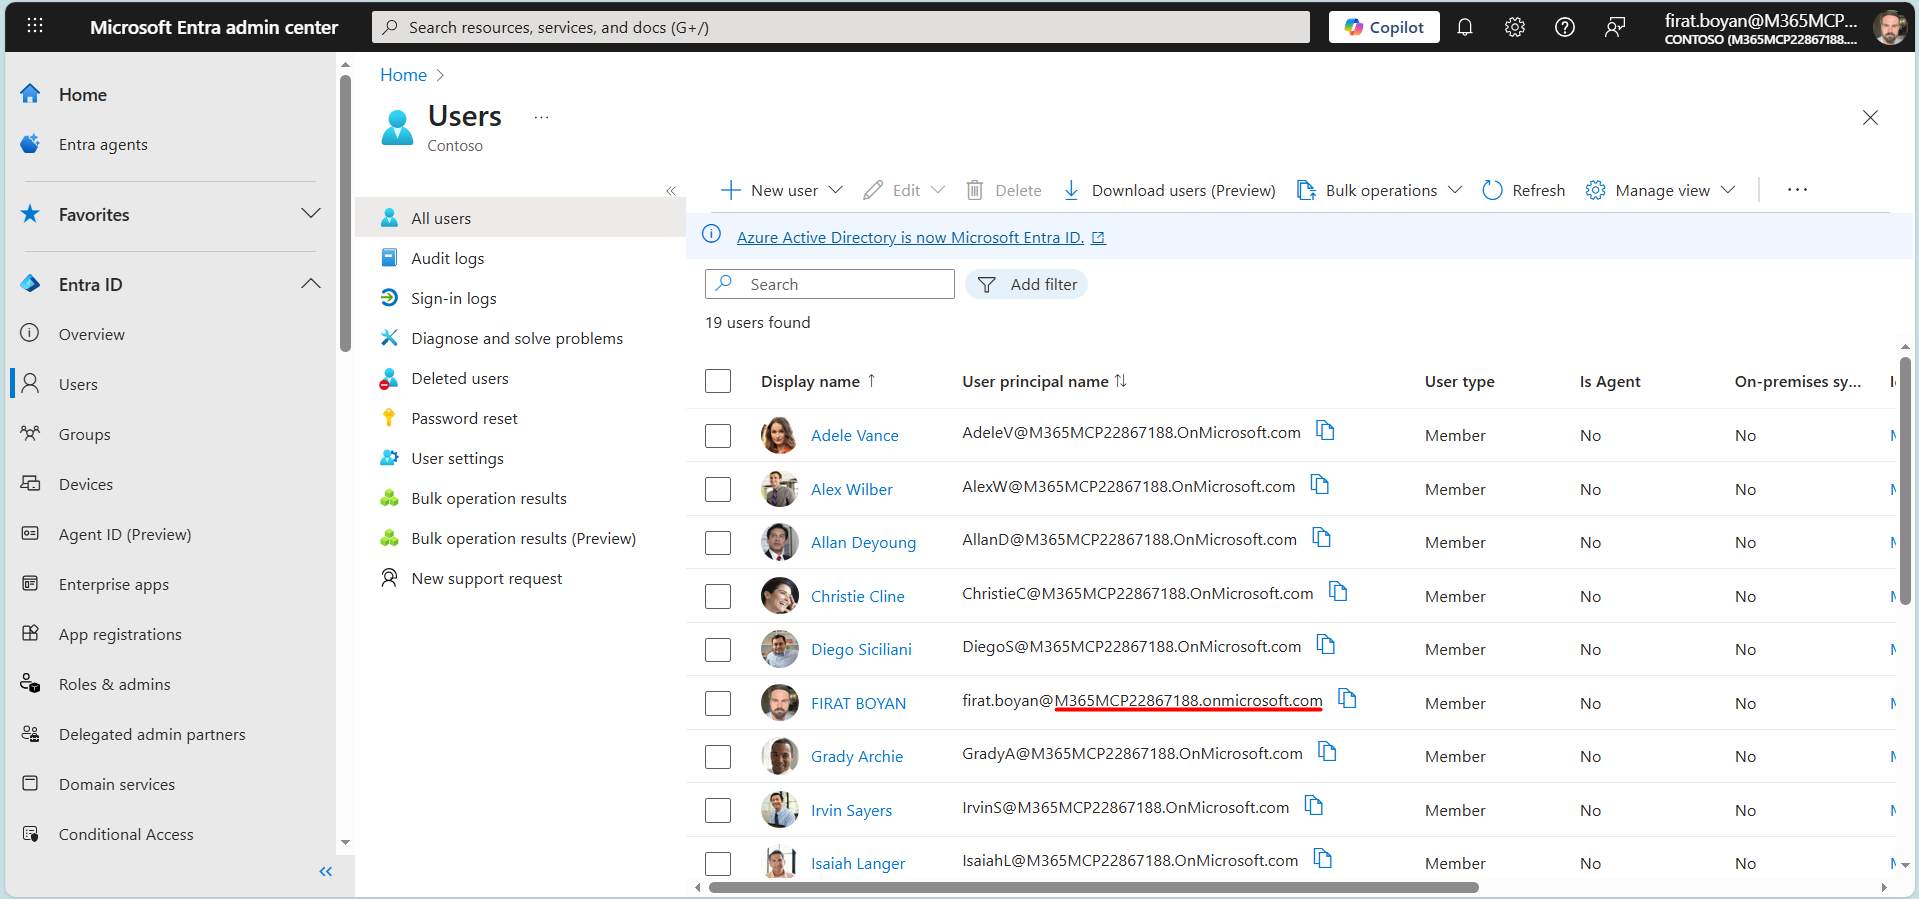
12- In the Users list in the Microsoft Entra admin center, the point to notice is that the User Principal Name field of the users still has the @tenant.onmicrosoft.com suffix. This shows clearly that, although domain verification is complete, the user accounts are not yet associated with the newly added domain.
Adding a domain in Microsoft 365 does not move user accounts to the new domain automatically. The domain is only verified at tenant level and made available for use. At this stage, users continue to work with the @tenant.onmicrosoft.com suffix by default. This state is kept deliberately, especially during transition periods.
In hybrid architectures, or in scenarios where a phased transition is planned, it is preferable not to change the User Principal Name values of users immediately, because authentication, synchronisation, licensing and application dependencies may rely on this field. For this reason, moving users to the new domain after the domain is verified is handled as a separate, controlled step.
The view on this screen confirms that the domain has been added to the tenant successfully but has not yet been applied to user identities. In later steps, the User Principal Name values of users can be moved to the new domain suffix manually or in bulk, as needed. When this change is complete, users sign in in the @domain.com format, and the @tenant.onmicrosoft.com suffix remains in the tenant only as the system domain that the Microsoft 365 infrastructure requires and that cannot be deleted.
This article walked through the process of adding a domain to a tenant in Microsoft 365 as a technical flow, starting from the default tenant.onmicrosoft.com domain. It made clear the logic behind the steps of the domain addition wizard, and that this process is not only a definition but a controlled preparation stage.
For the domain verification stage, it explained in detail how domain ownership is confirmed with a TXT record in DNS, in which scenarios the alternative verification methods apply, and why the TXT approach is technically the cleanest method. It stressed that this verification can be completed without affecting the existing services and serves only to check ownership.
It explained what it means for the domain to exist in the system without being associated with any service after verification, and why this is a deliberate choice, especially in hybrid setups. For scenarios where email traffic flows on-premises, it covered why deliberately leaving Exchange and the related DNS records disabled at this stage matters for the integrity of the infrastructure.
Finally, it covered how a domain that is verified but not connected to services forms a solid basis for the User Principal Name (UPN) migration and service activation in later stages. This approach offers a technically correct and sustainable plan for environments that want to proceed without breaking the existing setup and to plan the transition steps in a controlled way.
I hope you find it useful...
Feel free to share your thoughts and questions about this article in the comments below. Every contribution helps the content reach more people and makes for a more useful discussion.