A PKI is the cryptographic structure that manages authentication, data integrity, encryption and trust relationships within a corporate network. A Certification Authority issues, signs, renews, publishes and, when necessary, revokes certificates. On the Microsoft side, this task is performed by the Active Directory Certificate Services (AD CS) role on Windows Server. Certificates issued by AD CS can be used in scenarios such as SSL/TLS, S/MIME, IPsec, EFS, Smart Card Logon, 802.1X-based network access control, VPN authentication and code signing.
Trust in a certificate starts with trust in the CA that signed it. This trust relationship is built through a certificate chain that starts at the root CA and extends through the subordinate CA to the user, device or service certificate. The client checks the validity period of the certificate, the Subject and SAN values, the signature algorithm, Key Usage, Enhanced Key Usage, the CRL or OCSP revocation status, and whether the chain leads to a trusted root CA.
CA installation should not be treated like an ordinary Server Manager role installation. Whether the CA runs as an enterprise or standalone CA, whether it is in the Root or Subordinate position, how the private key is protected, the Cryptographic Provider, the Key Length, the Hash Algorithm, the validity period of the CA certificate, and the CRL Distribution Point (CDP) and Authority Information Access (AIA) locations directly affect how well the PKI works. In a badly designed CA structure, certificates can still be issued, but clients may not be able to validate the certificate chain, or CRL access may fail.
In enterprise CA scenarios, certificate templates, enrolment permissions, autoenrollment settings, the Public Key Services container, the AIA and CDP publication points, Group Policy settings and the domain membership of the CA are evaluated together. For certificate distribution to work without problems, clients must trust the CA certificate, they must be able to reach the CRL files, and the template permissions must be granted to the correct accounts.
This article covers the installation and configuration of an Enterprise Root CA. The hands-on installation and the screenshots were prepared on Windows Server 2022. This structure is suitable for examining AD CS behaviour, the logic of certificate templates and the integration of the PKI components with Active Directory in lab and test environments. In production environments, the number of CAs and the hierarchy are planned according to the security and availability requirements of the organisation. The separation between an offline root CA and an online enterprise subordinate CA is a model that is often preferred in this planning.
The article covers the process from the preliminary checks to the role installation, from the Configuration Wizard to the post-installation hardening steps, and the verification of the CA certificate with certutil and PowerShell. Because the configuration of the AIA and CDP publication points over HTTP is not applied in this article, the installation is limited to lab and test scope. The AIA and CDP design must be completed before this CA issues production certificates. Certificate template configuration, the deployment of autoenrollment with Group Policy and the building of a two-tier PKI hierarchy are also outside the scope of this article.
This article is not tied to a specific Windows Server version. The basic Active Directory Certificate Services (AD CS) architecture, the Enterprise Root CA installation logic and the basic management steps described here are generally valid for Windows Server 2016, Windows Server 2019, Windows Server 2022 and Windows Server 2025. The installation and the screenshots in the article were prepared on Windows Server 2022, and there may be small differences in the interface, the default values or the available options between versions.
1- Certification Authority Types
The AD CS role on Windows Server supports 4 different CA types. These types are determined on 2 separate classification axes.
The first axis determines whether the CA is integrated with Active Directory. This axis contains the Enterprise CA and Standalone CA options. The second axis determines the position of the CA in the PKI hierarchy and consists of the Root CA and Subordinate CA options.
When these 2 axes are combined, 4 CA types result: Enterprise Root CA, Enterprise Subordinate CA, Standalone Root CA and Standalone Subordinate CA.
|
CA Type |
Active Directory Integration |
Position in the PKI Hierarchy |
Certificate Request Management |
Common Usage Scenario |
|
Enterprise Root CA |
Integrated with Active Directory. It requires a domain-joined server and uses certificate templates and user and group information. |
It is at the top of the PKI hierarchy. It signs its own certificate with its own private key. |
It distributes certificates automatically or in a controlled way through certificate templates and AD permissions. |
Lab environments, small-scale structures or single-tier PKI designs. |
|
Enterprise Subordinate CA |
Integrated with Active Directory. It runs on a domain-joined Windows Server. |
It has a CA certificate signed by a parent CA. It usually issues the end-user and device certificates. |
It provides central certificate management with certificate templates, autoenrollment and AD-based permissions. |
It is used as the online issuing CA in production environments. |
|
Standalone Root CA |
It has no Active Directory dependency. It can run in a workgroup or in an offline environment. |
It is at the top of the PKI hierarchy. It signs its own certificate with its own private key. |
Certificate requests wait for manual approval by default. It does not use certificate templates. |
It is preferred as the offline root CA in production environments. |
|
Standalone Subordinate CA |
It has no Active Directory dependency. It can also run on a domain member server, but it does not use certificate templates or autoenrollment. |
It has a CA certificate signed by a parent CA. |
Certificate requests are managed with manual processes. |
Systems outside AD, isolated PKI structures or special certificate distribution scenarios. |
In a production PKI design, the number of CAs and the hierarchy are planned according to the requirements of the organisation. The two-tier structure with an offline standalone root CA and an online enterprise subordinate CA is a commonly preferred design because it keeps the root CA private key away from the network. The single-tier structure in this article is for lab and test environments.
2- Environment and Parameters Used
The lab installation in this article was performed on a Windows Server 2022 Standard server named TRISTSRVCER01 in the abc.local Active Directory domain. The Common Name selected for the CA is ABC-Corporate-Root-CA. The server host name is deliberately not included in this name. The host name can change in operations such as hardware replacement, migration and renaming. The CA name, however, is permanent from the moment the CA certificate is created. A CA name that depends on the host name loses its corporate meaning when the server changes. A Common Name that represents the corporate identity stays consistent for the lifetime of the certificates.
In the Common Name, the hyphen character is used instead of a space to separate words. CA names that contain spaces must be written in quotation marks in certutil -config and PowerShell parameters. In AIA and CDP URLs, spaces are encoded as %20 and the URLs become harder to read. Words joined with hyphens remove this problem.
|
Parameter |
Value |
Description |
|
Hostname |
TRISTSRVCER01 |
The host name of the CA server. |
|
Domain |
abc.local |
The Active Directory domain that the server is a member of. |
|
FQDN |
TRISTSRVCER01.abc.local |
The full network name formed by combining the host name and the domain. |
|
IP Address |
10.10.10.210 |
The static IP address assigned to the server. |
|
CA Common Name |
ABC-Corporate-Root-CA |
The permanent name selected for the CA. |
|
CA Type |
Enterprise Root CA |
The AD-integrated root CA type. |
|
Cryptographic Provider |
RSA#Microsoft Software Key Storage Provider |
The provider used for the CA private key. |
|
Hash Algorithm |
SHA256 |
The algorithm that the CA uses when it signs certificates and CRLs. |
|
Key Length |
RSA 2048 bit |
The length of the CA private key. |
|
Validity Period |
5 years |
The validity period of the CA certificate. |
|
Working Directory |
C:\Temp |
The directory used for export and dump files. |
The CA Common Name cannot be changed after it is confirmed in the Configuration Wizard. This name is written to the Subject and Issuer fields of the CA certificate and to the PKI objects in AD. To change the name, the CA must be removed and installed again.
3- Preliminary Checklist
The following items are verified before the installation starts. All of the commands are run on TRISTSRVCER01, in a PowerShell session opened as administrator.
|
Check |
Expected State |
|
Domain Membership and Server Role |
The server is a member of the abc.local domain and is not a domain controller. |
|
Static IP Address |
10.10.10.210 is assigned and DHCP is disabled. |
|
DNS Resolution |
The FQDN resolves to the correct IP address and the domain controller records are found. |
|
Time Synchronisation |
The server takes its time from the domain hierarchy. |
|
Permissions |
The account that performs the installation is a member of Enterprise Admins and has local Administrators rights on the server. |
|
Existing Enterprise CA in the Forest |
There is no unplanned enterprise CA in the forest. |
|
Working Directory |
The C:\Temp directory exists. |
Domain Membership and Server Role
An enterprise CA needs domain membership to use certificate templates, AD permissions and the Public Key Services container. This check also verifies that the CA role is placed on a separate member server and not on a domain controller.
Get-CimInstance -ClassName Win32_ComputerSystem | Select-Object Name, Domain, PartOfDomain, DomainRole
In the output, the PartOfDomain value is expected to be True, the Domain value abc.local and the DomainRole value 3. The value 3 shows that the server is a domain member server. If the value is 2, the server is not joined to the domain, and the join is completed before the installation starts. If the value is 4 or 5, the server is a domain controller and a separate member server must be used for the CA.
Microsoft does not recommend placing the CA role on a domain controller. Keeping the CA on a separate server reduces the attack surface and makes private key protection easier. In production environments, the CA server should be treated as a Tier 0 asset.
Static IP Address
Clients reach the CA and the AIA and CDP publication points through the DNS name. A fixed IP address on the server keeps the DNS record consistent and keeps CA access uninterrupted.
Get-NetIPInterface -AddressFamily IPv4 -ConnectionState Connected | Select-Object InterfaceAlias, Dhcp
Get-NetIPAddress -AddressFamily IPv4 | Select-Object InterfaceAlias, IPAddress
On the network interface in use, the Dhcp value is expected to be Disabled and the IPAddress value 10.10.10.210. If the Dhcp value appears as Enabled, a static IP address is assigned to the interface and the domain controller addresses are entered as the DNS servers.
DNS Resolution
Certificate validation, LDAP publication, Group Policy processing and CA access depend on DNS. The server's own FQDN record and the SRV records used to locate the domain controllers must resolve.
Resolve-DnsName -Name TRISTSRVCER01.abc.local
Resolve-DnsName -Name _ldap._tcp.dc._msdcs.abc.local -Type SRV
The first command is expected to return the address 10.10.10.210, and the second command the SRV records of the domain controllers. If the FQDN does not resolve, the DNS record of the server is registered again with ipconfig /registerdns. If the SRV records are not returned, the DNS server setting on the network interface is checked.
Time Synchronisation
The NotBefore and NotAfter fields in certificates depend on time. A clock difference between the CA and the clients can make a newly issued certificate appear as if it is not yet valid.
w32tm /query /source
The output is expected to show the name of a domain controller. If Local CMOS Clock or Free-running System Clock appears, the server does not take its time from the domain hierarchy. In this case, the w32tm /config /syncfromflags:domhier /update command is run, and then the synchronisation is renewed with Restart-Service w32time and w32tm /resync.
Permission Check
The enterprise CA installation writes to the Public Key Services container at forest level, updates the NTAuthCertificates object and publishes the CA information in Active Directory. For this reason, the account that performs the installation must be a member of the Enterprise Admins group and must have local Administrators rights on the CA server.
whoami /groups | findstr /i /c:"Enterprise Admins" /c:"BUILTIN\Administrators"
In the output, the ABC\Enterprise Admins and BUILTIN\Administrators lines are expected to appear as Enabled group. If the BUILTIN\Administrators line shows Group used for deny only, the PowerShell session was not opened as administrator. If the Enterprise Admins line does not appear at all, the account is added to the group. The user signs out and signs in again so that the group membership applies to the session.
Check for an Existing Enterprise CA in the Forest
Another unplanned enterprise CA in the same forest can cause certificate templates and autoenrollment to be processed through an unexpected CA. Before the installation, the enterprise CAs registered in the forest are listed.
The command lists the enterprise CAs registered in Active Directory. When a new PKI is built, the list is expected to show no CA or only known CAs. If an unknown CA is listed, the place of this CA in the PKI design is clarified before the installation starts.
Preparing the Working Directory
If the C:\Temp directory used in the export and dump operations does not exist, the Export-Certificate command returns an error. The directory is created in advance.
New-Item -Path C:\Temp -ItemType Directory -Force
4- Decision Table
The role installation and the Configuration Wizard contain more than 1 decision point. Making these decisions at the planning stage removes the need to decide on the wizard pages. The following table summarises the decisions made in this installation together with their step numbers.
|
Step |
Page |
Decision to Make |
Selection in This Installation |
|
Step 4 - Role Services |
Role Services |
Which AD CS role services are installed |
Certification Authority and Certification Authority Web Enrollment |
|
Step 7 - Starting the Wizard and Credentials |
Credentials |
The account that performs the configuration |
ABC\Administrator (member of Enterprise Admins) |
|
Step 9 - Setup Type |
Setup Type |
Enterprise CA or Standalone CA |
Enterprise CA |
|
Step 10 - CA Type |
CA Type |
Root CA or Subordinate CA |
Root CA |
|
Step 11 - Private Key |
Private Key |
Create a new private key or use an existing private key |
Create a new private key |
|
Step 12 - Cryptography for CA |
Cryptography for CA |
Cryptographic Provider, Key Length and Hash Algorithm |
RSA#Microsoft Software Key Storage Provider, 2048, SHA256 |
|
Step 13 - CA Name |
CA Name |
CA Common Name |
ABC-Corporate-Root-CA |
|
Step 14 - Validity Period |
Validity Period |
The validity period of the CA certificate |
5 years |
|
Step 15 - CA Database |
CA Database |
Database and log directory |
Default directory C:\Windows\system32\CertLog |
5- Installing the AD CS Role
Step 1 - Starting the Add Roles and Features Wizard
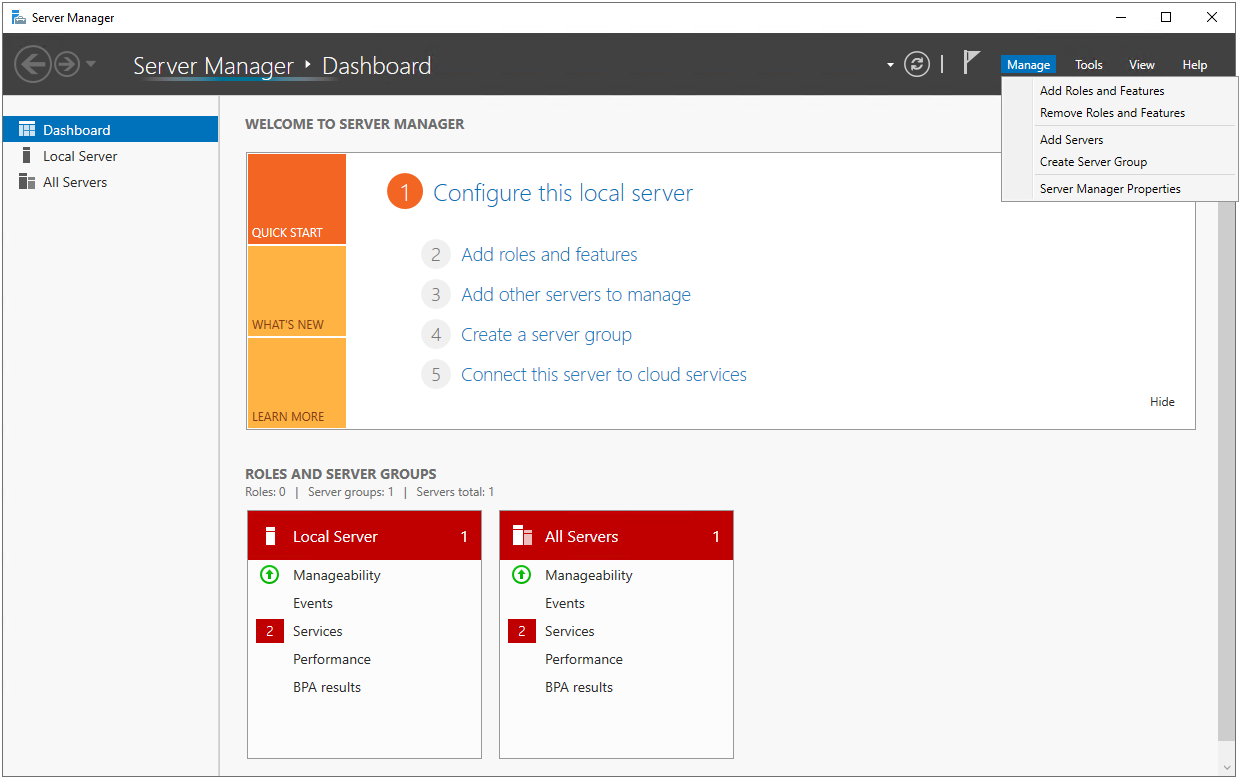
Sign in to the server with the account verified in the Permission Check section. In Server Manager, the Add Roles and Features option is clicked from the Manage menu in the upper right corner.
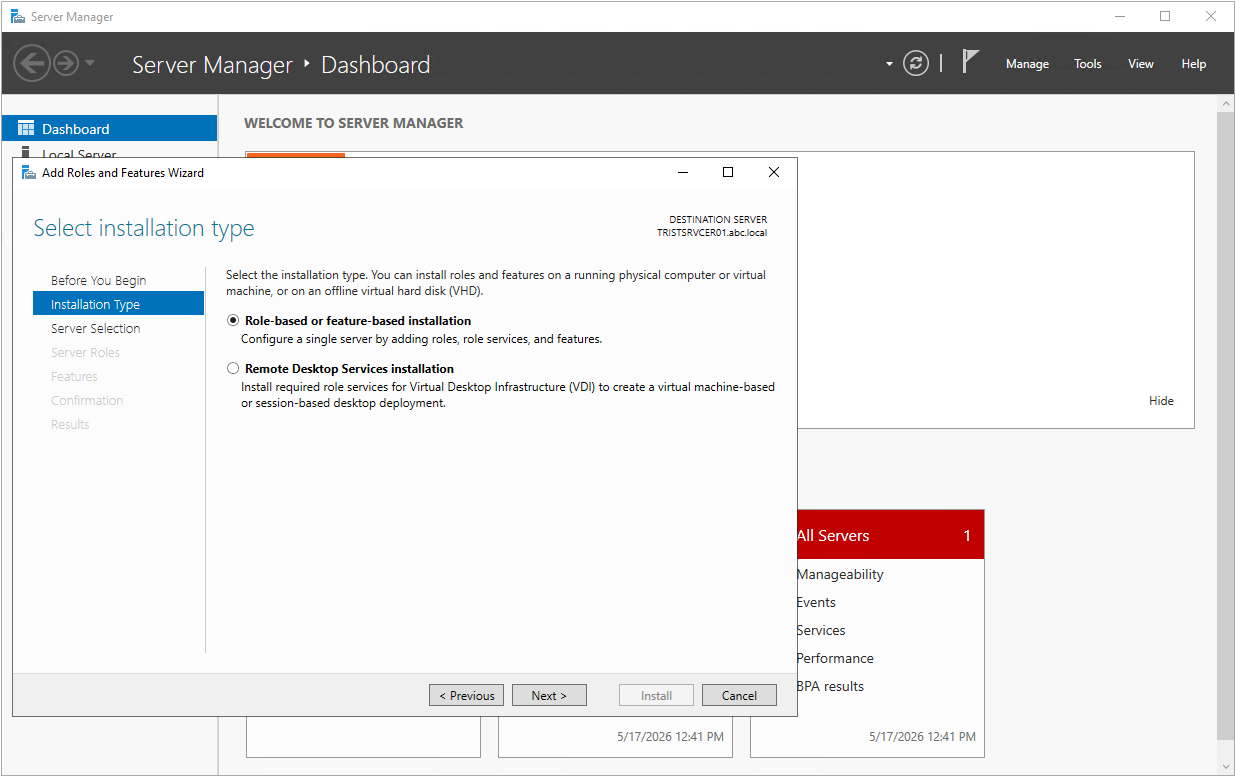
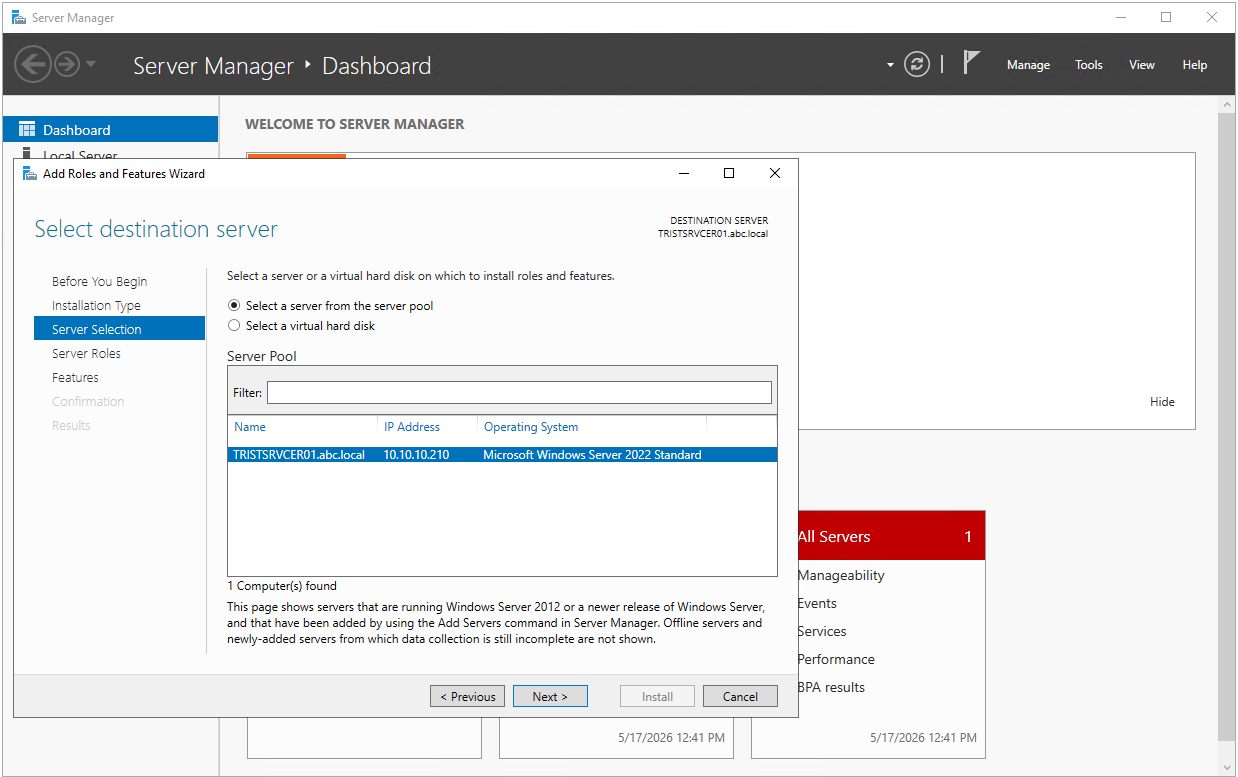
The Before You Begin page is skipped. On the Installation Type page, the Role-based or feature-based installation option, which is selected by default, is left selected. On the Server Selection page, the TRISTSRVCER01.abc.local server on which the role is installed is already selected.
Step 2 - Server Roles and Features
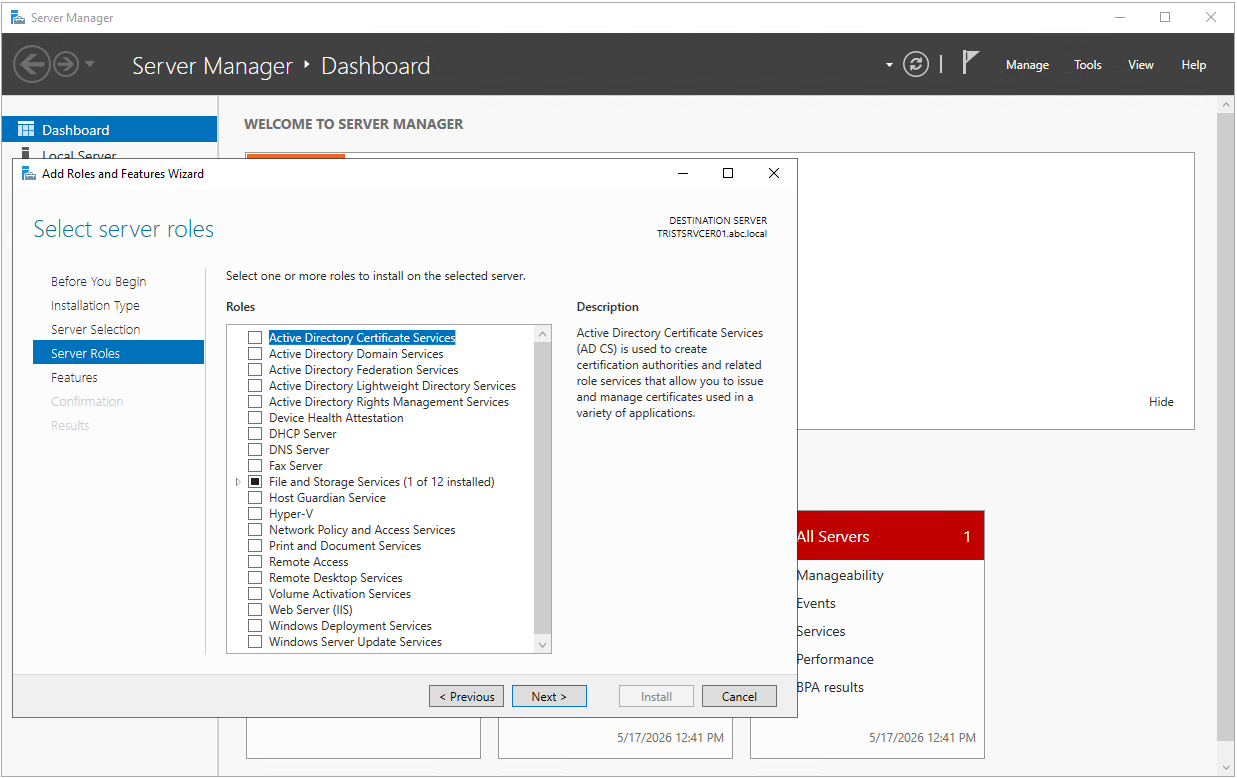
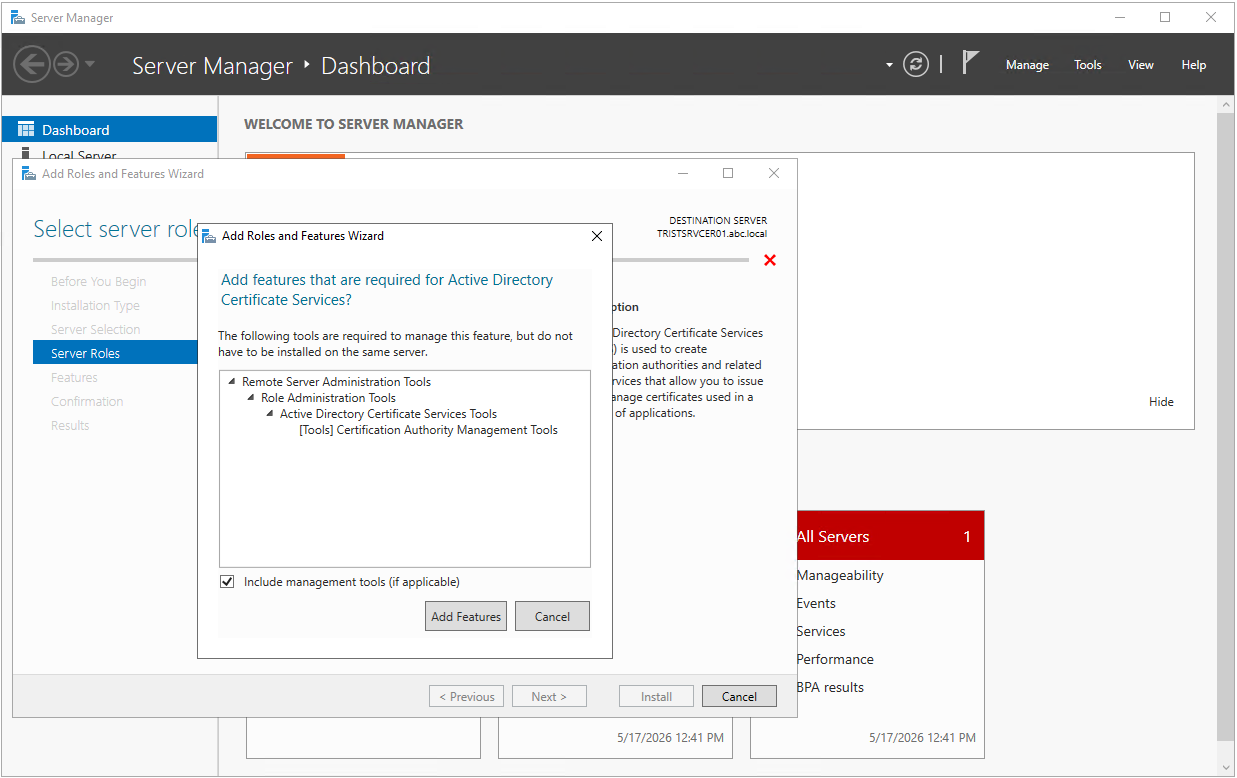
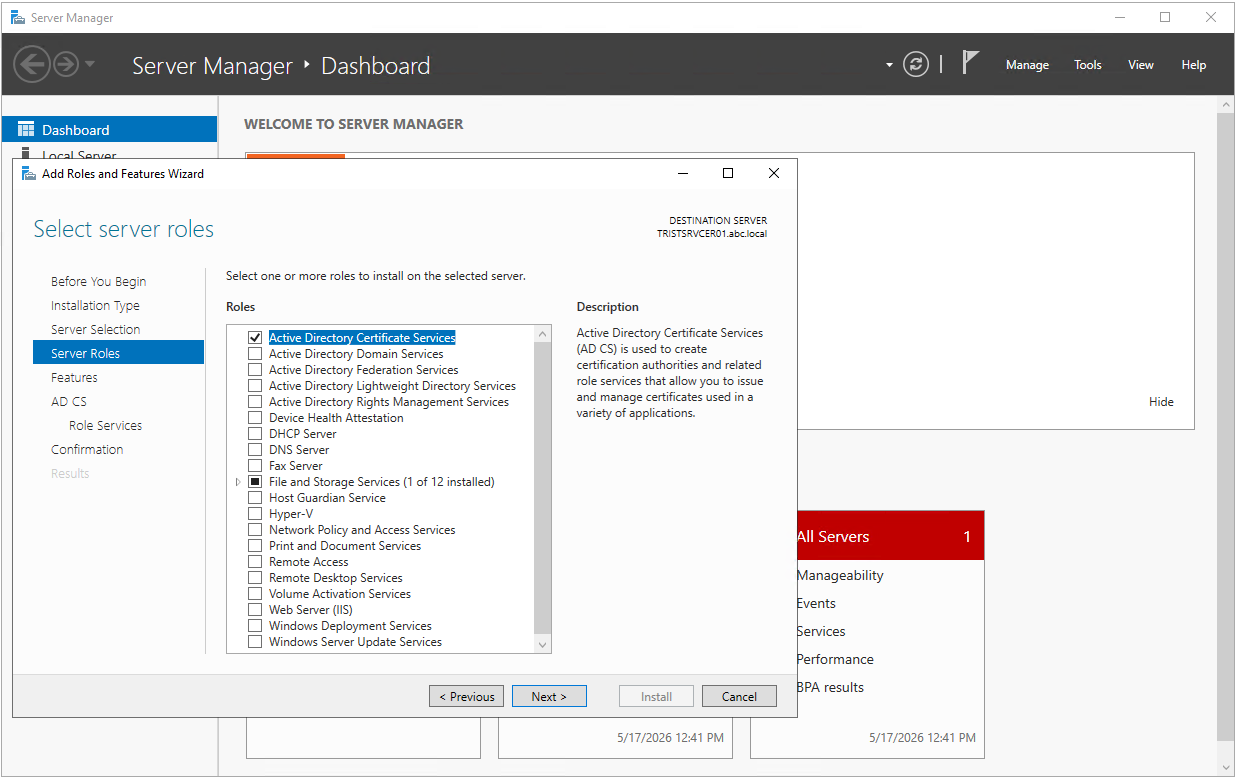
On the Server Roles page, the Active Directory Certificate Services option is selected. When it is selected, a window opens and states that the Certification Authority Management Tools component, which is required to manage the role, must also be added. The Add Features button is clicked to include the management tools in the installation.
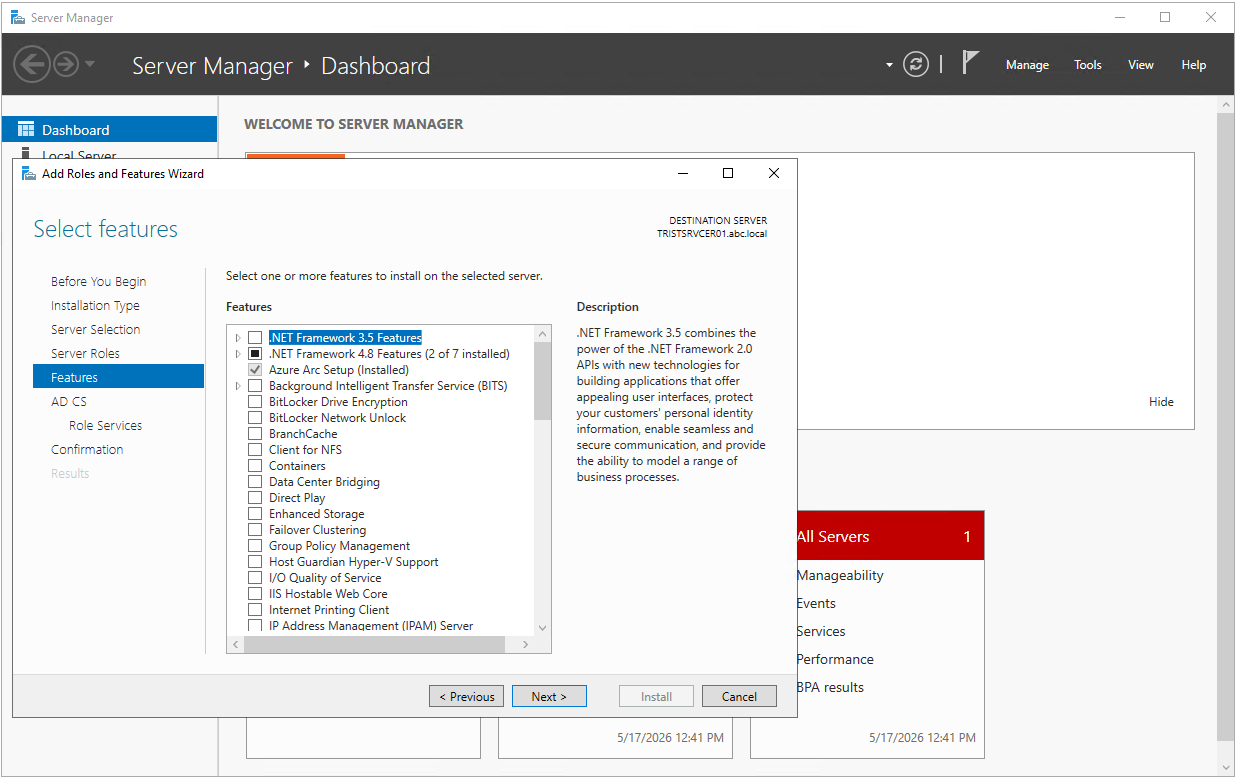
On the Features page, no additional feature selection is required and the installation continues with the default values.
Checkpoint
In the Server Roles list, the Active Directory Certificate Services option appears selected and the management tools are included in the installation.
Step 3 - AD CS Information Page
The AD CS information page states that the name and the domain membership of the server cannot be changed after the Certification Authority is installed. The reason is that the CA configuration is bound to the server name. The registry configuration of the CA, the Enrollment Services object in Active Directory, and the AIA and CDP URLs built with the %1 (ServerDNSName) variable use the current FQDN of the server. The CA Common Name is independent of this and does not contain the host name in this installation.
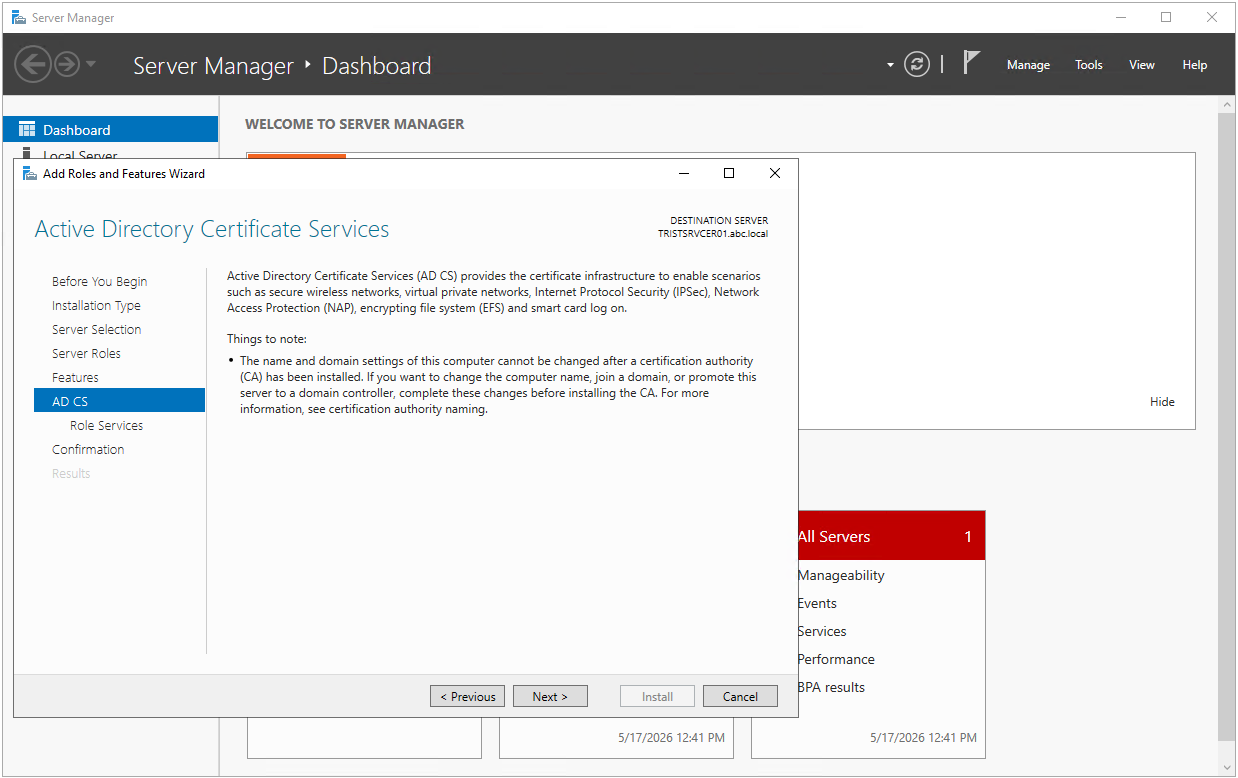
After the CA is installed, the host name, the FQDN and the domain membership of the server must not be changed. These values are bound to the CA configuration and to the publication points. The name and domain settings of the server must be completed before the installation.
Step 4 - Role Services
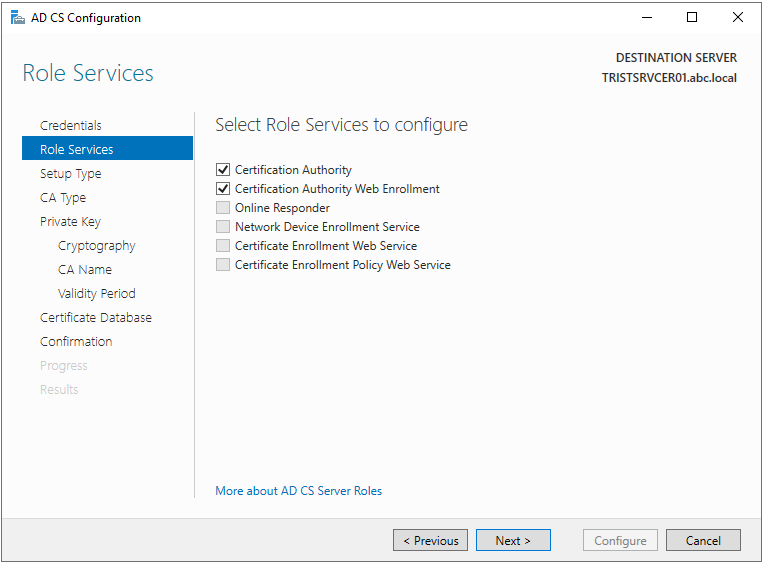
The Role Services page lists the role services under AD CS. In this installation, the Certification Authority and Certification Authority Web Enrollment services are selected. Certification Authority is the main component that issues certificates. Certification Authority Web Enrollment allows certificate requests to be made through a browser-based interface.
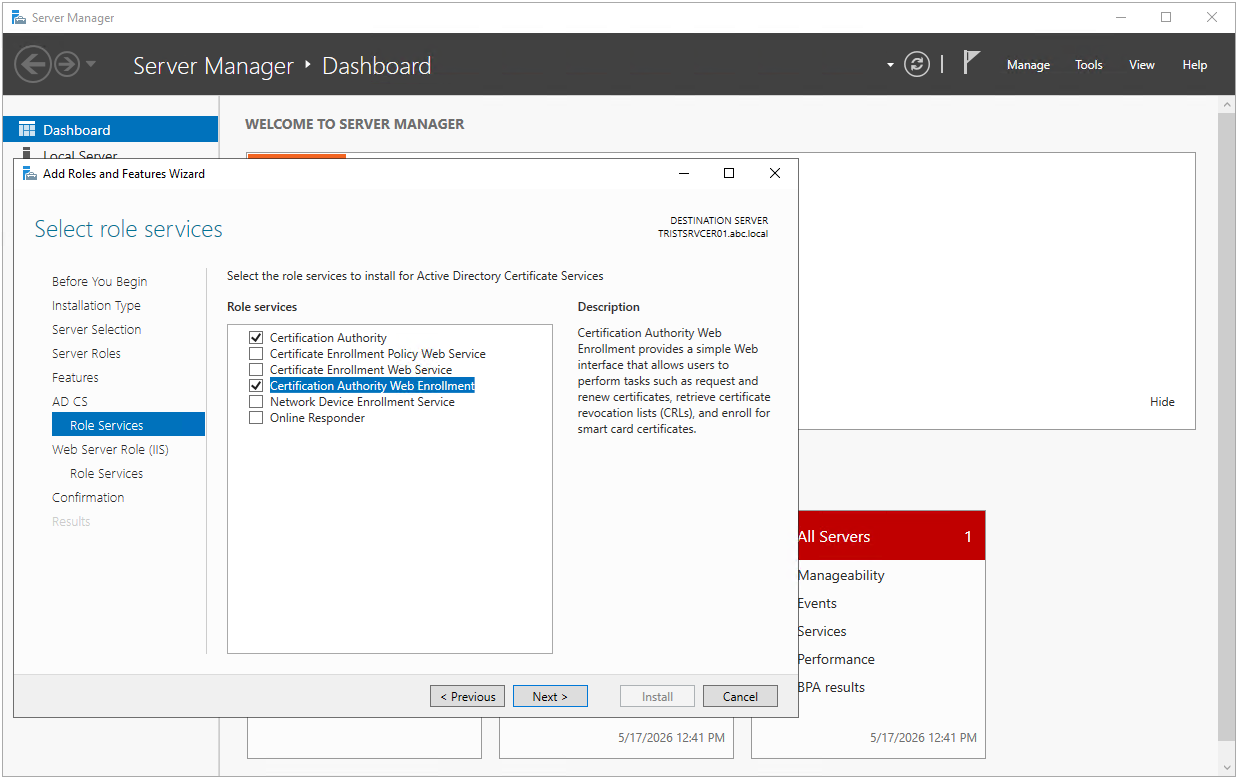
Web Enrollment allows certificate requests to be submitted through the browser in PKCS #10 format and adds the Web Server (IIS) role to the installation. The service is installed over HTTP. HTTPS must be configured in IIS before enrolment from the browser is possible, and this is described under Step 17 - Securing Web Enrollment.
Step 5 - IIS Components and Confirmation
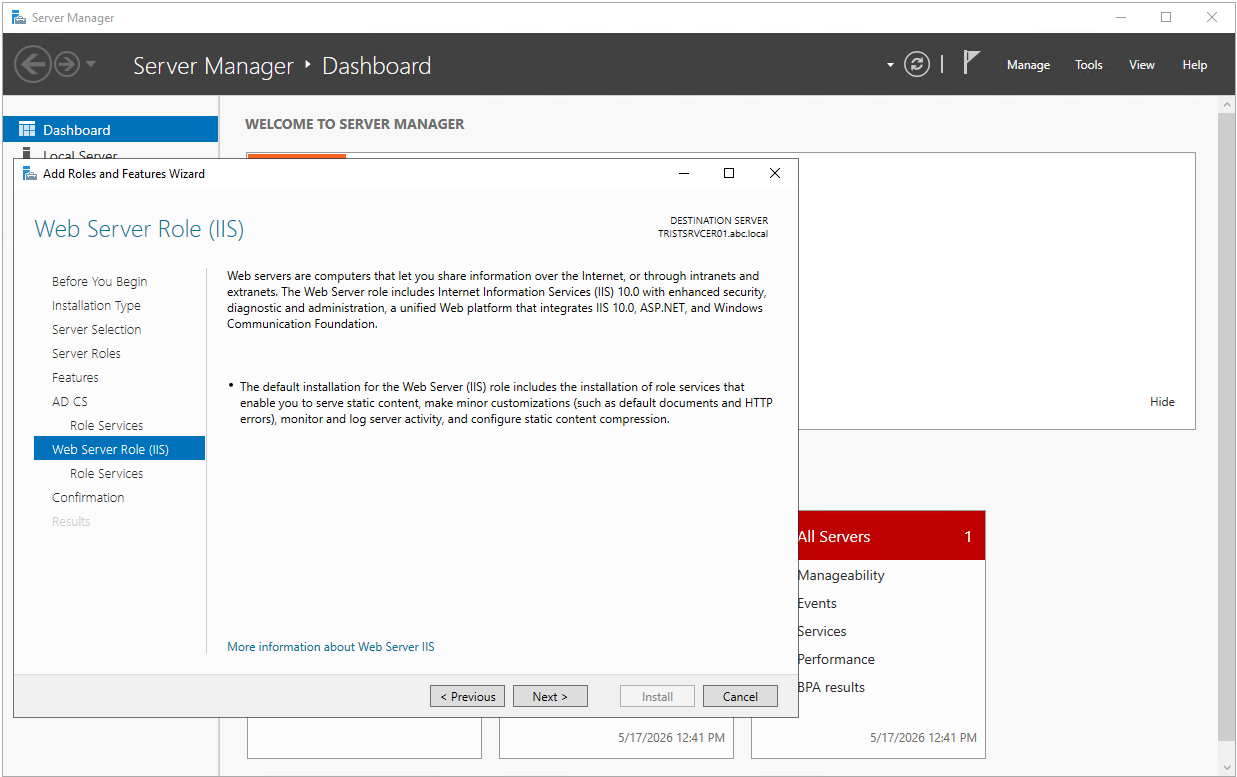
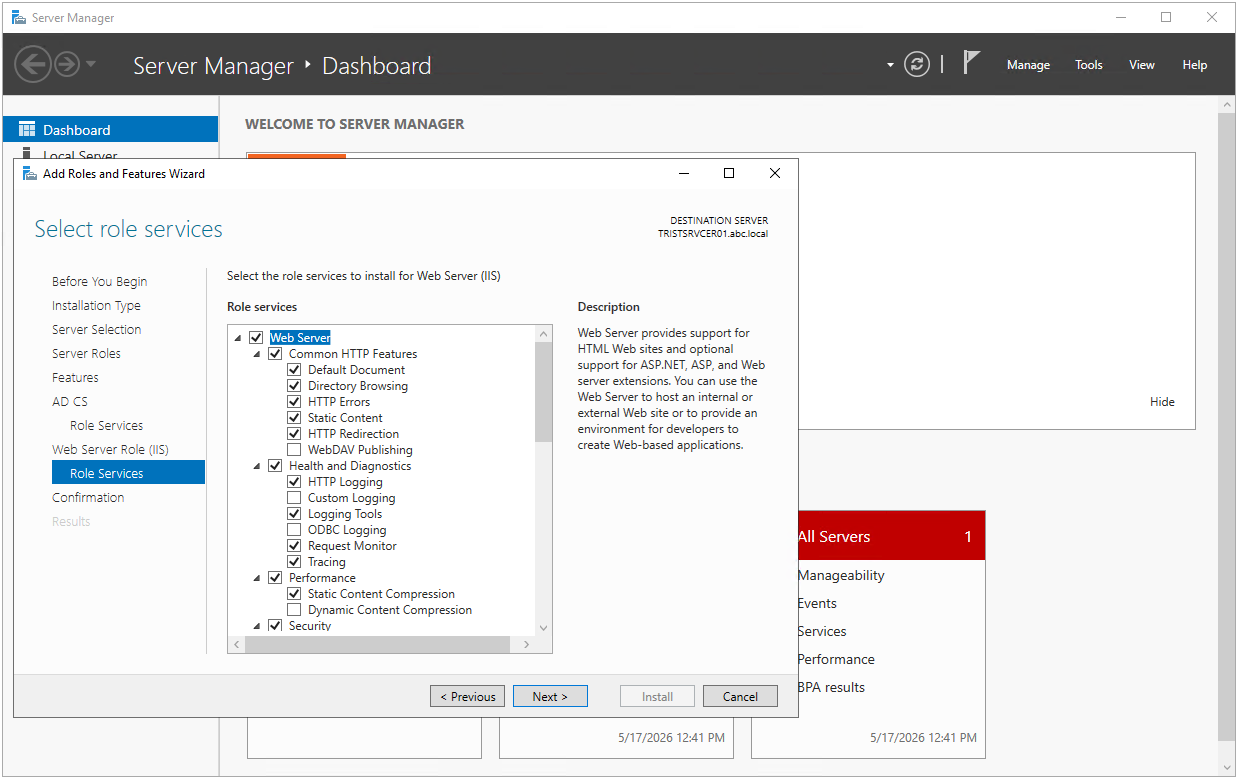
Because Web Enrollment is selected, the Web Server Role (IIS) information page appears, followed by the IIS Role Services page. The IIS components required for Web Enrollment are selected by default and the wizard continues without any change.
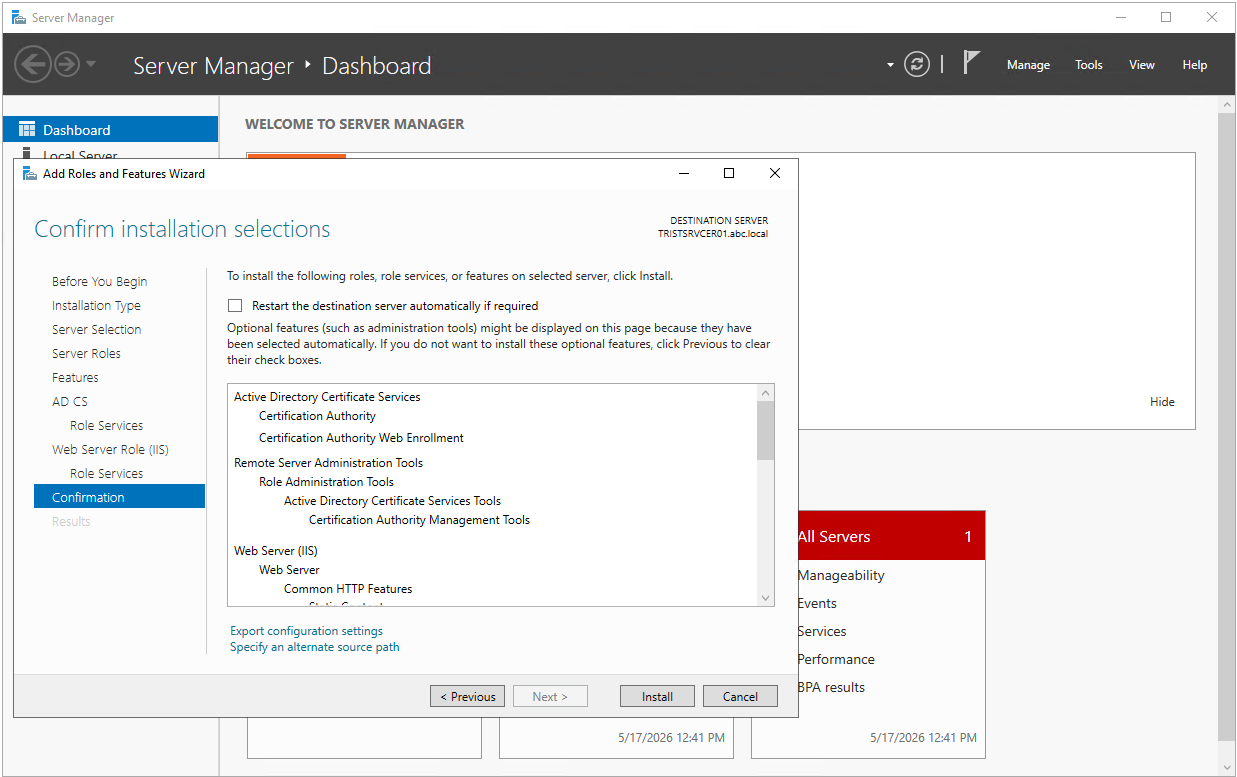
The Confirmation page shows a summary of the roles and services to be installed. Certification Authority and Certification Authority Web Enrollment are listed under Active Directory Certificate Services, Certification Authority Management Tools under Remote Server Administration Tools, and the required IIS components under Web Server (IIS). The Install button is clicked to start the installation.
Step 6 - Installation Result and State Before Configuration
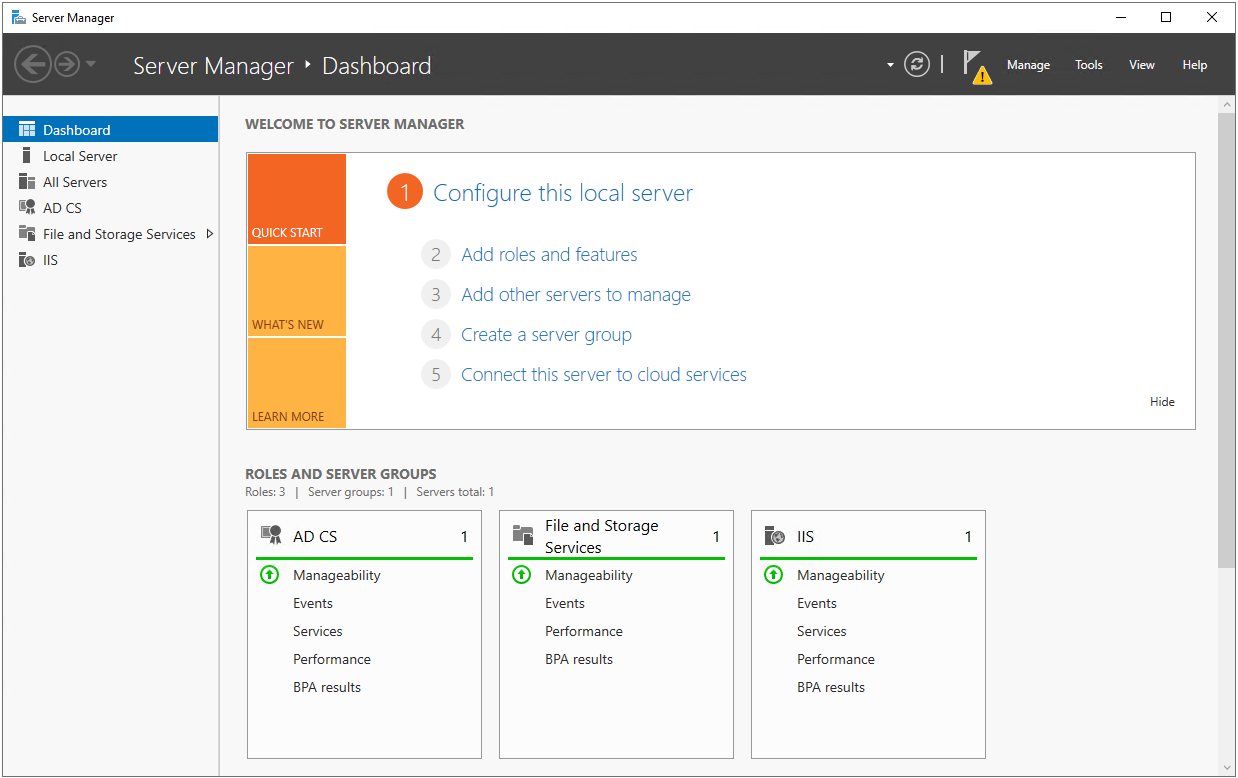
The installation is monitored on the Installation progress page and no user interaction is required during this time. When the installation is complete, the message Configuration required. Installation succeeded on TRISTSRVCER01.abc.local is displayed at the top. This message shows that the role is installed but the CA configuration has not been done yet. The same page also contains the Configure Active Directory Certificate Services on the destination server link.
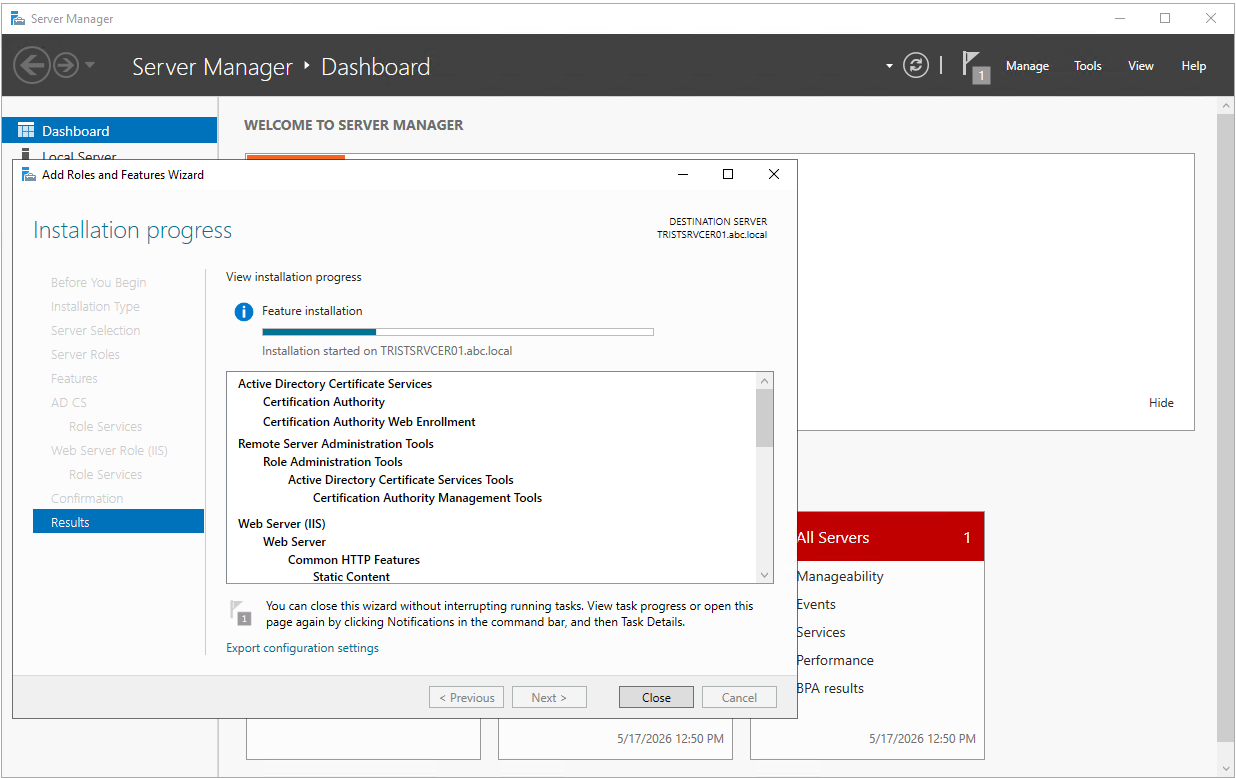
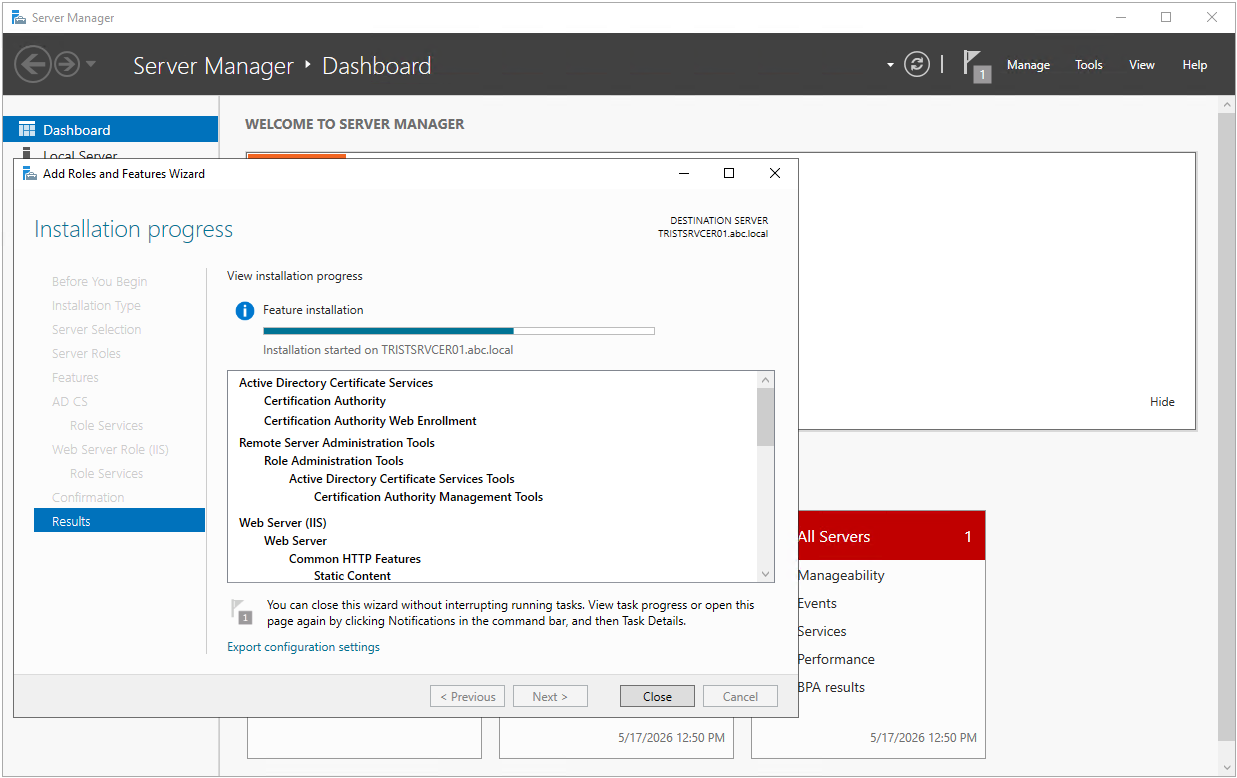
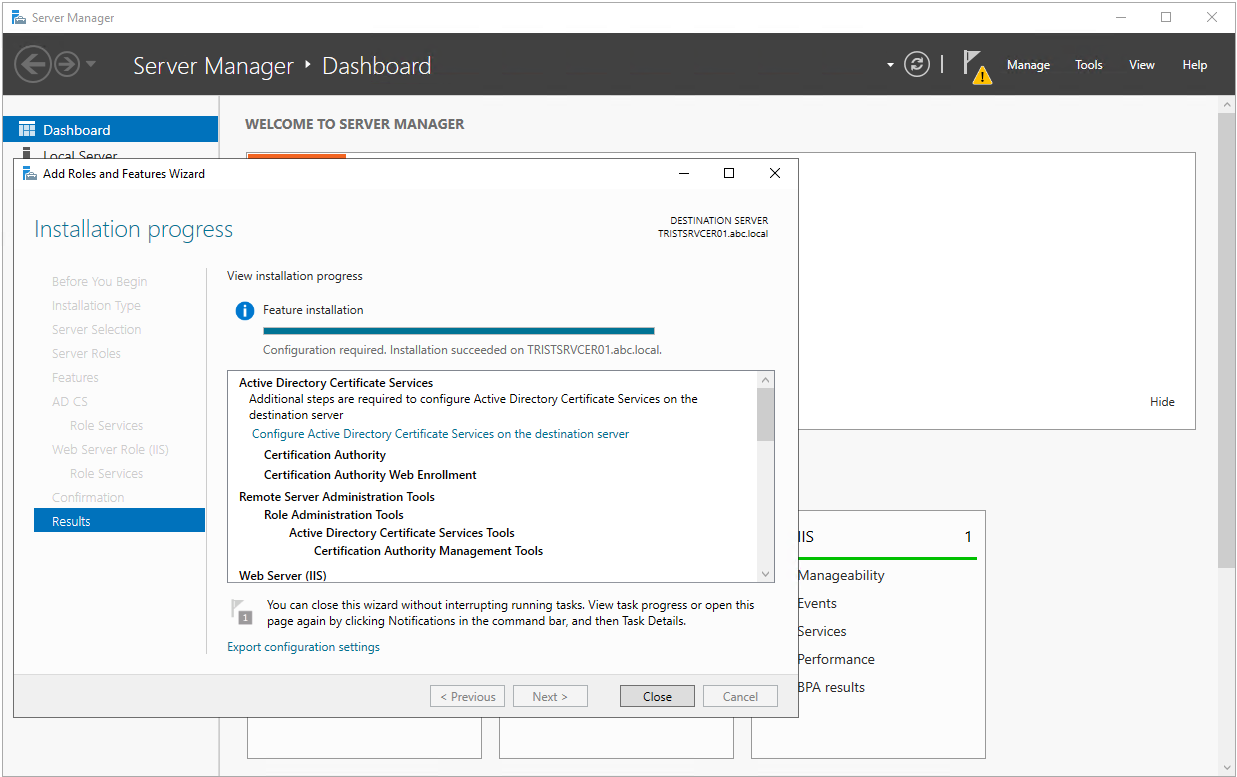
The AD CS installation consists of 2 stages. In the first stage, the role and the binary files are installed on the system. In the second stage, Post-Deployment Configuration, PKI parameters such as the CA Type, Cryptographic Provider, CA Common Name and Validity Period are set and the CA service is created.
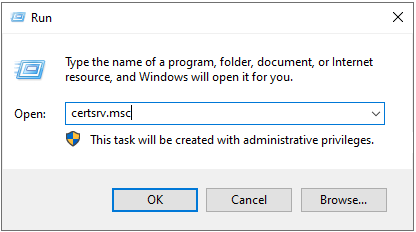
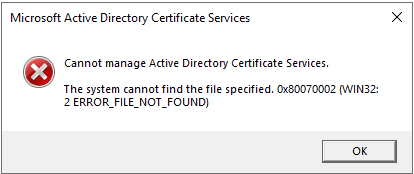
At this stage, the CA service has not been created yet. In this lab, an attempt to open the certsrv.msc console returned the error Cannot manage Active Directory Certificate Services. The system cannot find the file specified. 0x80070002 (WIN32: 2 ERROR_FILE_NOT_FOUND). The error is not a sign of corruption or of an incomplete installation. The management console gives this warning because it cannot find a configured CA to connect to.
Checkpoint
The Configuration required message appears in Server Manager. At this stage, it is expected that the certsrv.msc console cannot connect to the CA, because the configuration has not been done yet.
6- AD CS Configuration Wizard
Step 7 - Starting the Wizard and Credentials
The yellow warning flag at the top of Server Manager is clicked. In the Post-deployment Configuration notification that opens, the Configure Active Directory Certificate Services on the destination server link is selected to start the wizard.
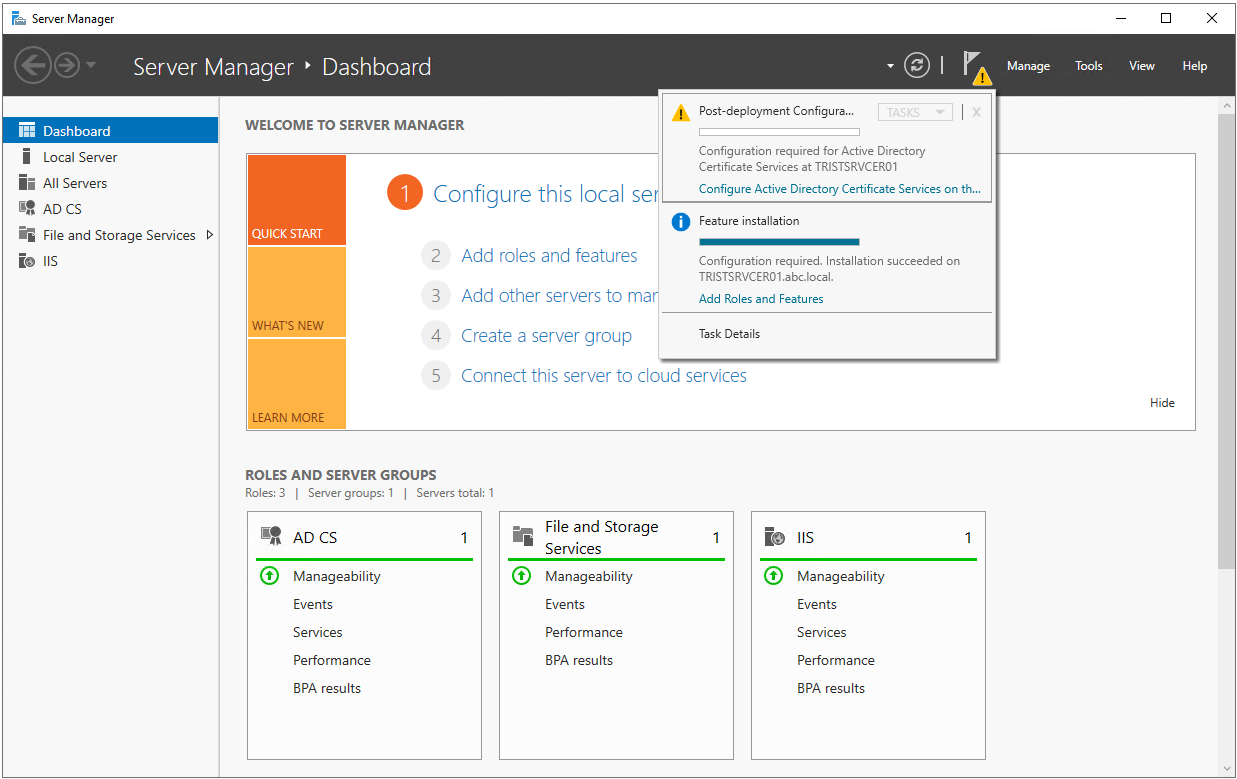
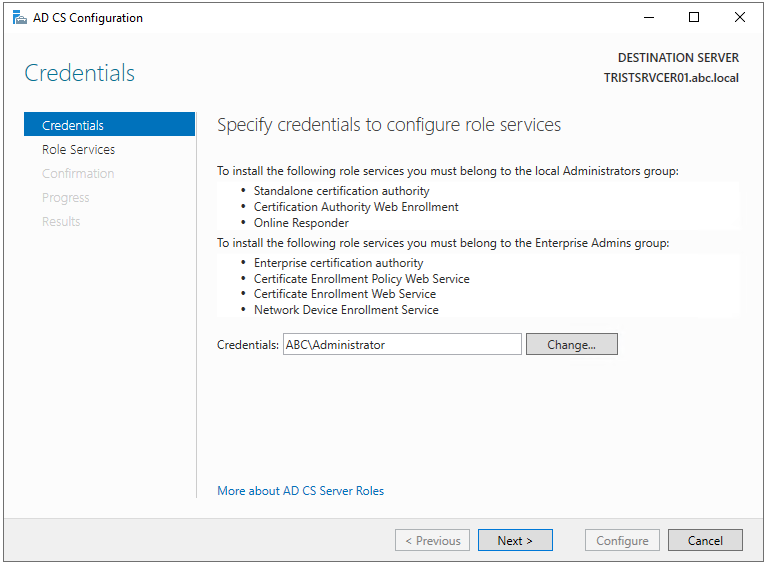
The Credentials page, the first page of the wizard, shows the account that configures the role services and the permission level required for each role service. To configure an Enterprise Certification Authority, the account must be a member of the Enterprise Admins group. The ABC\Administrator account is used in this installation.
Step 8 - Role Services
On the Role Services page, the services to be set up in this configuration are selected. Because Certification Authority and Certification Authority Web Enrollment were selected in the role installation, both are listed and both are selected.
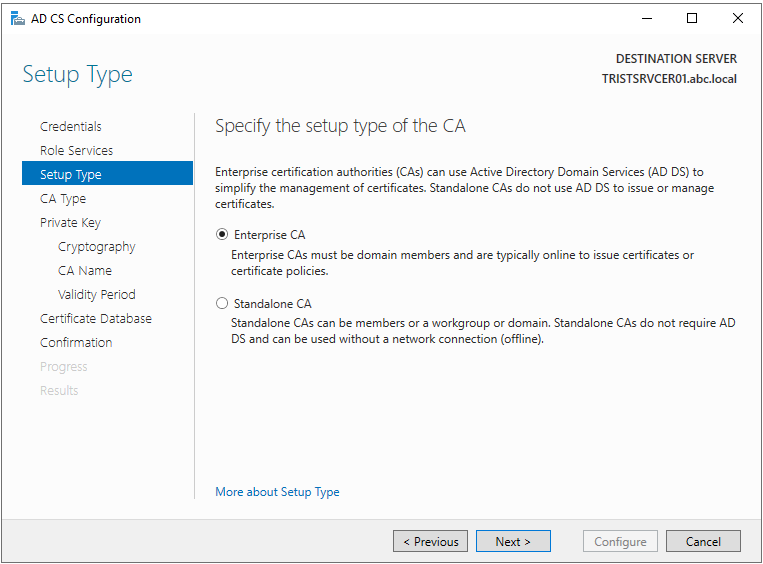
Step 9 - Setup Type
The Setup Type page determines whether the CA is installed as an enterprise CA integrated with Active Directory or as a standalone CA. Because the server is joined to the domain and AD integration will be used in certificate distribution, the Enterprise CA option is selected.
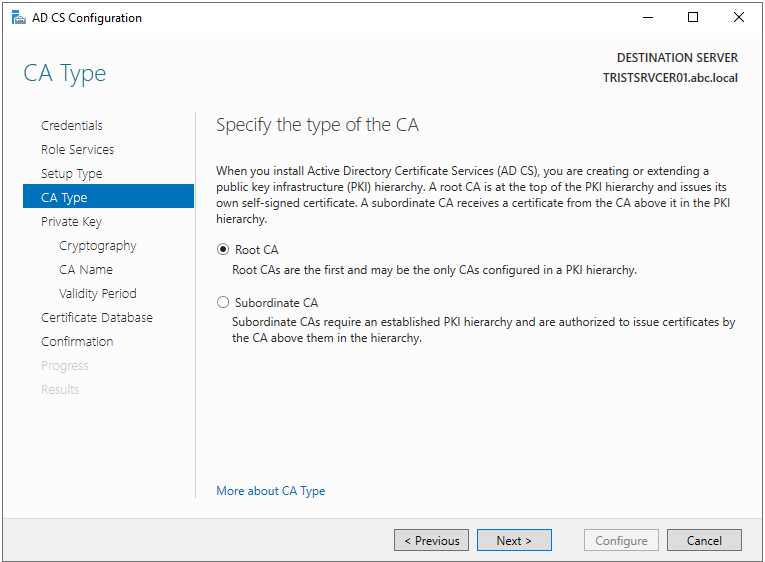
Step 10 - CA Type
The CA Type page determines the position of the CA in the hierarchy. Because the CA to be installed will be a self-signed CA at the top of the hierarchy, the Root CA option is selected. If there were another CA at a higher level in the hierarchy, Subordinate CA would be selected and the CA certificate would be requested from the parent CA.
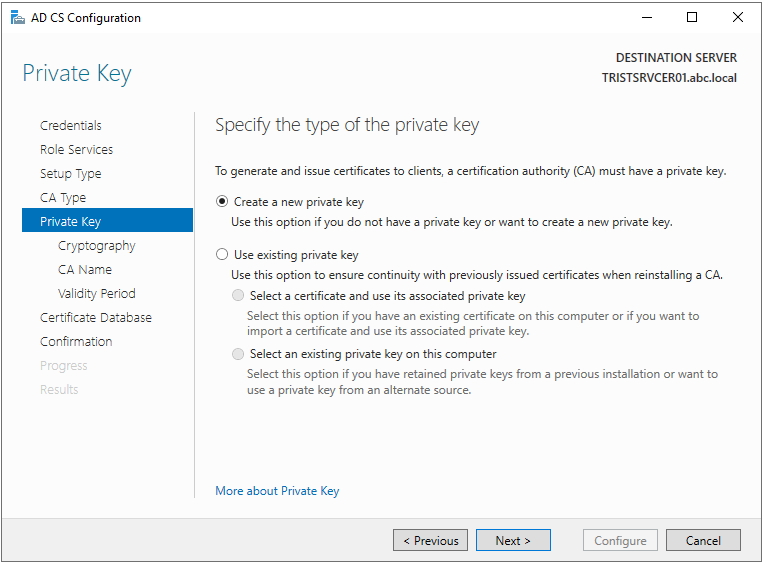
Step 11 - Private Key
The Private Key page determines how the private key that forms the identity of the CA is obtained. Because a new CA is being installed, the Create a new private key option is selected. The Use existing private key options are used with a previously backed-up private key, in scenarios such as reinstalling an existing CA or moving it to another server.
Step 12 - Cryptography for CA
On the Cryptography for CA page, the cryptographic provider that stores the private key, the key length and the hash algorithm used for signing are selected. The default software-based provider, RSA#Microsoft Software Key Storage Provider, is left selected. The key length is set to 2048 and the hash algorithm to SHA256.
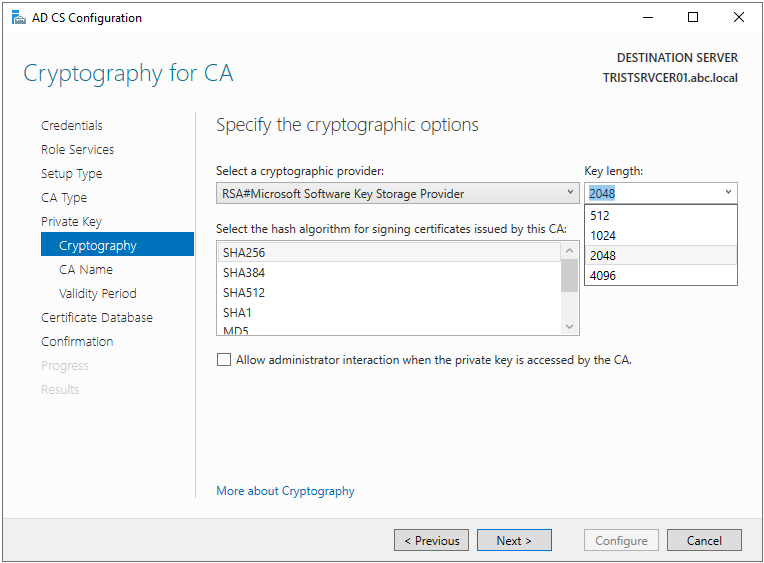
The hash algorithm and key length options listed on this page look similar, but each one has a different effect on security, compatibility and performance. The following tables evaluate these options separately.
|
Hash Algorithm |
Description |
Usage Assessment |
|
SHA256 |
The algorithm of the SHA-2 family that produces a 256-bit hash. It is widely used in modern Windows PKI structures to sign the CA certificate and the issued certificates. |
The algorithm preferred in this installation. It is a balanced choice for current enterprise scenarios in terms of security and compatibility. |
|
SHA384 |
The algorithm in the SHA-2 family that produces a 384-bit hash output. |
It can be considered in structures with higher security expectations. Client, application and device compatibility must be checked separately. |
|
SHA512 |
The algorithm of the SHA-2 family that produces a 512-bit hash output. |
It should not be treated as the default choice. It can cause compatibility problems with old clients, old applications or some network devices. |
|
SHA1 |
The hash algorithm used in old PKI structures. It is not considered secure because it has become weak against collision attacks. |
It must not be used in new CA installations. |
|
MD5 |
An old and cryptographically weak hash algorithm. |
It must not be used for certificate signing. |
|
Key Length |
Description |
Usage Assessment |
|
512 bit |
A very old RSA key length. |
It does not meet current security expectations and must not be used. |
|
1024 bit |
An RSA key length found on old systems. |
It is considered weak for current PKI deployments and should not be preferred in new CA installations. |
|
2048 bit |
The RSA key length commonly used in enterprise PKI installations. It provides a balance between security, performance and compatibility. |
The value selected in this installation. It is suitable for lab, test and many enterprise scenarios. |
|
4096 bit |
It provides a stronger RSA key length than 2048 bit. Signing operations require more processing power. |
It can be considered for long-lived root CAs or for structures with high security expectations. Compatibility and operational impact must be planned separately. |
Elliptic curve based options such as ECDSA P-256 are also in the provider list. However, with these options it must be verified in advance that all clients, applications and network devices support ECDSA-signed certificates.
SHA256 and 2048-bit RSA are preferred in this installation. In production environments, storing the CA private key on a Hardware Security Module (HSM) instead of a software-based provider is a more secure approach.
Step 13 - CA Name
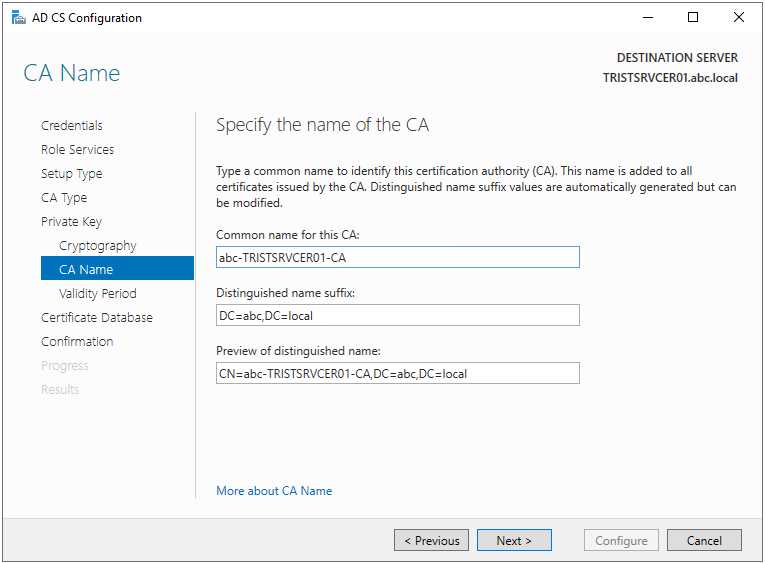
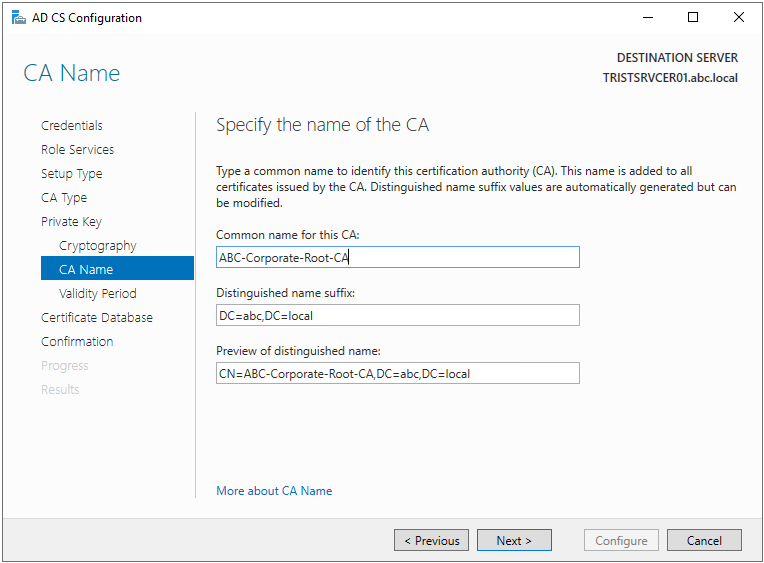
On the CA Name page, the wizard suggests a Common Name derived from the domain and the host name. Instead of the suggested name abc-TRISTSRVCER01-CA, the name ABC-Corporate-Root-CA is entered, which has a corporate meaning and is independent of the host name.
The Distinguished name suffix field automatically contains the value DC=abc,DC=local. This value is the domain information converted to DN format. The Preview of distinguished name field shows the full DN of the CA.
Checkpoint
The Preview of distinguished name field shows the value CN=ABC-Corporate-Root-CA,DC=abc,DC=local.
Step 14 - Validity Period
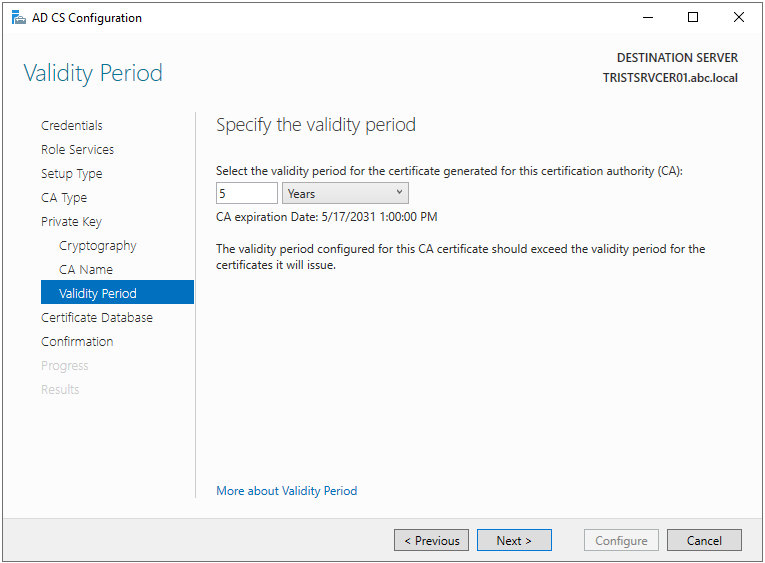
The Validity Period page sets the validity period of the CA certificate. In this installation, the period is left at 5 years.
A CA cannot issue a certificate that is valid for longer than the remaining lifetime of its own certificate. Even if a template defines a longer period, the end date of the issued certificate is limited by the end date of the CA certificate. For this reason, the lifetime of the CA certificate is planned to be clearly longer than the lifetime of the certificates it will issue. 5 years is enough for a lab environment. In production, longer periods for the root CA certificate are planned together with the renewal schedule of the CA certificate.
Step 15 - CA Database
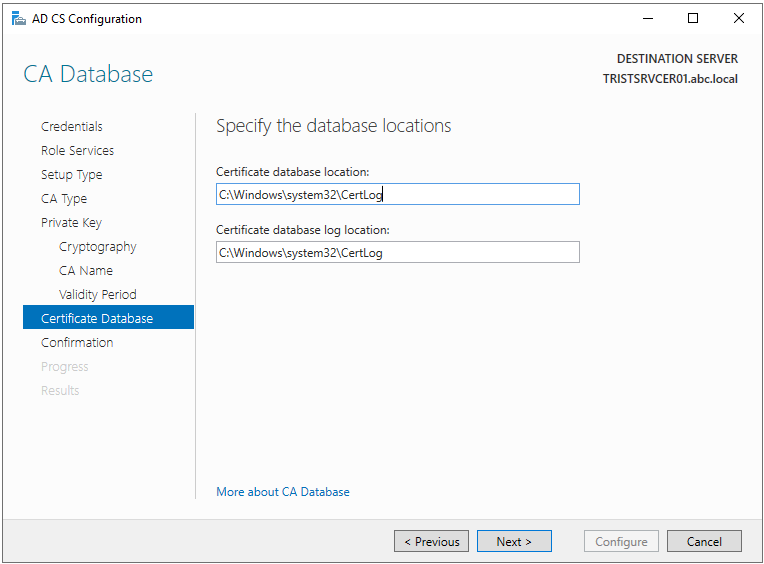
The CA Database page sets the directories where the certificate database and the log files are stored. The C:\Windows\system32\CertLog directory is suggested by default, and the default value is used in this installation. In a production environment, keeping the database and log directory on a separate data disk is better for management and backup.
Step 16 - Confirmation and Results
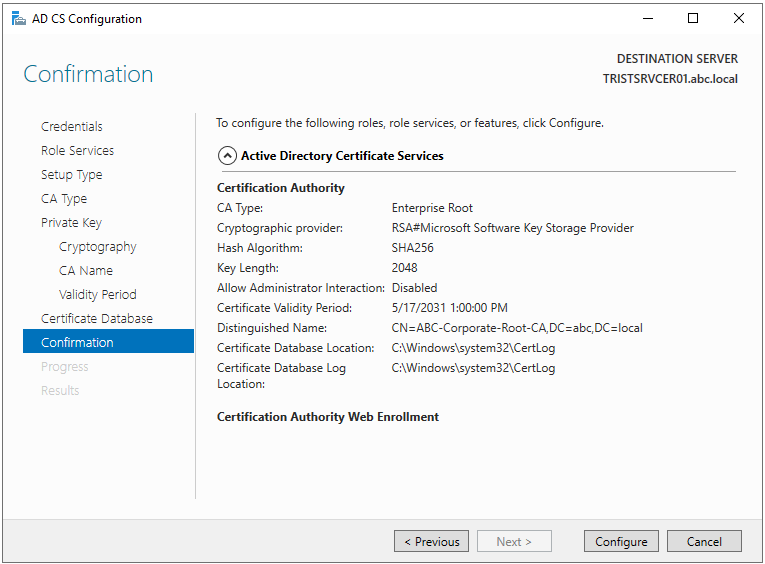
The Confirmation page shows a summary of the selections made in the previous steps. It displays Enterprise Root as the CA Type, RSA Microsoft Software Key Storage Provider as the Cryptographic Provider, SHA256 as the Hash Algorithm, 2048 as the Key Length and CN=ABC-Corporate-Root-CA,DC=abc,DC=local as the Distinguished Name. The Configure button is clicked to start the configuration.
With Configure, the CA certificate is published across the forest and is added to the trusted root list of the domain member computers. Because an enterprise CA publishes the default certificate templates, domain controllers can obtain certificates from this CA automatically.
Checkpoint
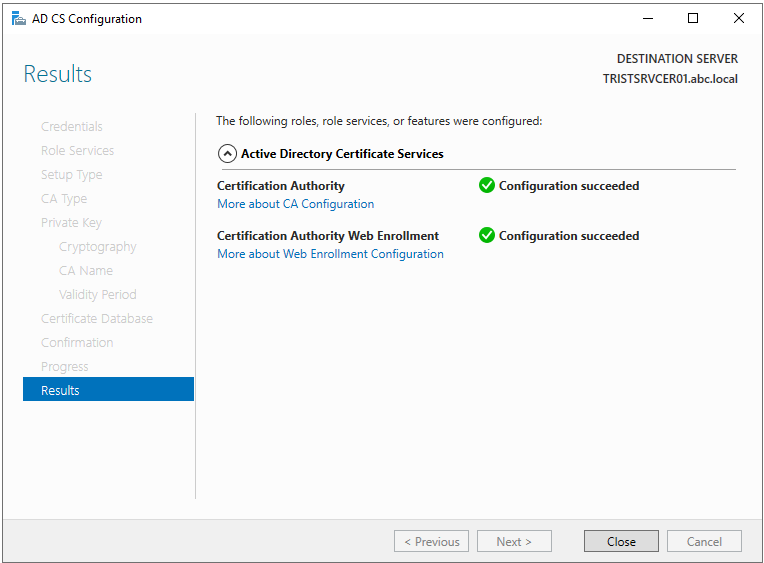
On the Results page, the Configuration succeeded message appears for Certification Authority and Certification Authority Web Enrollment.
7- Installing AD CS with PowerShell
The installation performed in Step 1 to Step 16 can also be done with PowerShell. This method is preferred for Server Core environments, automation and repeatable installations. The commands are an alternative to the installation done through the graphical interface. They are not run again on a server that has been configured with the wizard.
The first command installs the AD CS role and the management tools on the server. This step corresponds to the role installation in Step 1 to Step 6.
Install-WindowsFeature -Name ADCS-Cert-Authority -IncludeManagementTools
The second command takes the decisions made in the Configuration Wizard as parameters and completes the Enterprise Root CA configuration. The parameters match the selections in the Decision Table exactly.
$params = @{
    CAType              = "EnterpriseRootCA"
    CACommonName        = "ABC-Corporate-Root-CA"
    CryptoProviderName  = "RSA#Microsoft Software Key Storage Provider"
    KeyLength           = 2048
    HashAlgorithmName   = "SHA256"
    ValidityPeriod      = "Years"
    ValidityPeriodUnits = 5
}
Install-AdcsCertificationAuthority @params -Force
If the Web Enrollment service is also to be installed, the following commands are run. The first command installs the Web Enrollment role service and the required IIS components, and the second command configures the service.
Install-WindowsFeature -Name ADCS-Web-Enrollment -IncludeManagementTools
Install-AdcsWebEnrollment -Force
Install-AdcsCertificationAuthority requires the same permissions as the wizard. PowerShell must be opened as administrator, and for an enterprise CA installation the command must be run with an account that is a member of Enterprise Admins. If the signed-in account is not a member of this group, the authorised account is supplied with the -Credential parameter.
The -Force parameter only skips the user confirmation prompt. Because the command runs without waiting for confirmation, the parameters must be compared with the Decision Table before the command is run.
8- Post-Installation Tasks
When the Configuration Wizard is complete, the CA is running. However, securing Web Enrollment, reviewing the published templates, enabling auditing and backing up the CA are treated as part of the installation. These steps are performed on TRISTSRVCER01, in a PowerShell session opened as administrator. The permission that each step requires is stated in the step, and each operation is performed with an account limited to that permission.
Step 17 - Securing Web Enrollment
After installation, Web Enrollment is served over HTTP on IIS. The HTTP endpoints of AD CS can be used as targets in NTLM relay attacks. Microsoft KB5005413 recommends enforcing HTTPS and using Extended Protection for Authentication (EPA) on these endpoints. The operations in this step require local Administrators rights on the CA server.
Web Enrollment without HTTPS and Extended Protection for Authentication is exposed to NTLM relay attacks. A service in this state must not be left enabled in a production environment.
If Web Enrollment will not be used, the service is removed. If certificate requests are made through autoenrollment and certlm.msc, the browser interface is not needed. The following commands remove the Web Enrollment configuration and the role service. The IIS role stays on the server and can be removed separately if it is not used for another purpose.
Uninstall-AdcsWebEnrollment -Force
Uninstall-WindowsFeature -Name ADCS-Web-Enrollment
If Web Enrollment will be used, HTTPS and EPA are configured. First, a Web Server certificate that contains the FQDN of the server (TRISTSRVCER01.abc.local) as a SAN is obtained. Which template and which permissions are used to obtain this certificate depends on the certificate template configuration and is outside the scope of this article. After the certificate is obtained, the following settings are made in IIS Manager.
Under Sites, Default Web Site is selected and the HTTPS binding for 443/TCP is configured with the server certificate that was obtained. In the CertSrv virtual directory, SSL Settings is opened and Require SSL is enabled. In the same directory, Advanced Settings is opened for Windows Authentication under Authentication, and the Extended Protection value is set to Required.
According to KB5005413, IIS is restarted for these changes to take effect. The command is run in a Command Prompt or PowerShell session opened as administrator.
The iisreset /restart command stops all sites on IIS for a short time. During this time, the Web Enrollment pages and the CertEnroll directory cannot be reached.
Checkpoint
The address https://TRISTSRVCER01.abc.local/certsrv opens from a domain member client without a certificate warning, and access over HTTP is refused.
Step 18 - Reviewing the Published Certificate Templates
During installation, an enterprise CA automatically publishes a group of default certificate templates. Some of these templates are for domain controller, computer and user certificates, and objects with suitable permissions can obtain certificates from these templates. Unpublishing the templates that will not be used limits the certificate types that the CA issues to the planned scope.
certutil -CATemplates
The command lists the templates that the CA currently publishes. A template that is confirmed as unused is unpublished with the following command. {Template Name} is replaced with the template name from the certutil -CATemplates output.
Remove-CATemplate -Name "{Template Name}" -Force
Remove-CATemplate does not delete the template from Active Directory. It only removes it from the list of templates that the CA issues certificates from. Because this list is kept in the Enrollment Services object in Active Directory, the operation is performed with an account that has write permission on this object. The same operation can also be done in certsrv.msc by right-clicking the template in the Certificate Templates folder and selecting Delete.
Unpublishing the domain controller certificate templates affects scenarios that depend on these certificates, such as LDAPS, Smart Card Logon and Kerberos PKINIT. These templates must not be removed before their usage is clear.
Step 19 - Enabling the Audit Settings
For the CA to record certificate requests, approvals, revocations and configuration changes, 2 settings must be made together. The first is the AuditFilter value, which determines which event types the CA audits. The second is the Certification Services audit subcategory, which makes Windows write these events to the Security log. The AuditFilter change requires the Manage CA (CA Administrator) permission on the CA, and auditpol and the service restart require local Administrators rights.
certutil -setreg CA\AuditFilter 127
auditpol /set /subcategory:"Certification Services" /success:enable /failure:enable
Restart-Service -Name CertSvc
The value 127 enables all event groups that AD CS can audit. The certutil -getreg CA\AuditFilter command verifies that the value is saved as 127 (0x7f). If Advanced Audit Policy is managed by a GPO in the domain, the local setting made with auditpol can be overwritten by the GPO. In this case, the Certification Services subcategory is enabled in the relevant GPO.
The Restart-Service -Name CertSvc command stops the CA service for a short time. During this time, certificate requests are not processed.
Step 20 - Backing Up the CA
The private key and certificate of the CA, the certificate database and the configuration in the registry form the identity of the CA. A backup of these 3 components is required so that the same CA can be installed again if the server is lost. The backup is used in restores performed with the Use existing private key option on the Step 11 - Private Key page. The backup operation is performed with local Administrators rights on the CA server.
New-Item -Path C:\CABackup -ItemType Directory -Force
Backup-CARoleService -Path C:\CABackup -Password (Read-Host -Prompt "Backup password" -AsSecureString)
reg export "HKLM\SYSTEM\CurrentControlSet\Services\CertSvc\Configuration" C:\CABackup\CAConfig.reg
Backup-CARoleService backs up the CA certificate together with the private key to a password-protected file, and the certificate database to a separate folder. The reg export command exports the registry key that contains the CA configuration, that is, the publication points, the audit settings and the CRL periods. An empty folder is used for the backup.
The backup folder contains the CA private key. The folder must be moved from the server to a secure location with restricted access, and the backup password must be stored in a separate place.
Step 21 - Exporting the Root CA Certificate
Domain member computers obtain the root CA certificate automatically through Active Directory. For devices that are not domain members, network devices or devices managed with Intune, the root CA certificate must be distributed as a file. The certificate is exported with certutil in the classic method, and with the PowerShell Export-Certificate cmdlet in this installation. The operation is performed with local Administrators rights on the CA server.
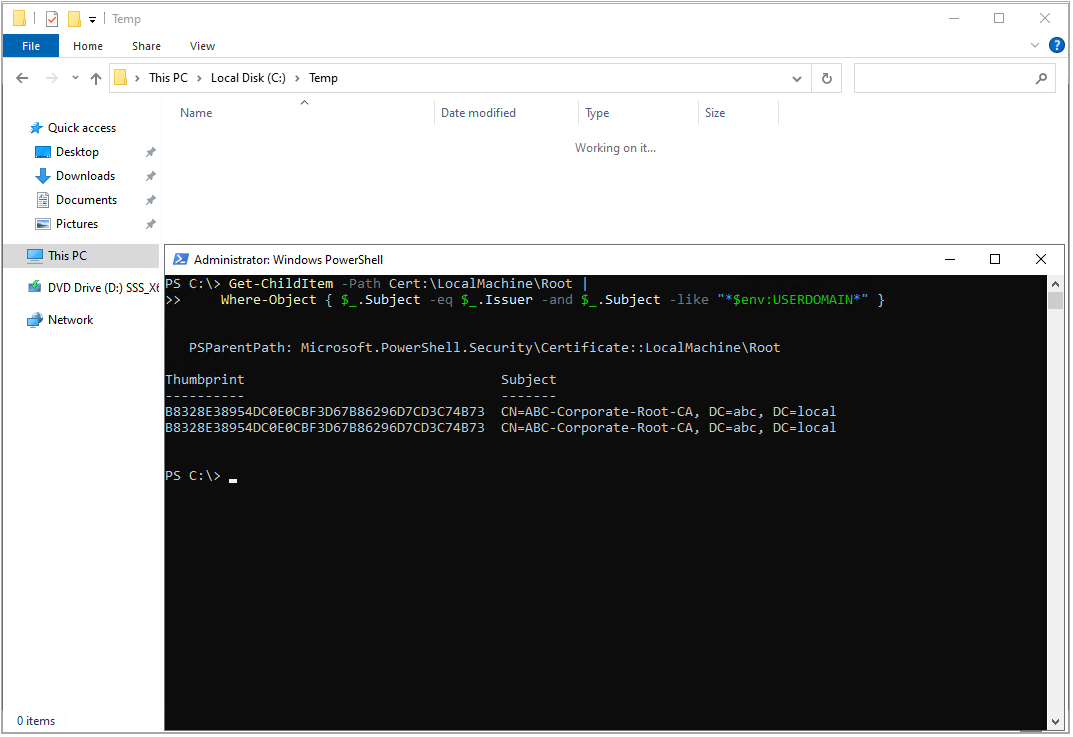
Filtering the certificate. The certificates in the Root store of the local computer whose Subject and Issuer fields are equal, that is, the self-signed certificates, are listed.
Get-ChildItem -Path Cert:\LocalMachine\Root |
    Where-Object { $_.Subject -eq $_.Issuer -and $_.Subject -like "*$env:USERDOMAIN*" } |
    Format-List Subject, Issuer, Thumbprint, NotBefore, NotAfter
The expression $_.Subject -eq $_.Issuer selects the self-signed certificates. The $env:USERDOMAIN variable returns the NetBIOS name of the domain (ABC) and separates the filter result from the Microsoft root certificates. Format-List prevents the output from being truncated and shows each field on its own line.
When the command is run, the output contains 2 entries. Both have exactly the same Thumbprint value, B8328E38954DC0E0CBF3D67B86296D7CD3C74B73, and the same Subject value, CN=ABC-Corporate-Root-CA, DC=abc, DC=local. The identical Thumbprint shows that the 2 entries are the same certificate. The reason for this repetition is explained under the Trusted Root Certification Authorities Store heading.
The -like "*$env:USERDOMAIN*" filter can also match another root certificate that has ABC in its Subject. In environments with more than 1 internal root CA, it is safer to use a full Subject match.
Get-ChildItem -Path Cert:\LocalMachine\Root |
    Where-Object { $_.Subject -eq "CN=ABC-Corporate-Root-CA, DC=abc, DC=local" } |
    Format-List Subject, Issuer, Thumbprint, NotBefore, NotAfter
The System.Object[] error. The Export-Certificate cmdlet expects a single certificate object. Because the filter returns 2 entries of the same certificate, the following error is returned when the result is passed directly to Export-Certificate.
Cannot convert 'System.Object[]' to the type
'Microsoft.CertificateServices.Commands.Certificate'
As the solution, Select-Object -First 1 is added to the filter. Because the Thumbprint value of the 2 entries is the same, the result does not depend on which one is selected.
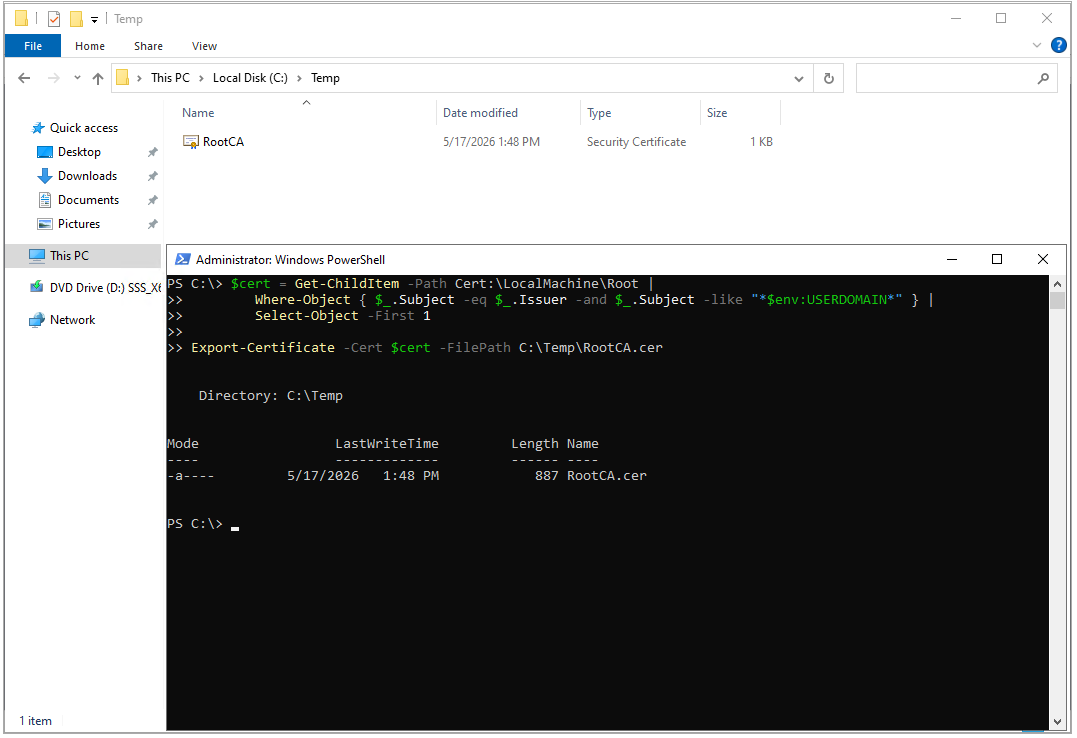
Exporting with Export-Certificate. The following command reduces the certificate to a single object and exports it to the C:\Temp\RootCA.cer file.
$cert = Get-ChildItem -Path Cert:\LocalMachine\Root |
        Where-Object { $_.Subject -eq $_.Issuer -and $_.Subject -like "*$env:USERDOMAIN*" } |
        Select-Object -First 1

Export-Certificate -Cert $cert -FilePath C:\Temp\RootCA.cer
When the command runs successfully, the PowerShell output lists the file that was created. The -a---- value in the Mode column shows that the file was created with the archive attribute, and the value of 887 bytes in the Length column shows the DER-encoded binary size of the certificate. When the C:\Temp directory is opened, the RootCA.cer file appears with the Security Certificate type.
The same operation can also be done with the classic method through certutil. When this command is run on the CA server, it writes the CA's own certificate directly to a file.
certutil -ca.cert C:\Temp\RootCA.cer
Checkpoint
The C:\Temp\RootCA.cer file is created, and when it is opened, ABC-Corporate-Root-CA appears in the Issued to and Issued by fields.
9- Verification
The installation is verified at more than 1 layer, not through a single command or a single screen. The management consoles show that the CA service is running, pkiview.msc and certutil show the AD integration and the configuration, and certutil -dump shows the cryptographic structure of the certificate. The consoles and commands are run on TRISTSRVCER01.
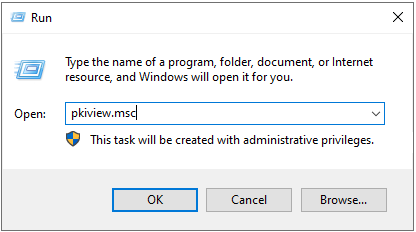
Checking the CA Service with certsrv.msc
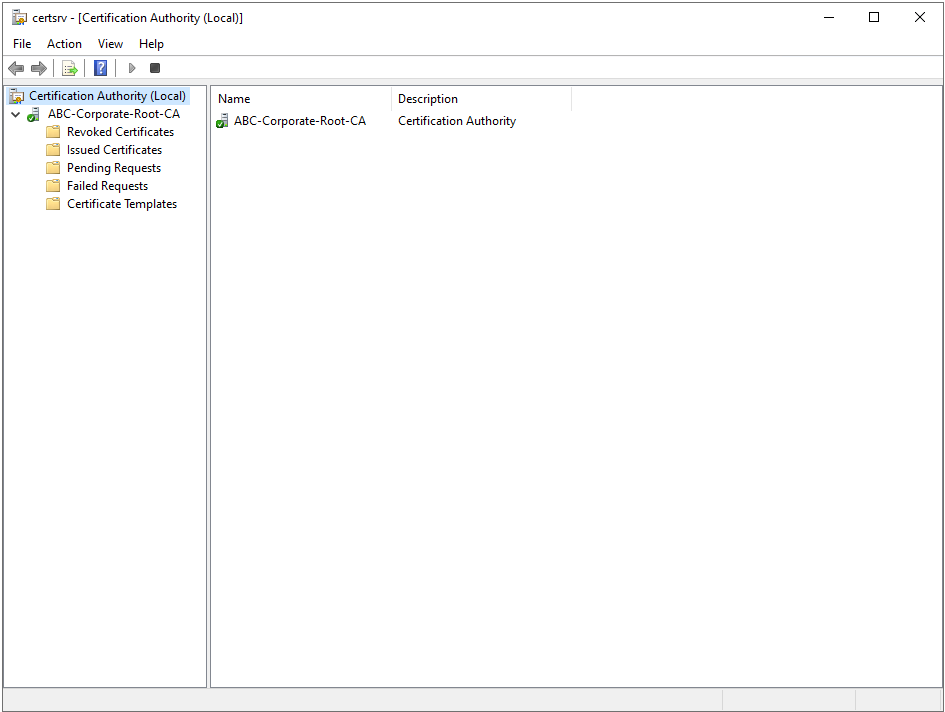
The certsrv.msc command is run in the Run window. When the console opens, the ABC-Corporate-Root-CA object appears in the left pane with a green tick. The Revoked Certificates, Issued Certificates, Pending Requests, Failed Requests and Certificate Templates folders appear under it. The console could not connect to the CA in Step 6, and the fact that it now connects shows that the CertSvc service has been created.
PKI Health Check with pkiview.msc
pkiview.msc is the Enterprise PKI tool used to check the health of an AD CS deployment. The tool scans the CA certificates in the hierarchy and the AIA, CDP and DeltaCRL publication points, and reports the availability status of each one.
When the tool opens, ABC-Corporate-Root-CA (V0.0) is displayed under Enterprise PKI in the left pane. In the right pane, the Status column shows OK for the CA Certificate, AIA Location #1, CDP Location #1 and DeltaCRL Location #1 rows. The URLs in the Location column in the form ldap:///CN=ABC-Corporate-Root-CA,... show that the CA certificate and the CRL are published in Active Directory over LDAP.
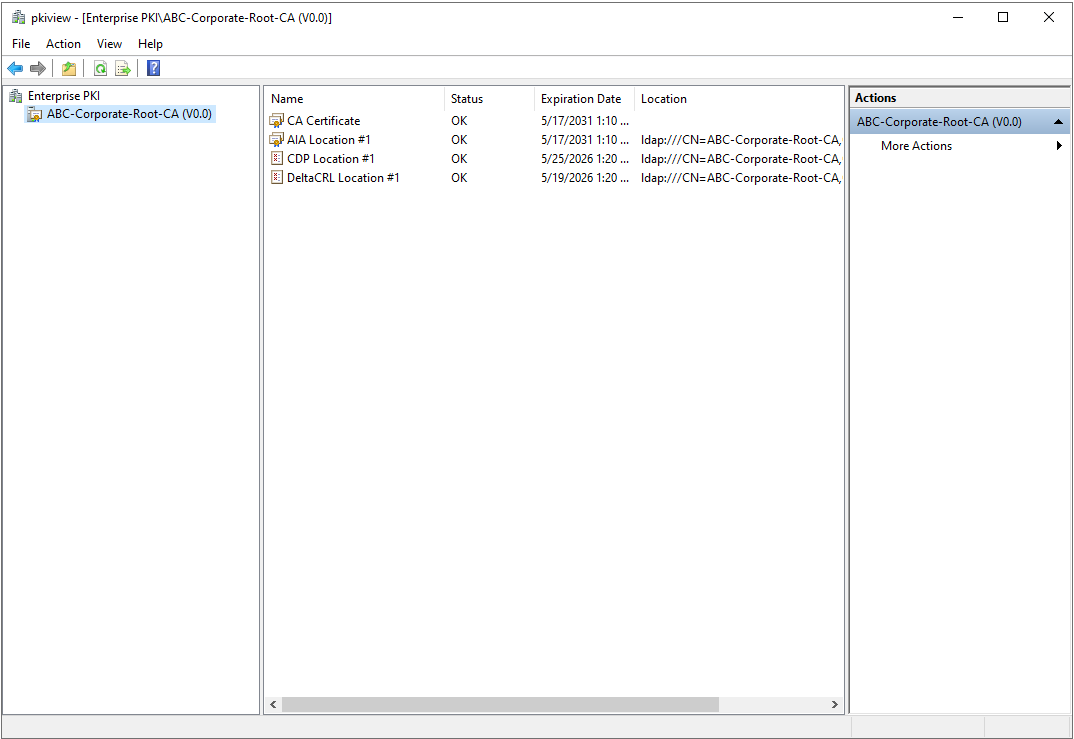
Apart from OK, the Status column can show the values Unable to Download, Expiring and Expired. Unable to Download shows that the publication point cannot be reached, Expiring shows that the period will end soon, and Expired shows that the period has ended.
Checking the Publication Points
pkiview.msc shows the current access status. The locations to which the CA publishes certificates and CRLs are defined in the CA configuration and are displayed with the following commands.
certutil -getreg CA\CACertPublicationURLs
certutil -getreg CA\CRLPublicationURLs
The number at the start of each line in the output is a set of flags that determines whether the location is used for publication or for inclusion in certificates. Lines that start with ldap:/// show the Active Directory publication, and lines that start with http:// show the CertEnroll directory under IIS. Variables in the URLs such as %1 and %3 are filled with values such as the server name and the CA name.
Devices that are not domain members cannot reach the LDAP publication points. For these devices to validate the certificate chain and the revocation status, the AIA and CDP locations must be reachable over HTTP. Because the HTTP publication configuration is not applied in this article, the installation is within lab and test scope.
The AIA and CDP URLs are written into the certificate at the moment it is issued and do not change afterwards. In production, these locations must be planned and configured before the CA starts to issue certificates.
Command-Line Verification with certutil -cainfo
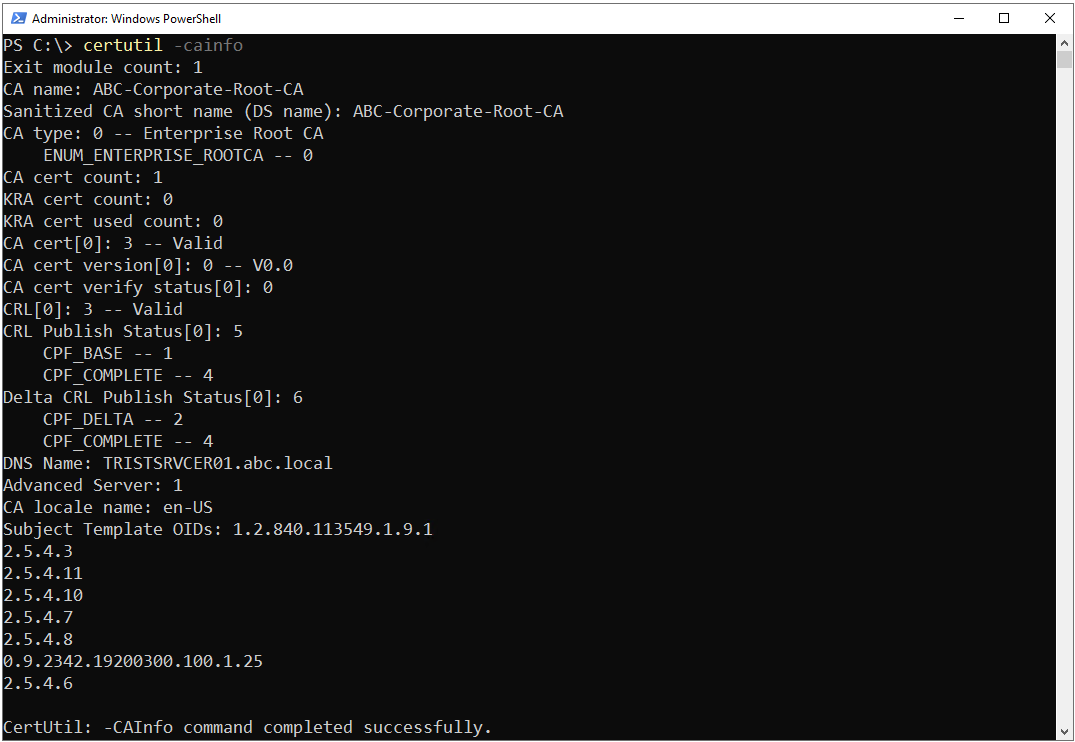
The certutil -cainfo command lists the basic configuration information of the CA.
The main fields in the command output and their meanings are summarised in the following table.
|
Output Field |
Value |
Meaning |
CA name: |
ABC-Corporate-Root-CA |
Shows that the name set on the Step 13 - CA Name page is saved. |
CA type: |
0 -- Enterprise Root CA |
The result of the Step 9 - Setup Type and Step 10 - CA Type decisions. The same value also appears in the output in the ENUM_ENTERPRISE_ROOTCA -- 0 line. |
CA cert[0]: |
3 -- Valid |
The CA certificate is valid. |
CRL[0]: |
3 -- Valid |
The CRL published by the CA is valid. |
DNS Name: |
TRISTSRVCER01.abc.local |
The FQDN of the server that hosts the CA. |
Advanced Server: |
1 |
A server flag reported by certutil. In this lab, the value appears as 1. It is not a deciding field in the verification of the installation. |
Checking the Cryptographic Settings in CA Properties
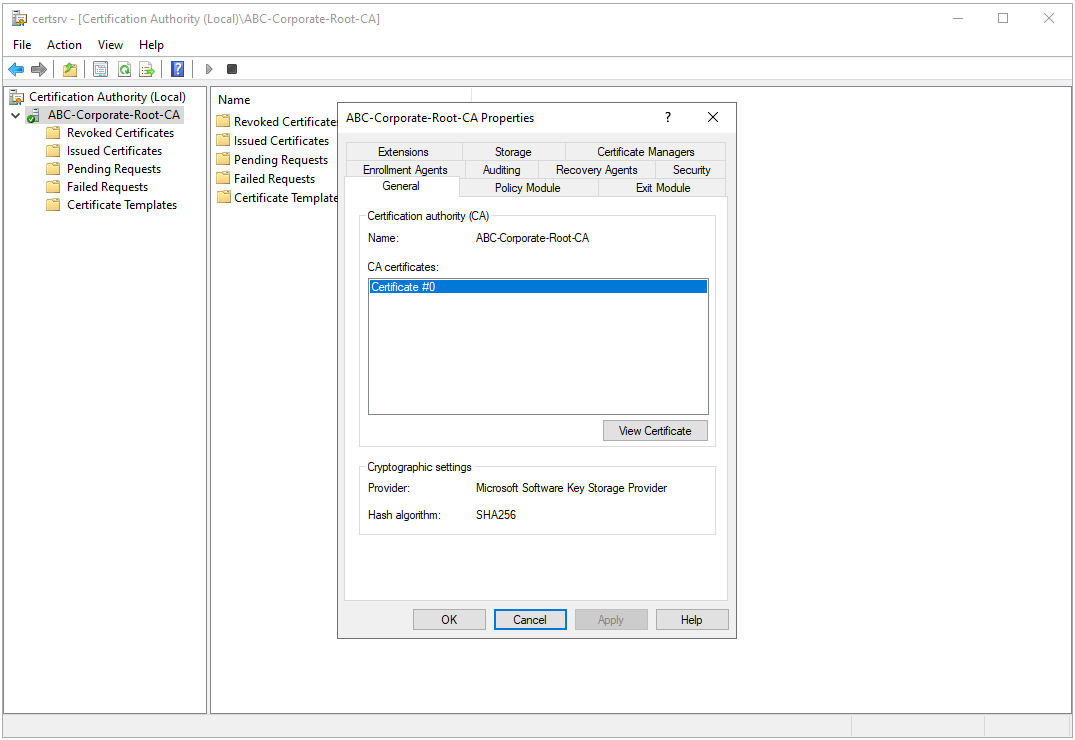
In the certsrv.msc console, ABC-Corporate-Root-CA is right-clicked and Properties is selected. In the Cryptographic settings section of the General tab, the values Provider: Microsoft Software Key Storage Provider and Hash Algorithm: SHA256 are displayed. These values confirm that the CA uses the selections made on the Step 12 - Cryptography for CA page.
General and Certification Path Tabs of the Root CA Certificate
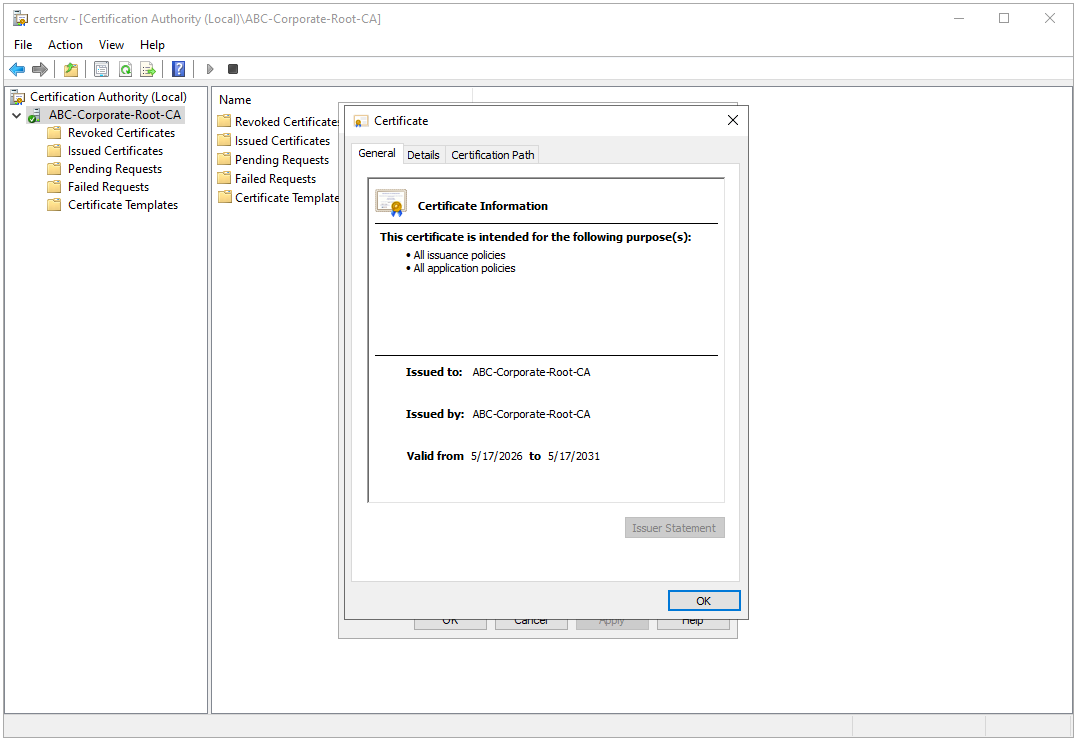
When the View Certificate button is clicked in the CA Properties window, the details of the root CA certificate open.
On the General tab, the Issued to: ABC-Corporate-Root-CA and Issued by: ABC-Corporate-Root-CA lines are the same, which shows that the certificate is a self-signed root certificate. The same value in both the Subject and the Issuer fields means that the certificate is signed with its own private key. The Valid from 5/17/2026 to 5/17/2031 line shows that the 5-year period selected on the Step 14 - Validity Period page is applied.
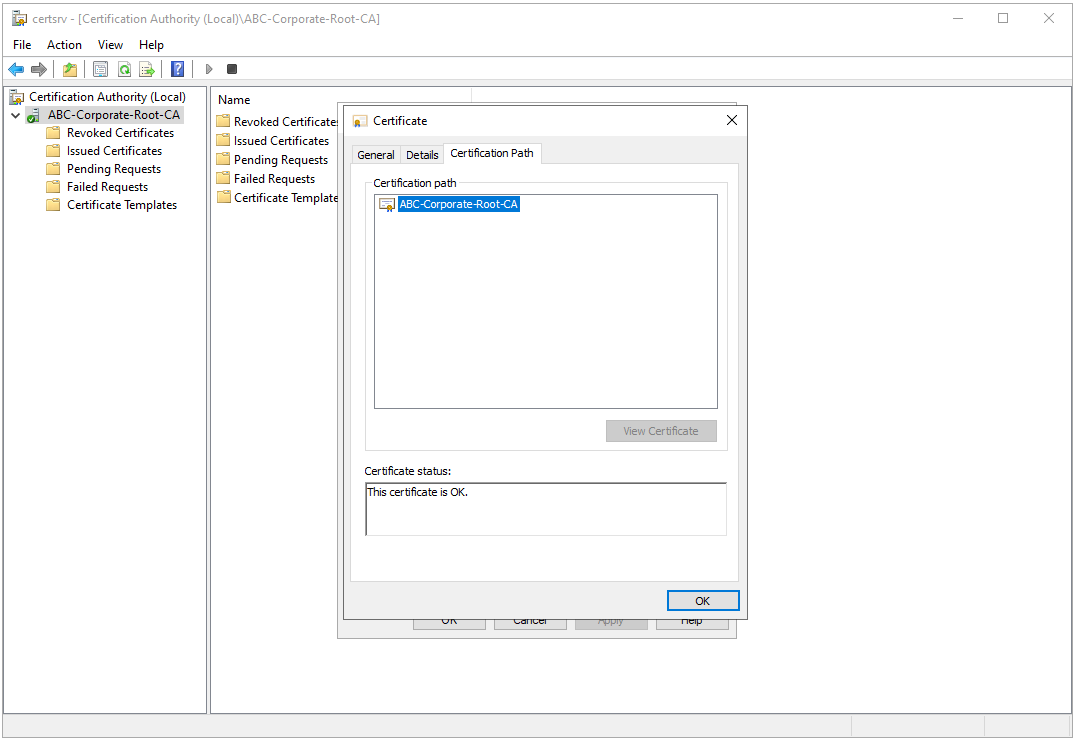
The Certification Path tab displays the certificate chain. Because this is a root certificate, the chain has a single item, and this item is ABC-Corporate-Root-CA itself. The This certificate is OK. message at the bottom shows that the certificate is in the trusted root store and that the chain is validated.
Trusted Root Certification Authorities Store
The location of the root CA certificate in the local computer store is checked with the certlm.msc command from the Run window. When the Certificates folder under Trusted Root Certification Authorities is opened, the ABC-Corporate-Root-CA certificate is listed 2 times.
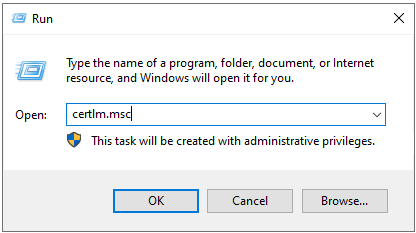
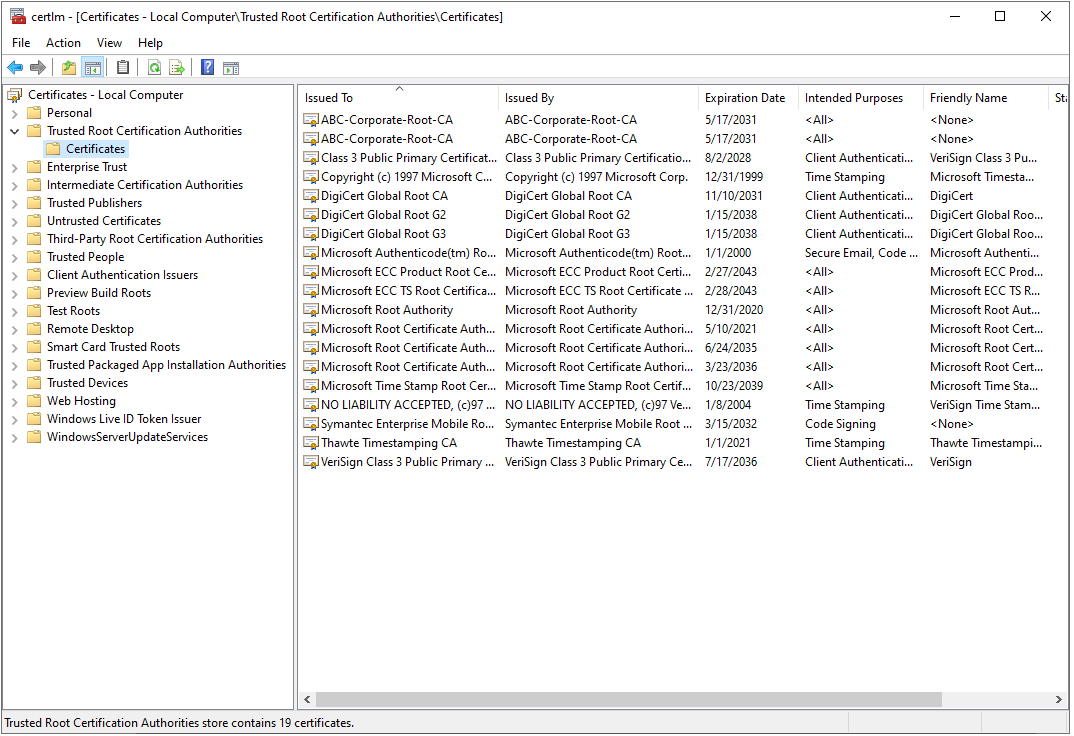
This view is not a duplicate record. Trusted Root Certification Authorities in certlm.msc is a logical store and shows the content of more than 1 physical store together. The first copy of the certificate is written to the local Registry store of the server during the CA installation. The second copy comes from the Enterprise store, which is read from the Certification Authorities object under the Public Key Services container in Active Directory. Other domain member computers also obtain the root CA certificate through this Enterprise store.
The content of the Enterprise store can also be displayed separately with the following command.
certutil -enterprise -store Root
The Thumbprint value of the 2 entries is the same, so a single certificate is listed. One of the entries is read from the local Registry store, and the other from the Enterprise store that comes from Active Directory.
Certificate Analysis with certutil -dump
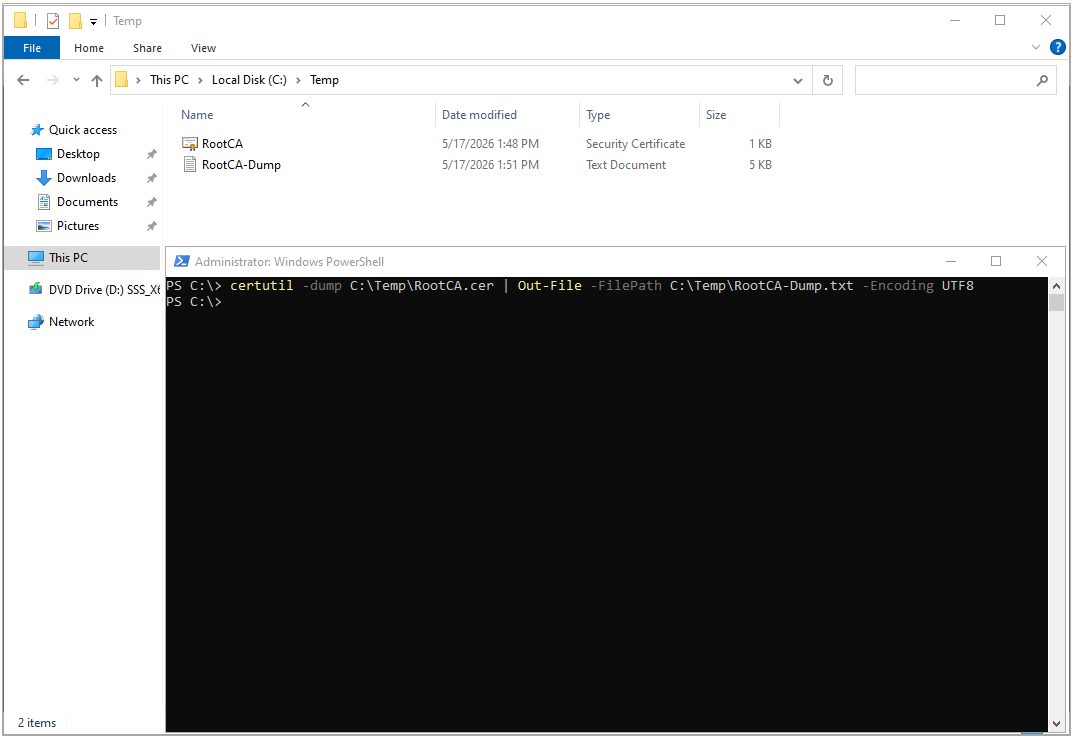
The internal structure of the certificate file is examined with the certutil -dump command. This command prints the X.509 fields, the extensions and the hash values of the certificate as text. Writing the output to a file with UTF-8 encoding instead of examining it on the screen makes it both permanent and easier to read. The command uses the RootCA.cer file created under Step 21 - Exporting the Root CA Certificate.
certutil -dump C:\Temp\RootCA.cer | Out-File -FilePath C:\Temp\RootCA-Dump.txt -Encoding UTF8
The resulting file is approximately 5 KB in size. The file contains the basic information of the certificate, its extensions, and the hash and signature verification lines. This section examines the basic information and the hash and signature lines.
Basic certificate information. The first part of the dump file shows the X.509 version of the certificate, the serial number, the signature algorithm, the Issuer and Subject information, the validity range and the public key information.
|
Dump Field |
Value |
Technical Meaning |
|
X509 Certificate: Version |
3 |
Shows that the certificate is in X.509 Version 3 format. Version 3 allows the use of extensions such as Key Usage, Basic Constraints, Subject Key Identifier, AIA and CDP. |
|
Serial Number |
31f9a883444237824a11250152d6395e |
The unique serial number assigned to the certificate. It is used in certificate revocation, tracking and validation operations. |
|
Signature Algorithm ObjectId |
1.2.840.113549.1.1.11 sha256RSA |
Shows that the certificate is signed with the SHA256 hash algorithm and the RSA signing method. |
|
Issuer |
CN=ABC-Corporate-Root-CA, DC=abc, DC=local |
The CA that signed the certificate. In a root CA certificate, the Issuer field contains the CA's own name. |
|
Subject |
CN=ABC-Corporate-Root-CA, DC=abc, DC=local |
Shows who the certificate belongs to. The fact that it is the same as the Issuer shows that the certificate is self-signed. |
|
NotBefore |
5/17/2026 1:00 PM |
The date and time at which the certificate becomes valid. |
|
NotAfter |
5/17/2031 1:10 PM |
The date and time at which the validity of the certificate ends. It is consistent with the 5-year validity period. |
|
Public Key Algorithm ObjectId |
1.2.840.113549.1.1.1 RSA |
Shows that the public key algorithm is RSA. |
|
Public Key Length |
2048 bits |
Corresponds to the 2048-bit Key Length value selected on the Step 12 - Cryptography for CA page. |
In this lab, there is a 10-minute difference between the NotBefore and NotAfter times, and this is not an error. To tolerate possible clock differences between the CA and the clients, AD CS sets the NotBefore value slightly earlier than the moment of creation. The length of this period is determined by the ClockSkewMinutes setting and can be configured through the CAPolicy.inf file.
When this information is evaluated together, it confirms that the certificate is a self-signed root CA certificate in X.509 Version 3 format, signed with the sha256RSA algorithm, using a 2048-bit RSA public key, with identical Issuer and Subject fields.
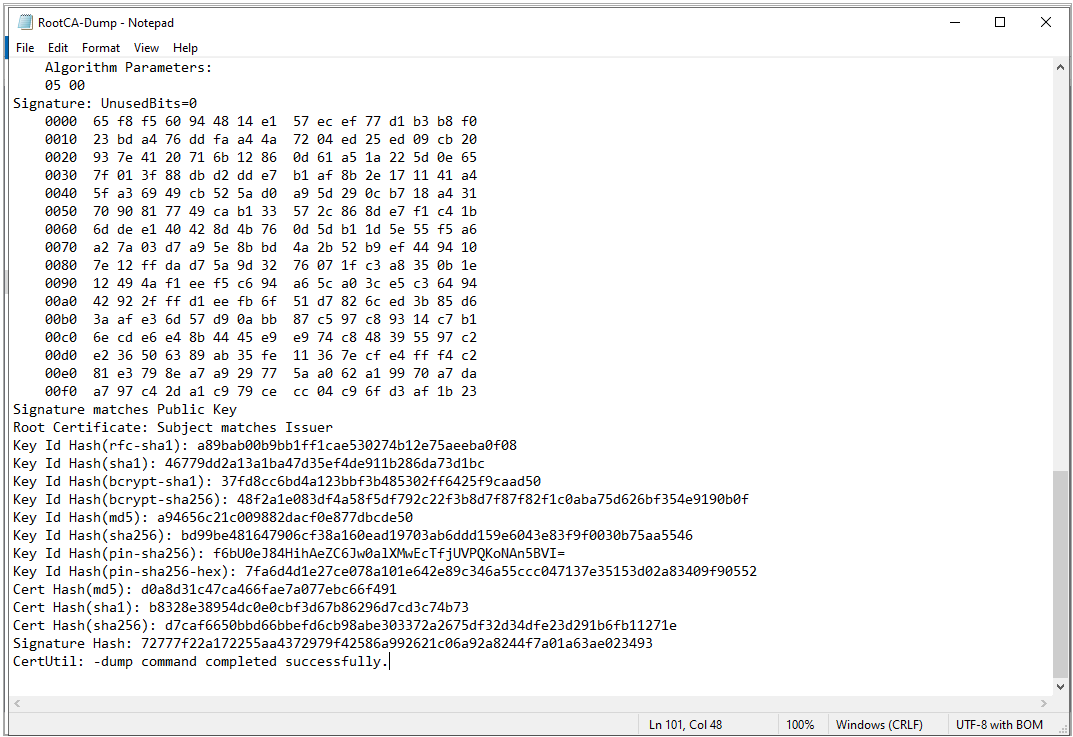
Hash and signature verification lines. The last part of the dump file contains the byte dump of the signature and the verification lines.
The Signature matches Public Key line states that the signature in the certificate is verified with the public key in the same certificate. In self-signed certificates, this is the cryptographic confirmation that the certificate is signed with its own private key.
The Root Certificate: Subject matches Issuer line shows that the Subject and Issuer fields match exactly and that the certificate is a root certificate.
The Cert Hash(sha1) and Cert Hash(sha256) lines give the SHA-1 and SHA-256 hash values of the certificate. The value shown as the Thumbprint in the Windows interface and in PowerShell is the SHA-1 hash. The SHA-256 hash is used to identify the certificate with a stronger digest. The operation ends with the CertUtil: -dump command completed successfully. line.
Summary Check Table
The following table shows the fields checked during verification together with the expected values. The CA type values match the decisions made on the Step 9 - Setup Type and Step 10 - CA Type pages, the cryptography values match Step 12 - Cryptography for CA, and the name values match Step 13 - CA Name.
|
Command |
Field |
Expected Value |
certsrv.msc |
CA object |
ABC-Corporate-Root-CA, active with a green tick |
pkiview.msc |
CA Certificate, AIA Location #1, CDP Location #1, DeltaCRL Location #1 |
OK |
certutil -cainfo |
CA type |
0 -- Enterprise Root CA |
certutil -cainfo |
CA cert[0] |
3 -- Valid |
certutil -cainfo |
CRL[0] |
3 -- Valid |
|
CA Properties |
Provider, Hash Algorithm |
Microsoft Software Key Storage Provider, SHA256 |
certutil -getreg CA\AuditFilter |
AuditFilter |
127 (0x7f) |
certutil -dump |
Signature Algorithm |
sha256RSA |
certutil -dump |
Public Key Length |
2048 bits |
certutil -dump |
Issuer and Subject |
Root Certificate: Subject matches Issuer |
certutil -dump |
Signature verification |
Signature matches Public Key |
Get-ChildItem Cert:\LocalMachine\Root |
Thumbprint |
The same value in both entries |
10- Rerunning, Rollback and Troubleshooting
The Configuration Wizard cannot be run again while the CA is configured. If the configuration is to be repeated with different parameters, the existing CA configuration is removed first. The same path is followed if the wizard was interrupted or returned an error. After the cause of the error is fixed, the partial configuration is removed and the wizard is run again.
For installation errors, installations done with PowerShell are run again with the -Verbose parameter to obtain detailed output. The AD CS installation writes its progress to an installation log in the %windir% directory. This log file is found with the following command and the most recently changed file is examined.
Get-ChildItem -Path $env:windir -Filter *ocm.log | Sort-Object LastWriteTime -Descending
Errors that occur while the CA service is running appear in Event Viewer under the Application log as events with the CertificationAuthority source.
The CA configuration and the role are removed with the following commands. The commands are run on the CA server in a PowerShell session opened as administrator, and for an enterprise CA with an account that is a member of Enterprise Admins.
Uninstall-AdcsCertificationAuthority -Force
Uninstall-WindowsFeature -Name ADCS-Cert-Authority -IncludeManagementTools
These commands remove the CA service on the server, but they do not touch the PKI objects created in Active Directory. The CA certificate stays in the Certification Authorities, AIA and NTAuthCertificates objects, its CRLs stay under CDP, and its registration information stays under Enrollment Services. If these objects are not cleaned up, the domain member computers continue to trust the removed CA.
The remaining objects are removed from the window that opens when Enterprise PKI is right-clicked in pkiview.msc and Manage AD Containers is selected. Because these objects are in the Configuration partition of the forest, the operation requires Enterprise Admins rights. If a CA is to be removed permanently, the certificates issued by the CA are revoked and the last CRL is published before the clean-up.
Removing the CA and deleting the AD objects cannot be undone. All services that obtained a certificate from this CA fail chain validation unless the CA is restored from the backup described under Step 20 - Backing Up the CA.
11- Conclusion and Next Steps
The completion of the installation is assessed through the Summary Check Table. When all fields in the table give the expected values, Web Enrollment is either configured with HTTPS and EPA or removed, and the CA backup is stored in a secure location outside the server, the Enterprise Root CA is ready for lab and test use.
A single-tier Enterprise Root CA is a quick starting point for lab and test environments. In a production environment, the number of CAs and the hierarchy are planned according to the requirements of the organisation. The two-tier structure with an offline root CA and an online subordinate CA is a strong and common option in this planning. Not installing the CA on a domain controller, protecting the private key with an HSM and hardening the CA server as a Tier 0 asset are also parts of this design.
Before this CA issues production certificates, the first task is to plan and configure the AIA and CDP publication points so that they are reachable over HTTP. After that, the configuration of certificate templates, the deployment of autoenrollment with Group Policy and the building of a two-tier PKI hierarchy will be covered in separate articles.
I hope you find it useful...
Feel free to share your thoughts and questions about this article in the comments below. Every contribution helps the content reach more people and makes for a more useful discussion.